Migrating from Small Business Server 2003 to Exchange 2003 Standard
Part – 1
Introduction
For the purposes of this article, I am assuming that the SBS server will be decommissioned at the end of the process, leaving a windows 2003 server Native Domain with a separate dedicated Domain Controller (DC) and separate server box running Exchange 2003 Standard.
You could in-fact keep the SBS server in the domain, so long as it remains a “god” in terms of holding the FSMO roles and being the DC in the root of the forest. Remember, you can’t have more than one SBS server in a forest at any one time!
This sounds easy, but do not forget that SBS is a control freak and wants to be in-charge of the whole forest. So asking it to take a back seat needs slow and careful attention. Disobey these rules at your peril. Plus, if you throw Exchange into the mix, this makes for quite a complex operation. Do not experiment on a live system. The slightest error and you lose the whole domain.

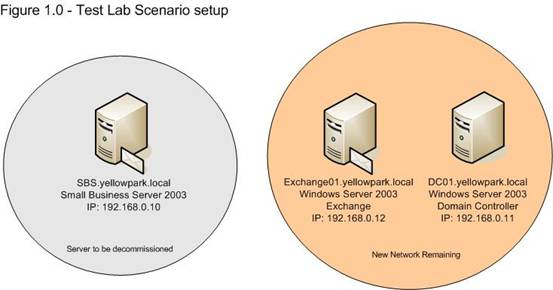
Figure 1: Test Lab Scenario setup
Figure 1 is a diagram of the lab environment that I have created for this tutorial using Virtual Server. SBS represents the original Small Business Server 2003 with Exchange installed and configured. DC01 will be the new domain controller and Exchange01 will be the new Exchange server. At the end of the process, SBS will be decommissioned, leaving DC01 controlling the domain and Exchange01 as the Exchange server.
To clear things up straight away, Microsoft does not permit you to separate components of SBS 2003, for example to install Exchange on another server. I have been asked this question on my blog previously.
The main steps of this procedure are as follows:
- Join a Windows Server 2003 Standard to the domain as a member server (DC01).
- Install DNS on DC01.
- DC promo DC01.
- Make DC01 a Global Catalog server (GC).
- Change the preferred DNS address of DC01 to point to itself. Change the preferred DNS address of SBS to point to DC01.
- Transfer the FSMO roles to DC01.
- Wait for replication to take place. Give it a good 15 minutes, depending upon the size of your network.
- Remove the GC from SBS.
Step-through Network configuration changes
- Join DC01 to the domain yellowpark.local as a member server.
Firstly, change the network card settings of DC01 to point to SBS for DNS.
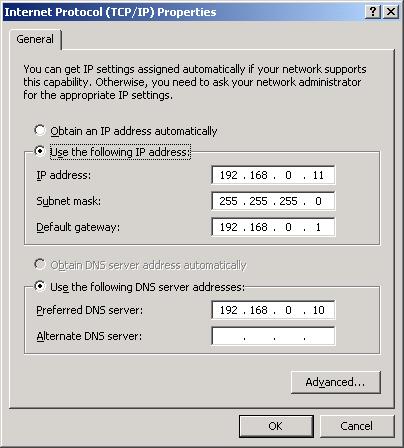
Figure 2: Internet Protocol settings
Then, right click My Computer and Click properties, then click the Computer Name tab.
Click the Change Button, and enter the details of the domain to join.
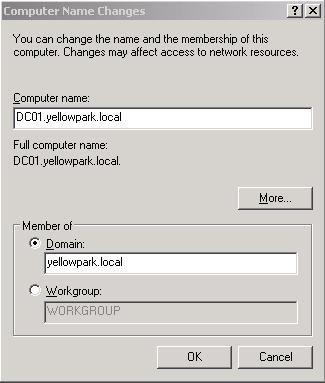
Figure 3: Joining the domain
Click OK. You will then be prompted to enter a Username and Password with the permissions necessary to join the domain. Enter the username and password and click OK. You will then need to reboot.
- Install DNS on DC01
Go to Add Remove Programs, Add Remove Windows Components.
Select Network Services and click details.
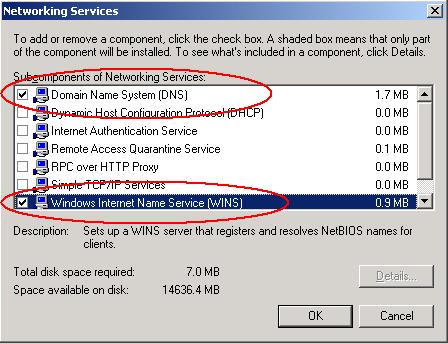
Figure 4: Install Networking Services
Select DNS and WINS and click OK.
- Once DNS and WINS has installed, you are ready to promote DC01 to a Domain Controller.
Click Start, Run. Then enter dcpromo and click OK.
Click through the Wizard then select Additional domain controller for an existing domain. Click Next.

Figure 5: Active Directory Installation
Enter a username and password with the permissions capable of doing this, e.g. Administrator. Click Next.
Enter the name of the domain (e.g. yellowpark.local) and click Next.
Select the location where you would like to store the database folder and the log folder, for the purpose of this article accept the defaults, Click Next.

Figure 6: Database and Log folders
Select the location you would like the Sysvol folder to be stored. Again, accept the default and click next.
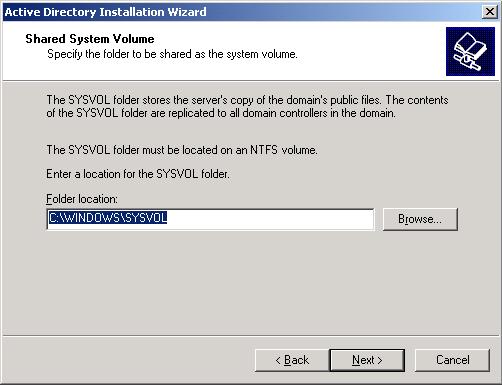
Figure 7: Sysvol folder location
Enter a password to be used for the Directory Services Restore Mode. Make sure you don’t forget this! Click Nexttwice. DCPromo starts running and will take a few minutes to complete.
You will be prompted to reboot upon completion. Reboot and log onto the domain DC01.
- Next step is to make DC01 a Global Catalog Server (GC). Open Active Directory Sites and Services. Click Start, Administrative Tools, Active Directory Sites and Services.
Expand Sites, Expand Servers, then expand NTDS Settings. Right click NTDS Settings for Exchange01 and ClickProperties.
Tick Global Catalog.

Figure 8: Global Catalog Server
- Next we’re going to open the Network Card properties of DC01 and change the Preferred DNS Server IP address to point to itself – 192.168.0.11.
- Transferring the FSMO roles to DC01.
Click Start, point to Administrative Tools, and then click Active Directory Users and Computers.
Click the change button to change the RID Master role to DC01. Repeat this for each of the other tabs.
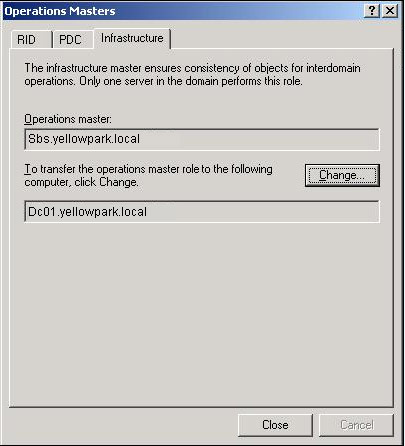
Figure 9: Operations Master Roles
To transfer the Domain Naming Master, Open Active Directory Domains and Trusts.
Click Start, point to Administrative Tools, and then click Active Directory Domains and Trusts.
Right Click Active Directory Domains and Trusts Node and click Operations Master. Click the change button to change the Operations Master to DC01.
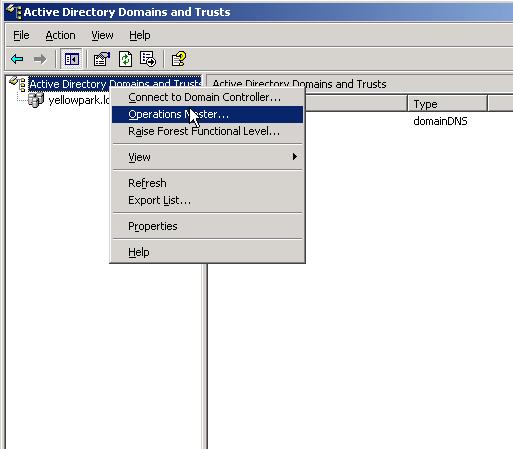
Figure 10: Domain Naming Master
To transfer the Schema Master role:
Firstly, you’ll need to register Schmmgmt.dll (if you haven’t used it before). Click Start, click Run, type regsvr32 schmmgmt.dll, and then click OK. Then create a new snap in. Click Start, click Run, type mmc, and then click OK.Right-click Active Directory Schema, and then click Change Domain Controller. Specify DC01. Right-click Active Directory Schema, and then click Operations Master. In the Change Schema Master dialog box, click Change. Move the site licensing server to the SBS 2003 computer. To do this, open Active Directory Sites and Services. Expand Sites and then click Default-First-Site-Name. Right-click Licensing Site Settings, and then clickProperties. Click Change, type the name of DC01 in the Enter the object name to select area, and then click OK.
- Reboot and wait for event 1119 or 1869 to show in the Event Viewer Directory Service Log on DC01. This shows DC01 is a GC. This is very important. Remember, no Global Catalog means no one can log on and you will loose the domain!
It can take an hour for this event to show. I usually go and make a cup of tea and come back later. There is a work around to make it happen quicker, but I would avoid it. When I did this test lab, it took 1 hour 47 minutes before I saw Event 1869.
- Next step is to remove the GC from SBS. Open Active Directory Sites and Services. Click Start, Administrative Tools, Active Directory Sites and Services. Expand Sites, Expand Servers, then expand SBS NTDS Settings. Right click NTDS Settings for Exchange01 and click Properties. Un-tick Global Catalog.
Part – 2
Introduction
In Part 1, I covered the main steps required to prepare the forest, domain and network for decommissioning Small Business Server 2003 (SBS) from a forest. In this article I will cover the steps necessary to move Exchange from SBS to a different server and decommission SBS from the network.
At this point, we should have a new domain controller (DC01) installed into the domain. This is also a GC and holds all the FSMO roles. Next up, we will join Exchange01 to the domain and install Exchange 2003 onto Exchange01.
I’m not going to run through the installation process. Suffice to say, for the purposes of this tutorial, I have accepted the installation defaults. You can find a good article on the msexchange.org website for best practices on installing Exchange Server 2003.
Make sure you use Netdiag and Dcdiag to test all your network settings and connections. Also use these if you run into problems. It will instantly tell you what’s going wrong on the network.
You might also want to throw in gpupdate /force to check that the domain is refreshing policies OK. This checks if user permissions are running as expected and everything can talk to each other.
During this next stage, we will accomplish the following tasks:
- Replicate all public folders to Exchange01
- Rehome the Offline Address Book folder
- Change the server that is responsible for generating the Offline Address List
- Rehome the Schedule+ Free Busy folder
- Rehome the Organization Forms folder
- Rehome the Recipient Update Service (RUS)
- Designate another server to be the routing group master
- Create another Site Replication Service (SRS) instance
- Rehome connectors to Exchange01
- Move mailboxes to Exchange01
- Decommission SBS
Step-through Exchange 2003 Migration settings
Open Exchange System Manager and check that the SBS and Exchange01 are showing as servers in the organisation.
Firstly, you want to replicate all the Public Folders on to Exchange01. This will then give you two copies of your public folders, which is good working practice anyway.
Click Start, point to Programs, point to Microsoft Exchange, and then click System Manager.
If the Display administrative groups option is turned on, expand Administrative Groups, and then expand First Administrative Group. (To display administrative groups, right-click Your_Organization, click Properties, click to select the Display administrative groups check box, click OK two times, and then restart Exchange System Manager).
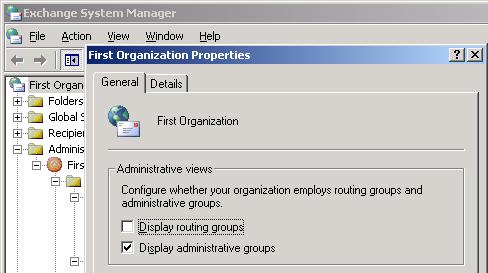
Figure 2: Display Administrative Groups
Expand Folders, expand Public Folders, right-click a top-level public folder, and then click Properties.
Click the Replication tab, and then click Add.
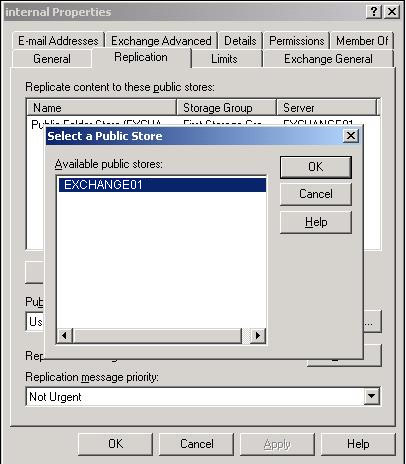
Figure 3: Public Folder Replication
In the Select a Public Store box, select the name of the server where you want a replica of this public folder (Exchange01), and then click OK.
Click Apply, and then click OK. If this public folder has any subfolders and if you want these subfolders to have a replica on the destination server, right-click the top-level public folder, click All Tasks, and then click Manage Settings.
In the Propagate Folder Settings box, click to select the Replicas check box, and then click OK. When you complete this step, all subfolders of that top-level folder have a replica on the destination server.
Repeat steps 1 to 7 for all the Public Folders.
Next you need to wait for replication again, and then check that the public folders are In Sync. Follow these steps:
- Right-click the public folder to verify, and click Properties.
- Click the Replication tab, and click Details.
- The Replication Status column should indicate In Sync.
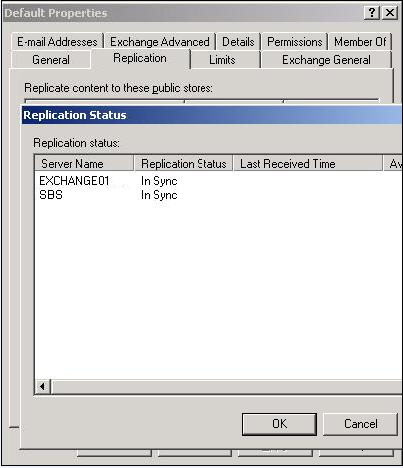
Figure 4: Public Folders In Sync
Next you must turn off replication for each public folder. To do this, follow these steps:
- Expand Public Folders, right-click a top-level public folder, and then click Properties.
- Click the Replication tab.
- In the Replicate content to these public stores section, click the name of the public folder store that is on the source server, click Remove, click Apply, and then click OK.
- Repeat these steps for each public folder:
- Offline Address Book folder
- Offline Address List
- Schedule+ Free Busy folder
- Organization Forms folder
- Recipient Update Service (RUS)
Designate another server to be the routing group master
You must designate Exchange01 to be the routing group master. To do this, follow these steps:
In Exchange System Manager, expand First Administrative Group (where First Administrative Group is the name of your administrative group), expand Routing Groups, and then expand First Routing Group (where First Routing Group is the name of the routing group where you want to change the routing group master).
Click Members, right-click the server in the right pane that you want to make the routing group master, and then clickSet as Master.
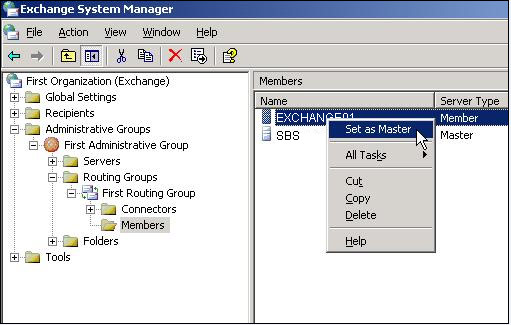
Figure 5: Routing Group Master
Create another Site Replication Service (SRS) instance
If you have Site Replication Service (SRS) installed and running, you must create a new SRS in Exchange System Manager. I’m leaving this out, as we are assuming the SBS Server was a stand alone system.
Set-up connectors on Exchange01
Next you need to set-up any connectors from SBS on Exchange01. To do this, simply write down the connector settings from SBS and recreate them on Exchange01.
Move mailboxes to Exchange01
To transfer mailboxes from SBS to Exchange01, follow these steps:
Open Exchange System Manager and drill down to the Mailbox Store on SBS.
In the right pane, select the mailboxes you wish to move by holding down the Ctrl key and selecting the mailboxes with the mouse. Then right click, and click Exchange Tasks. Click Next on the Exchange Task Wizard.
On the Available Tasks page, under Select a task to perform, click Move Mailbox, and then click Next.
On the Move Mailbox page, click the destination server that is in the Server list, click a mailbox store in the Mailbox Store list, and then click Next.
Configure how to handle corrupted messages that are found during the move, and click Next two times.
Expected errors while moving mailboxes
Some mailboxes might take a couple of goes to transfer over. This is normal. Get as many done en-mass, then correct the errors.
After you have transferred mailboxes to the new server, the final stage of the process is to uninstall Exchange from SBS, dcpromo down to a member server, then remove SBS from the domain.
To uninstall Exchange Server from SBS, go to Control Panel and double click Add or Remove Programmes.
Select Windows Small Business Server from the list of programmes and click Change/Remove. Click through the wizard until your reach the components selection page.
In the Action column, select Remove from the drop down list. Click Next twice. Exchange will then be unistalled from the server.
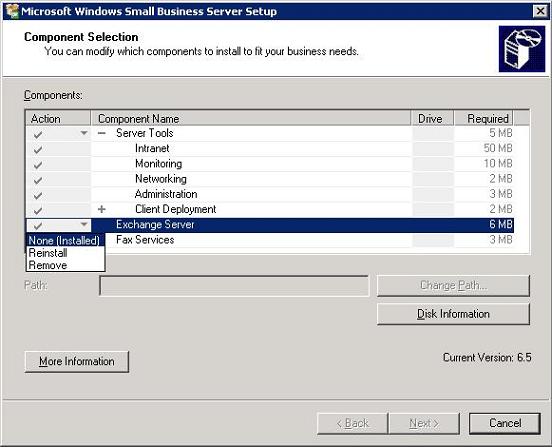
Figure 6: Uninstall Exchange from SBS
When the uninstall has completed, reboot. Then run dcpromo. To do this, Click Start, Run, type dcpromo and clickOK. Following this process the SBS will be a member server in the domain.
To remove SBS from the domain, right click MyComputer and select properties. Click the Computer Name tab and click the Workgroup radio button. Enter WORKGROUP for the new workgroup name and click OK. You will be prompted to reboot.
Following this, your new network will be running with a Stand alone Domain Controller (DC01) and stand alone Exchange Server (Exchange01).
Conclusion
This is a relatively straight-forward process so long as you take your time, and you’ve tried it out before. Do not experiment on a live system. When I did this for real the first time, I had a test network set-up that I used to try all the steps first. You could use Virtual server for this.
Categorised as: Microsoft, Networking, Windows Upgrade
Leave a Reply
You must be logged in to post a comment.