Insert a USB on a working SRX, then copy the partition
Insert the USB on the broken SRX and boot from USB
loader> nextboot Platform: srx-trident eUSB usb loader> nextboot usb Setting next boot dev usb loader> reboot Resetting…
To do so, use the command below: request system snapshot media internal slice alternate The slice seems to be a hidden command; therefore, you would have to type it in manually.
Recovering the Junos image in primary partition
When you spot that a primary partition has failed you should try to recover it as soon as possible as you are left with only one root partition. The recovery of the primary partition can be done easily by taking a snapshot of the root file system in the secondary partition and copying it to the primary partition.
The following command takes a snapshot of the currently active partition (secondary partition) and copies it to the alternate partition (primary partition).
root@SRX345>request system snapshot slice alternate
Formatting alternate root (//dev//da0s1a)...
Copying '//dev//da0s2a' to '//dev//da0s1a' .. (this may take a few minutes)
The following filesystems were archived: //
Run the following command to verify that you have a valid backup image.
root@SRX> show system software backup
Backup JUNOS package information:
File name: //cf//packages//junos-15.1X49-D150.2-domestic
File size: 254838138
You can also use the show system storage partitions command to check both partitions.
loader> ? Available commands: watchdog enable or disable kernel watchdog bcachestat get disk block cache stats autoboot boot automatically after a delay boot boot a file or loaded kernel lsdev list all devices nextboot set next boot device more show contents of a file read read input from the terminal echo echo arguments unset unset a variable set set a variable show show variable(s) ? list commands help detailed help install install JunOS include read commands from a file ls list files lsmod list loaded modules unload unload all modules load load a kernel or module reboot reboot the system heap show heap usage save save U-Boot environment export export variables to U-Boot environment loader> boot can’t load ‘/kernel’ can’t load ‘/kernel.old’ no bootable kernel loader> nextboot Platform: srx-trident eUSB usb loader> nextboot usb Setting next boot dev usb loader> reboot Resetting…
Octeon unique ID: 040000708015f31e0245 ….. … PCIe: Port 2 not in PCIe mode, skipping Net: octrgmii0 Node 0 Interface 4 has 1 ports (AGL) Boot Media: eUSB usb Found TPM SLB9660 TT 1.2 by Infineon TPM initialized USB1: Starting the controller USB XHCI 1.00 scanning bus 1 for devices… 2 USB Device(s) found USB0: Starting the controller USB XHCI 1.00 scanning bus 0 for devices… 2 USB Device(s) found scanning usb for storage devices… 2 Storage Device(s) found Type the command ‘usb start’ to scan for USB storage devices.
Press SPACE to stop autoboot: 0 SF: Detected SF with page size 256 Bytes, erase size 64 KiB, total 8 MiB SF: 1048512 bytes Read: OK SF: 1048576 bytes Read: OK
Starting application …
SF: Detected SF with page size 256 Bytes, erase size 64 KiB, total 8 MiB [0]Booting from usb slice 1 Consoles: U-Boot console Found compatible API, ver. 3.9
FreeBSD/MIPS U-Boot bootstrap loader, Revision 2.10 (slt-builder@svl-junos-pool87.juniper.net, Sun Mar 4 10:30:52 PST 2018) Memory: 4096MB [0]Booting from usb slice 1 /boot/init.4th loaded. Loading /boot/defaults/loader.conf /kernel data=0x126bb74+0x1c04e4 syms=[0x4+0xba2c0+0x4+0x11d559]
Hit [Enter] to boot immediately, or space bar for command prompt. Booting [/kernel]… Kernel entry at 0x801000c0 … init regular console Primary ICache: Sets 16 Size 128 Asso 39 Primary DCache: Sets 8 Size 128 Asso 32 Secondary DCache: Sets 1024 Size 128 Asso 4
…
Timecounter “mips” frequency 1200000000 Hz quality 0 da1 at umass-sim1 bus 1 target 0 lun 0 da1: Removable Direct Access SCSI-4 device da1: 40.000MB/s transfers da1: 7680MB (15728640 512 byte sectors: 255H 63S/T 979C) da0 at umass-sim0 bus 0 target 0 lun 0 da0: Fixed Direct Access SCSI-4 device da0: 40.000MB/s transfers da0: 7672MB (15712256 512 byte sectors: 255H 63S/T 978C) random: unblocking device. hwpmc: OCTEON/4/64/0x1ff Trying to mount root from ufs:/dev/da1s1a MFSINIT: Initialising MFSROOT Process-1 beginning MFSROOT initialization… Creating MFSROOT… /dev/md0: 20.0MB (40956 sectors) block size 16384, fragment size 2048 using 4 cylinder groups of 5.00MB, 320 blks, 640 inodes. super-block backups (for fsck -b #) at: 32, 10272, 20512, 30752 Populating MFSROOT… Creating symlinks… Setting up mounts… Continuing boot from MFSROOT… Attaching /cf/packages/junos via /dev/mdctl… Mounted junos package on /dev/md1… J Automatic reboot in progress… Verified jboot signed by PackageProductionECP256_2020 method ECDSA256+SHA256 Verified junos signed by PackageProductionECP256_2020 method ECDSA256+SHA256 Verified junos-20.2R1.10 signed by PackageProductionECP256_2020 method ECDSA256+ SHA256 Checking integrity of BSD labels: s1: Passed s2: Passed s3: Passed s4: Passed ** /dev/bo0s3e FILE SYSTEM CLEAN; SKIPPING CHECKS clean, 94741 free (21 frags, 11840 blocks, 0.0% fragmentation) ** /dev/bo0s3f FILE SYSTEM CLEAN; SKIPPING CHECKS clean, 1746346 free (386 frags, 218245 blocks, 0.0% fragmentation) Checking integrity of licenses: Checking integrity of configuration: rescue.conf.gz: Passed
LPC bus driver lpcbus0 on cpld0 tpm0: on lpcbus0 tpm: IFX SLB 9660 TT 1.2 rev 0x10 Loading configuration … . .. Additional routing options:kern.module_path: /boot//kernel;/boot/modules -> /boo t/modules;/modules/ifpfe_drv;/modules; kld netpfe drv: ifpfed_dialer pvid_cryptosoft0: on motherboard IPsec: Initialized Security Association Processing. db kld ipsecs . Doing additional network setup:. Starting final network daemons:. setting ldconfig path: /usr/lib /opt/lib starting standard daemons: cron. root@SEDG-ABC-SRX01% alization:. root@SEDG-ABC-SRX01% ization:. root@SEDG-ABC-SRX01% s:set cores for group access root@SEDG-ABC-SRX01%
— NOTICE: System is running on alternate media device (/dev/da1s1a).
root@SEDG-ABC-SRX01% root@SEDG-ABC-SRX01% root@SEDG-ABC-SRX01% cli {secondary:node0} root@SEDG-ABC-SRX01> show system snapshot media internal
node0:
Information for snapshot on internal (/dev/da0s1a) (backup) Creation date: Aug 27 17:03:31 2020 JUNOS version on snapshot: junos : 20.2R1.10
node1:
Information for snapshot on internal (/dev/da0s1a) (primary) Creation date: Nov 27 18:07:49 2021 JUNOS version on snapshot: junos : 20.2R1.10 Information for snapshot on internal (/dev/da0s2a) (backup) Creation date: Aug 27 17:10:28 2020 JUNOS version on snapshot: junos : 20.2R1.10
root@SEDG-ABC-SRX01> … media internal slice alternate
node0:
error: Snapshot to alternate slice cannot be performed as internal is not the boot media
node1:
Formatting alternate root (/dev/da0s2a)… Copying ‘/dev/da0s1a’ to ‘/dev/da0s2a’ .. (this may take a few minutes) The following filesystems were ABChived: /
{secondary:node0} root@SEDG-ABC-SRX01>
{secondary:node0} root@SEDG-ABC-SRX01> show system snapshot media internal
node0:
Information for snapshot on internal (/dev/da0s1a) (backup) Creation date: Aug 27 17:03:31 2020 JUNOS version on snapshot: junos : 20.2R1.10
node1:
Information for snapshot on internal (/dev/da0s1a) (primary) Creation date: Nov 27 18:07:49 2021 JUNOS version on snapshot: junos : 20.2R1.10 Information for snapshot on internal (/dev/da0s2a) (backup) Creation date: Jan 13 17:27:02 2022 JUNOS version on snapshot: junos : 20.2R1.10
{secondary:node0} root@SEDG-ABC-SRX01>
{secondary:node0} root@SEDG-ABC-SRX01> show chassis cluster status Monitor Failure codes: CS Cold Sync monitoring FL Fabric Connection monitoring GR GRES monitoring HW Hardware monitoring IF Interface monitoring IP IP monitoring LB Loopback monitoring MB Mbuf monitoring NH Nexthop monitoring NP NPC monitoring SP SPU monitoring SM Schedule monitoring CF Config Sync monitoring RE Relinquish monitoring IS IRQ storm
Cluster ID: 1 Node Priority Status Preempt Manual Monitor-failures
Redundancy group: 0 , Failover count: 0 node0 100 secondary no no None node1 50 primary no no None
Redundancy group: 1 , Failover count: 0 node0 100 secondary no no None node1 50 primary no no None
{secondary:node0} root@SEDG-ABC-SRX01> show system snapshot media al? No valid completions {secondary:node0} root@SEDG-ABC-SRX01> show system snapshot media ? Possible completions: internal Show snapshot information from internal flash usb Show snapshot information from device connected to USB port
{secondary:node0} root@SEDG-ABC-SRX01> show system snapshot media internal
node0:
Information for snapshot on internal (/dev/da0s1a) (backup) Creation date: Aug 27 17:03:31 2020 JUNOS version on snapshot: junos : 20.2R1.10
node1:
Information for snapshot on internal (/dev/da0s1a) (primary) Creation date: Nov 27 18:07:49 2021 JUNOS version on snapshot: junos : 20.2R1.10 Information for snapshot on internal (/dev/da0s2a) (backup) Creation date: Jan 13 17:27:02 2022 JUNOS version on snapshot: junos : 20.2R1.10 root@SEDG-ABC-SRX01% unmount /altroot unmount: Command not found. root@SEDG-ABC-SRX01% unmount /altroot unmount: Command not found. root@SEDG-ABC-SRX01% exitcal, noatime, read-only) logouton /dev (devfs, local, multilabel) root@SEDG-ABC-SRX01% exitlocal, noatime) exitpackages on /junos/cf/packages (nullfs, local, noatime) devfs on /junos/cf/dev (devfs, local, noatime, multilabel) {secondary:node0}s (cd9660, local, noatime, read-only, verified) root@SEDG-ABC-SRX01> lfs, local, noatime) devfs on /junos/dev/ (devfs, local, noatime, noexec, read-only, multilabel) {secondary:node0}junos/cf/packages1 (nullfs, local, noatime) root@SEDG-ABC-SRX01> fs, local, noatime) /dev/bo0s3e on /config (ufs, local, noatime) {secondary:node0}f/var (ufs, local, noatime) root@SEDG-ABC-SRX01> , asynchronous, local, noatime) /cf/var/jail on /jail/var (nullfs, local, noatime) {secondary:node0}t-api on /web-api/var (nullfs, local, noatime) root@SEDG-ABC-SRX01> var/log (nullfs, local, noatime) devfs on /jail/dev (devfs, local, noatime, noexec, read-only, multilabel) {secondary:node0}/mfs (ufs, asynchronous, local, noatime) root@SEDG-ABC-SRX01> root@SEDG-ABC-SRX01% su – {secondary:node0} root@SEDG-ABC-SRX01>
{secondary:node0} root@SEDG-ABC-SRX01>
{secondary:node0} root@SEDG-ABC-SRX01>
{secondary:node0} root@SEDG-ABC-SRX01> request system snapshot slice alternate
node0:
Formatting alternate root (/dev/da1s2a)… Copying ‘/dev/da1s1a’ to ‘/dev/da1s2a’ .. (this may take a few minutes) The following filesystems were ABChived: /
node1:
Formatting alternate root (/dev/da0s2a)… Copying ‘/dev/da0s1a’ to ‘/dev/da0s2a’ .. (this may take a few minutes) The following filesystems were ABChived: /
{secondary:node0} root@SEDG-ABC-SRX01> show system storage partitions
node0:
Boot Media: usb (da1) Active Partition: da1s1a Backup Partition: da1s2a Currently booted from: active (da1s1a)
{secondary:node0} root@SEDG-ABC-SRX01> request system reboot media internal Reboot the system ? yes,no yes
Shutdown NOW!
[pid 5208]
{secondary:node0} root@SEDG-ABC-SRX01> *** FINAL System shutdown message from root@SEDG-ABC-SRX01 ***
System going down IMMEDIATELY
Jan 13 17:59:32 init: interface-control (PID 2371) terminate signal 15 sent JWaiting (max 60 seconds) for system process vnlru_mem' to stop...done Waiting (max 60 seconds) for system processvnlru’ to stop…done Waiting (max 60 seconds) for system process bufdaemon' to stop...done Waiting (max 60 seconds) for system processsyncer’ to stop… Syncing disks, vnodes remaining…0 0 0 done
SF: Detected SF with page size 256 Bytes, erase size 64 KiB, total 8 MiB [0]Booting from usb slice 1 Consoles: U-Boot console Found compatible API, ver. 3.9
FreeBSD/MIPS U-Boot bootstrap loader, Revision 2.10 (slt-builder@svl-junos-pool87.juniper.net, Sun Mar 4 10:30:52 PST 2018) Memory: 4096MB [0]Booting from usb slice 1 /boot/init.4th loaded. Loading /boot/defaults/loader.conf /kernel data=0x126bb74+0x1c04e4 syms=[0x4+0xba2c0+0x4+0x11d559]
Hit [Enter] to boot immediately, or space bar for command prompt. Booting [/kernel]… Kernel entry at 0x801000c0 … init regular console Primary ICache: Sets 16 Size 128 Asso 39 Primary DCache: Sets 8 Size 128 Asso 32 Secondary DCache: Sets 1024 Size 128 Asso 4
Continuing boot from MFSROOT… Attaching /cf/packages/junos via /dev/mdctl… Mounted junos package on /dev/md1… J Automatic reboot in progress… Verified jboot signed by PackageProductionECP256_2020 method ECDSA256+SHA256 Verified junos signed by PackageProductionECP256_2020 method ECDSA256+SHA256 Verified junos-20.2R1.10 signed by PackageProductionECP256_2020 method ECDSA256+SHA256 Checking integrity of BSD labels: s1: Passed s2: Passed s3: Passed s4: Passed ** /dev/bo0s3e FILE SYSTEM CLEAN; SKIPPING CHECKS clean, 94741 free (21 frags, 11840 blocks, 0.0% fragmentation) ** /dev/bo0s3f FILE SYSTEM CLEAN; SKIPPING CHECKS clean, 1746310 free (462 frags, 218231 blocks, 0.0% fragmentation) Checking integrity of licenses: Checking integrity of configuration: rescue.conf.gz: Passed
Creating JAIL MFS partition… JAIL MFS partition created Boot media /dev/da1 has dual root support ** /dev/da1s2a FILE SYSTEM CLEAN; SKIPPING CHECKS clean, 98068 free (76 frags, 12249 blocks, 0.0% fragmentation) chassis.ko loaded Loading JUNOS chassis module chassis_init_hw_chassis_startup_time: chassis startup time 0.000000 Thu Jan 13 18:04:35 GMT 2022
Exchange 2013 mail flow issue. It turned out to be the Malware agent causing the issue
Once it is enabled and the Exchange transport service is restarted, all emails are stuck in the submission queue with “Last Error: Message deferred by categorizer agent.”
Check the mail queue
Get-Queue -Identity submission
Get-Transport Agent will list all the transport agents, you can disable one at a time to isolate problematic agents. in my case it was the Malware Agent.
Use the Shell to disable malware filtering on a specific Exchange server
To disable malware filtering, run the following command: PowerShellCopy
iOS devices unfortunately do not register with ActiveSync or other tools with a logical clear human-readable version number. Instead, they show up with strings like “Apple-iPhone3C1/902.206”
Obviously, this makes discovery and reporting difficult. To help ourselves, and the community at large, we now maintain this list of hardware and iOS versions for Apple gear.
Hardware Versions:
iPod2C1 = iPod Touch 2
iPod3C1 = iPod Touch 3
iPod4C1 = iPod Touch 4
iPod5C1 = iPod Touch 5

iPad1C1 = iPad
iPad2C1 = iPad 2 WIFI
iPad2C2 = iPad 2 WIFI + 3G
iPad2C3 = iPad 2 WIFI + 3G CDMA
iPad2C4 = iPad Mini - WIFI
iPad2C5 = iPad Mini - WIFI + LTE
iPad3C1 = The New iPad (iPad 3)- WIFI
iPad3C2 = The New iPad (iPad 3) - WIFI + LTE
iPad3C3 = iPad with Retina Display (iPad 4) - WIFI
iPad3C4 = iPad with Retina Display (iPad 4) - WIFI + LTE
iPad4C1 = iPad Air - WIFI
iPad4C2 = iPad Air - WIFI + LTE
iPad4C4 = iPad Mini with Retina Display - WIFI
iPad4C5 = iPad Mini with Retina Display - WIFI + LTE
iPad4C7 = iPad Mini 3 WIFI
iPad4C8 = iPad Mini 3 WIFI+LTE
iPad5C1 = iPad Mini 4 - WIFI
iPad5C2 = iPad Mini 4 - WIFI + LTE
iPad5C3 - iPad Air 2 - WIFI
iPad5C4 = iPad Air 2 = WIFI + LTE
iPad6C3 = iPad Pro (9.7") - WIFI
iPad6C4 = iPad Pro (9.7") - WIFI + LTE
iPad6C7 = iPad Pro (12.9") - WIFI
iPad6C8 = iPad Pro (12.9") - WIFI + LTE
iPad6C11 = iPad 5th Gen
iPad6C12 = iPad (9.7") 2017 - WIFI
iPad7C1 = iPad Pro (12.9") WIFI 2nd Gen
iPad7C2 = iPad Pro (12.9") WIFI + LTE 2nd Gen
iPad7C3 = iPad Pro (10.5") WIFI 2nd Gen
iPad7C4 = iPad Pro (10.5") WIFI + LTE 2nd Gen
iPad7C5 = iPad 6th Gen
iPad7C6 = iPad 6th Gen
iPad7C11 = iPad (10.2") 7th Gen WIFI
iPad7C12 = iPad (10.2") 7th Gen WIFI+LTE
iPad8C1 = iPad Pro (11")
iPad8C2 = iPad Pro (11")
iPad8C3 = iPad Pro (11")
iPad8C4 = iPad Pro (11")
iPad8C5 = iPad Pro (12.9") 3rd gen
iPad8C6 = iPad Pro (12.9") 3rd gen
iPad8C7 = iPad Pro (12.9") 3rd gen
iPad8C8 = iPad Pro (12.9") 3rd gen
iPad8C11 = iPad Pro - Wi-Fi 12.9", 4th gen
iPad8C12 = iPad Pro - Wi-Fi + Cellular 12.9", 4th Gen
iPad11C1 = iPad Mini 5
iPad11C2 = iPad Mini 5
iPad11C3 = iPad Air 3rd gen
iPad11C4 = iPad Air 3rd gen
iPad11C7 = iPad - WIFI+LTE 10.2", 8th Gen

iPhone1C2 = iPhone 3G
iPhone2C1 = iPhone 3GS
iPhone3C1 = iPhone 4 GSM
iPhone3C2 = iPhone4 GSM
iPhone3C3 = iPhone 4 CDMA
iPhone4C1 = iPhone 4S
iPhone5C1 = iPhone 5 GSM/LTE
iPhone5C2 = iPhone 5 CDMA USA/China
iPhone5C3 = iPhone 5C GSM/CDMA/Americas
iPhone5C4 = iPhone 5C Europe/Asia
iPhone6C1 = iPhone 5S GSM/CDMA/Americas
iPhone6C2 = iPhone 5S Europe/Asia
iPhone7C1 = iPhone 6 Plus
iPhone7C2 = iPhone 6
iPhone8C1 = iPhone 6S
iPhone8C2 = iPhone 6S Plus
iPhone8C4 = iPhone SE
iPhone9C1 = iPhone 7
iPhone9C2 = iPhone 7 Plus
iPhone9C3 = iPhone 7
iPhone9C4 = iPhone 7 Plus
iPhone10C1 = iPhone 8
iPhone10C2 = iPhone 8 Plus
iPhone10C3 = iPhone X
iPhone10C4 = iPhone 8
iPhone10C5 = iPhone 8 Plus
iPhone10C6 = iPhone X
iPhone11C2 = iPhone XS
iPhone11C6 = iPhone XS Max
iphone11C8 = iPhone XR
iphone12C1 = iPhone 11
iphone12C3 = iPhone 11 Pro
iPhone12C5 = iPhone 11 Pro Max
iPhone12C8 = iPhone SE (Second Generation)
iPhone13C1 = iPhone 12 (?)
iPhone13C2 = iPhone 12 Mini (?)
iPhone13C3 = iPhone 12 Pro
iPhone13C5 = iPhone 12 Pro Max
By default MacOS ships with Python-2.-. But, I guess most of us have long back started to work with Python-3 and it is very irritating to run python3 every time instead of python in terminal. Here is how to do this.
Open the terminal (bash or zsh) whatever shell you are using.
Change the default python symlink to the version you want to use from above. Note that, we only need to choose the one that end with python3.*. Please avoid using the ones’ that end with config or python3.*m or python3.*m-config.
bash-3.2$ export FLASK_APP=flaskblog.py bash-3.2$ flask runTraceback (most recent call last): File “/Library/Frameworks/Python.framework/Versions/3.9/bin/flask”, line 8, in sys.exit(main()) File “/Library/Frameworks/Python.framework/Versions/3.9/lib/python3.9/site-packages/flask/cli.py”, line 967, in main cli.main(args=sys.argv[1:], prog_name=”python -m flask” if as_module else None) File “/Users/shiraj/Documents/GitHub/Python/Flask_blog-complete/forms.py”, line 10, in RegistrationForm validators=[DataRequired(), Email()]) File “/Library/Frameworks/Python.framework/Versions/3.9/lib/python3.9/site-packages/wtforms/validators.py”, line 332, in init raise Exception(“Install ’email_validator’ for email validation support.”) Exception: Install ’email_validator’ for email validation support.
In Exchange Server 2013, the maximum size of the default discovery mailbox is 50 GB. It’s used to store In-Place eDiscovery search results. Before the size limit was changed, organizations could increase the storage quota to more than 50 GB. As a result, discovery mailboxes could grow to more than 50 GB. There are three issues with a default discovery mailbox that is larger than 50 GB:
It’s not supported.
It can’t be migrated to Microsoft 365 or Office 365.
If it’s the default discovery mailbox in Exchange Server 2010, it can’t be upgraded to Exchange Server 2013.
How you resolve this depends on whether you want to save the search results from a default discovery mailbox that’s exceeded 50 GB.
Use the Exchange Management Shell to delete and re-create the default discovery mailbox
Run the following command to delete the default discovery mailbox. Remove-Mailbox “DiscoverySearchMailbox{D919BA05-46A6-415f-80AD-7E09334BB852}”
Run the following command to re-create the default discovery mailbox. New-Mailbox -Name “DiscoverySearchMailbox{D919BA05-46A6-415f-80AD-7E09334BB852}” -Alias “DiscoverySearchMailbox{D919BA05-46A6-415f-80AD-7E09334BB852}” -DisplayName “Discovery Search Mailbox” -Discovery
Run the following command to assign the Discovery Management role group permissions to open the default discovery mailbox and view search results. Add-MailboxPermission “DiscoverySearchMailbox{D919BA05-46A6-415f-80AD-7E09334BB852}” -User “Discovery Management” -AccessRights FullAccess -InheritanceType all
Follow these steps to install the software via the CLI from a USB stick:
Download the Junos upgrade file to the USB stick.
Locate the USB device ID that Junos is associating to the USB stick: user@srx> start shell user@srx% ls /dev/ > /var/tmp/before_USB.txt
Insert the USB device into the USB slot. For example, slot 0 would return the following: root# umass0: USB USBFlashDrive, rev 2.00/1.00, addr 2 da0 at umass-sim0 bus 0 target 0 lun 0 da0: <USB USBFlashDrive 0100> Removable Direct Access SCSI-0 device da0: 1.000MB/s transfers da0: 980MB (2007040 512 byte sectors: 64H 32S/T 980C)
Run the following command: user@srx% ls /dev/ > /var/tmp/after_USB.txt
Locate difference in the “before_USB.txt” and “after_USB.txt” outputs to locate drive label by using the “diff” command. (It will usually be da#s1, i.e. da0s1) user@srx% diff /var/tmp/before_usb.txt /var/tmp/after_usb.txt 35a36,37 > da1 > da0s1 58a61 > pass1 In this example the USB is “da0s1”.
Create a mount directory: user@srx% mkdir /tmp/usb
Mount the USB to the directory: user@srx% mount -t msdosfs /dev/<drivelabel> /tmp/usb Example:user@srx% mount -t msdosfs /dev/da0s1 /tmp/usb (there is a space between the label name and /tmp)
Verify that the USB is mounted to the device: root@% pwd /cf/root root@% cd /tmp/usb/ root@% pwd /cf/tmp/usb root@% ls junos-srxsme-12.1X46-D40.2-domestic.tgz
Exit shell and install the software: user@srx% exit user@srx> request system software add /tmp/usb/<upgrade filename> no-copy Example:request system software add /tmp/usb/junos-srxsme-12.1X46-D40.2-domestic.tgz no-copy
For additional details regarding software installation, refer to the instructions at Installing the Software.
Upon completion, reboot the SRX: user@srx> request system reboot
<HPE>xtd-cli-mode All commands can be displayed and executed in extended CLI mode. Switch to extended CLI mode? [Y/N] :Y Password: foes-bent-pile-atom-ship Warning: Extended CLI mode is intended for developers to test the system. Before using commands in extended CLI mode, contact the Technical Support and make sure you know the potential impact on the device and the network.
The goal of email spoofing is to trick the user into thinking an email is from a known and trusted source. Spoofing is done through the manipulation of email elements that are visible to the recipient, primarily the “Body From” field.
A spoofed email can be partial or full:
Partial Spoof: A partial spoof occurs when only the “Body From” is masked, with the Envelope Sender being set to something else. This spoof type can be managed with Domain-based Message Authentication, Reporting & Conformance (DMARC), which is an email authentication, policy, and reporting protocol.
Full Spoof: A full spoof occurs when both the “Body From” and Envelope Sender are spoofed. This spoof type can be managed with Sender Policy Framework (SPF). SPF is an email-validation system designed to detect email spoofing by providing a mechanism to allow mail exchangers to check that incoming mail comes from an authorized host.
However, there are certain technical circumstances where the use of either SPF or DMARC is not possible. This may be due to the number of valid sources extending beyond the capacity of SPF, a technical constraint, or your own DMARC infrastructure. This leaves you exposed to spoofing.
Table: Unknown, untrusted spoof examples
Bad Partial Spoof (unknown or malicious source):
Bad Full Spoof (unknown or malicious source):
X-Originating-IP: [123.89.123.12] X-Env-Sender: badguy@malicious.com From: <name_1@yourdomain.com> To: <name_2@yourdomain.com>
X-Originating-IP: [89.123.89.123] X-Env-Sender: email@yourdomain.com From: <name_1@yourdomain.com> To: <name_2@yourdomain.com>
In both spoof examples, the IP addresses are unknown sources, which are not allowed to spoof you). The Body From is masked to look like your domain; the Envelope Sender may or may not be masked to match your domain.
Table: Known, trusted spoof examples
Good Partial Spoof (valid or approved source):
Good Full Spoof (valid or approved source):
X-Originating-IP: [13.12.223.123] X-Env-Sender: business@partner.com From: <name_1@yourdomain.com> To: <name_2@yourdomain.com>
X-Originating-IP: [89.123.89.123] X-Env-Sender: businesspartner@yourdomain.com From: <name_1@yourdomain.com> To: <name_2@yourdomain.com>
Spoofed email does not necessarily mean that the email you receive is spam or bad; it can be legitimate and important to you. Today’s businesses rely heavily on legitimate spoofing for their business to function. Common email marketing services like MailChimp, Amazon SES, and Zoho Campaigns are typical mail service providers for sending newsletters.
Table: Ghost spoof examples
Bad Ghost Spoof (unknown or malicious source):
Good Ghost Spoof (valid or approved source):
X-Originating-IP: [123.80.123.80] X-Env-Sender: badguy@malicious.com From: “name_1@yourdomain.com” <badguy@malicious.com> To: <name_2@yourdomain.com>
X-Originating-IP: [23.70.123.83] X-Env-Sender: business@partner.com From: “name_1@yourdomain.com” <business@partner.com> To: <name_2@yourdomain.com>
A third type of spoof—which we refer to as a ghost spoof— is not technically spoofing, but it does exploit an element of the Body From. This element is the Display Name field.
A ghost spoof deals with an open text field that is not controlled in any way. Your email client will only show the display when one exists, especially if the display name matches the internal naming scheme. Your users would see the text inside the ” “, but not the Body From email. This varies between email clients.
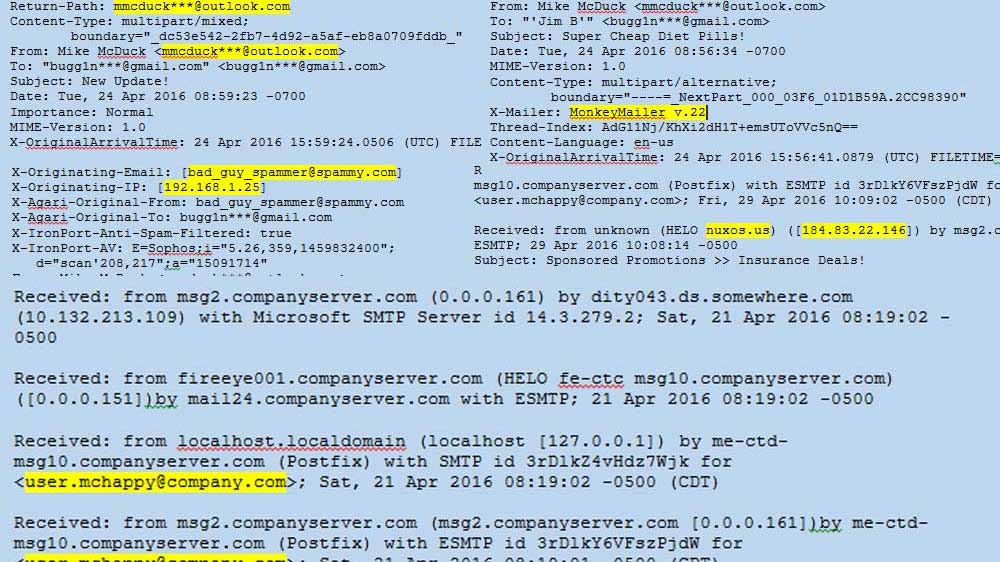
Email headers contain important information about the origin and path an email took before arriving at its final destination, including the sender’s IP address, internet service provider, email client, and even location. The information could be used to block future emails from the sender (in the case of spam) or to determine the legitimacy of a suspicious email. A review of the headers can also help to identify “header spoofing,” a strong indication the email was sent with malicious intent.
Understanding the Header Fields
Email headers are read chronologically from the bottom up and can be broken down into three main categories: 1) Message Information 2) X-Headers and 3) Server Relay Information. There is a convenient tool for analyzing headers available online at http://mxtoolbox.com/EmailHeaders.aspx. Simply copy and paste the headers into the tool, and it will analyze the server relays and convert the headers into an easy to read format.
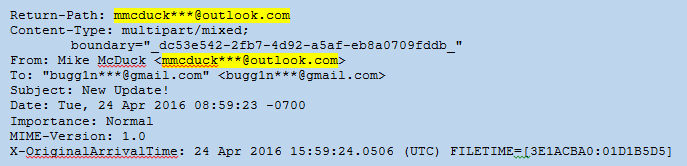
Message Information: Includes commonly recognized email header fields, such as To:, From:, Subject:, Date:, To:, as well as useful fields like Message-ID:, Return-Path:, ReplyTo:, among others. These fields are the most easily spoofed because they are specified by the sender’s mail client. They are usually found near the bottom of the headers as they are the first to be added.
Figure 1: Headers – Message Info
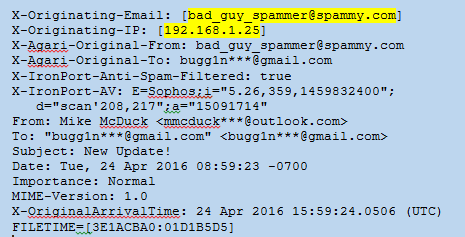
X-Headers: These fields are added to the email by security devices such as email anti-virus scanners as it traverses the internet and internal networks. The X-Headers may not be in order and are often intermixed within the Message Info and Server Relay headers. Not all X-Headers will be present in every case. In the example below there is an X-Originating-Email: that reveals the true sender was bad_guy_spammer@spammy.com and not mmcduck***@outlook.com. Sometimes there is an X-Originating-IP as well. The headers below also show that the email was scanned by Agari Email Security and IronPort devices.
Figure 2: Headers – X-Headers
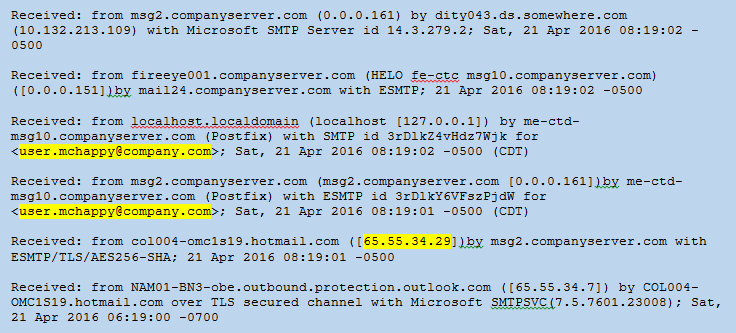
Server Relay Information: Each time a server relay receives an SMTP message, it will add a new Received: line at the beginning of the header block. A typical email received by a user on a corporate network will show many server relays both before and after being delivered to the corporate email servers (companyserver.com). These will be in chronological order starting from the bottom up.
Figure 3: Headers: Server Relay
Analyzing Headers
By analyzing the server relay information in chronological order from the bottom-up, you can get a picture of where the message travelled. Each receiving mail server adds the name and IP address of the server that delivered the message. The server name may reveal the domain of the sender relay, and a Who-Is lookup of the IP may give you a geographic location. In the case of messages sent via Gmail and other large email service providers, this may only lead you back to the location of the email servers or even the corporate headquarters of the provider (i.e. Mountain View, CA). If you are lucky, the headers will include an X-Originating-IP that may reveal the sender’s internet service provider and narrow down the sender’s location.
If you are looking at spam email headers from a network security perspective, it is important to identify the IP address/domain that delivered the email to your frontline email server, the security device in front of your email server. This is called the “originating IP” (not the same as X-Originating-IP). It is the first field added to the headers that can be 100% trusted because it was added by your own security device/server. The server relay header will read “Received: from some.external.domain ([some.IP]) by your.company.device ([your.IP]).” Potentially, everything before this entry could be spoofed, but, as your server is reporting it received an email from some.external.domain ([some.IP]) and is the one adding it to the headers, you should be able to trust it. Once you know which external IP delivered the message, there is a free reputation service provided by Cisco at https://www.senderbase.org/. The service gives IP addresses and domains a reputation rating (Known spammer IP’s and domains received “Poor” reputations). The originating IPs can be blocked at the externally facing firewalls on a case by case basis, by reputation, or both. Figure 4 shows an email received by msg2.companyserver.com and the originating IP/domain is highlighted. Figure 5 shows the “Poor” rating the IP received from SenderBase.org.
Figure 4: Headers – Originating IP
Figure 5: SenderBase.org – Reputation Rating
It is important to look for evidence of spoofing or alteration of header data in the Message Information headers. The spammer can easily alter these headers within their email client or by using specialized software. The most common field to spoof is the From: field. In the example in Figure 2, the sender changed the From: field to display “Mike McDuck <mmcduck***@outlook.com>” but the true sender was revealed by the X-Originating-Email field. It is not uncommon for spammers to use the recipient’s own name and email address in the From: field in order to increase the chances the recipient will open the email (“Why did I send this email to myself?”). The spammer will use any trick he or she can think of to deceive the recipient. Keep in mind the Return-Path: and Reply-To: can also be spoofed, depending on whether the spammer wants to receive the reply messages or not. Sometimes the To: field will also be altered to hide the intended recipient’s address.
The Message-ID is another good place to identify spoofing. The Message-ID is a unique identifier of digital messages and is difficult to alter as it is added by the mail server that processes the email. Because it has to be unique, it is common for message systems to use a date/time stamp followed by the sender’s domain name (example: CAF4Ths+hsd84G9sedaD@mail.gmail.com). If the sender domain in the From: field does not match the Message-ID, you might be dealing with a spoofed message.
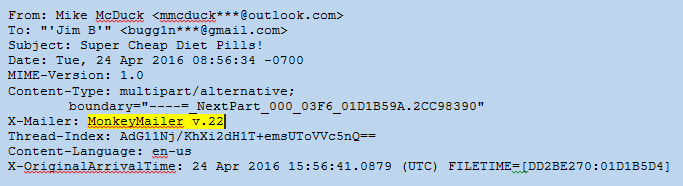
The majority of spam emails are generated by servers capable of producing millions of messages per day. Sometimes those servers are running programs that populate the “X-Mailer” field with the name of the mail client that was used. Legitimate emails will usually include a known mail client (i.e. Microsoft Outlook 16.0, Outlook Express, iPad Mail), but the spammer mail clients may be something less common (see Figure 6) or even obscured through random, nonsense characters.
Figure 6: Headers – Mail Client
Now What?
At first glance, email headers can seem confusing and overwhelming. Once you begin to understand the fields in the headers and what they can reveal about the message, you will find very useful information buried in the seemingly endless lines of text. The next step will be determining what you can do with the evidence you find. Stay tuned to for future blog posts on using the headers to identify/block spam and to detect targeted phishing emails.