Exchange Database Recovery Using eseutil commands
Exchange Database Recovery – Using eseutil commands
Below mentioned processes are not done on a day to day basis, but understanding how the process works is mandatory for every exchange administrator.
A step by step walk-through of procedure to be followed when exchange database fail to mount in Exchange System Manager:
1. Perform the Eseutil /mh “Path of the database” as indicated below and check the state of the database.
 Health of the Database
2. If the state is in clean shutdown, move all the log files from the Transaction logs folder location and then mount the stores.
3. If the state is in Dirty shutdown as mentioned below, check if the log files that is indicated as Logs required is available or now.
 Database in Dirty Shutdown
5. To make sure that the log files that is required is in a Clean state, you can perform Eseutil /ml “Path of the log fileslog prefix” as indicated below. This command will help you check the health of all the log files in the location.
 log file health – eseutil /ml
6.If the log files are healthy, then perform the Soft recovery with the command Eseutil /r <Log Prefix> /l “Path of the log files” /d “Path of the database”
 Soft recovery – eseutil/r
7. Once the command completes successfully, mount the stores.
You might get this error:
“Operation terminated with error -1216 (JET_errAttachedDatabaseMismatch, An outstanding database attachment has been detected at the start or end of recovery, but database is missing or does not match attachment info) after n seconds.”
To resolve this, run soft recovery with the “/i ” switch at the end and it will override the EDB-STM mismatch.
How to run HARD RECOVERY:
In case the required log files are not available in a clean state or missing, either restore from a successful back up or perform Hard repair.
8. In case we have valid backup, then we can restore the files.
9. In any restoration software, once the restoration completes, it should create a location containing the restore.env file along with the logs that were backed up without being committed to the database that was backed up.
10. By default, we have the location as C:Temp as indicated below:
 Log restore location
11. This folder contains the restore.env along with the logs as indicated below:
 Restore.env Location
12. Make sure we take a copy of the folder containing the logs and restore.env file as the content of the folder will be lost if the hard recovery completes or fails.
 Copy the folder post restore
13. In the command prompt, perform the Hard recovery from the BIN folder with the following command:
Eseutil /cc “Path of the restore.env containing folder”
14. The command will complete successfully:
 Hard Recovery completion
15. If you check the folder that contained the restore.env file, we would find that to be empty:
 Location becomes empty post Hard Recovery
16. If the backup was taken a few days back and there were logs created in the production location once the backup was done, then we must make sure that the production location contains the sequence of logs from the one in the restore.env location. In this case, the restore.env folder contained the last log file as E0000003.log. If the production location does not contain a sequence of this (i.e. E0000004.log), the hard recovery command will fail.
17. We can use the eseutil /cc “Path of the restore.env folder” /t in order to avoid playing the logs in the production location. (Kindly make sure to take a copy of the folder once again before performing the command as mentioned in step 12. However, in this case, there will be data loss of the mails created after the backup was taken.
18. We can mount the stores successfully.
How to run HARD REPAIR:
19. We can Hard repair the databases, to get them back into a clean shut down state in case we do not have a valid back up. To do so type the command:
D:Program FilesExchsrvrBin>eseutil /p “D:ExchsrvrMailbox Store (SERVER).edb”
20. When you are prompted to confirm this operation, choose OK.
 Pop-up whilst repair
http://support.microsoft.com/?id=317014
21. The process completes successfully.
 Repair process completed
How to run OFFLINE DEFRAG:
22. Once Eseutil /p finishes we will need to defrag the databases, to do so type the following command: Note: You must have available hard disk space equal to 110 percent of the size of the database that you want to defragment.
23. To defragment Priv.edb, type the following command at the command prompt, and then press ENTER:
24. D:Program FilesExchsrvrBin>eseutil /d “D:ExchsrvrMailbox Store (SERVER).edb”
 Offline Defrag
25. Note If the private and the public information store databases are large, this step may take some time. When you are prompted to confirm this operation, choose OK.
XADM: How to Defragment with the Eseutil Utility (Eseutil.exe) http://support.microsoft.com/?id=192185
26. Once Eseutil /d finishes Mount the store & Dismount the store immediately then perform the below steps.
How to run ISINTEG:
27. Use Isinteg.exe to fix the Pub1.edb database and the Priv1.edb database. The Isinteg.exe utility runs a test on all areas of each of the databases and reports the results. Isinteg.exe also tries to fix any issues that are encountered.
28. To fix Priv1.edb, type the following command at a command prompt
29. E:Program FilesExchsrvrBin>isinteg -s (SERVER) -fix -test alltests and choose the store that we are running the command on.
 ISINTEG
You are prompted to select the database to be checked.
Index Status Database-Name
Storage Group Name: First Storage Group
1 Offline Mailbox Store (servername)
2 Offline Public Folder Store (servername)
30. Enter a number to select a database or press Return to exit.
31. You can only check databases that are marked as offline. The Information Store service must be started, but the information store must be dismounted.
32. When you select a database, you are prompted with the following message to confirm the selection:
“You have selected First Storage Group / Mailbox Store <servername>
Continue? (Y/N)”
33. Press Y and Enter to start checking the selected database.
34. You receive a summary report that indicates the number of tests that were run, the number of warnings, the number of errors found, the number of fixes attempted, and the time it took for the program to run. If there are any warnings, errors, or fixes, run the command again. Repeat this step until there are no warnings, errors, or fixes reported and the report looks similar to the following text:
Test reference table construction result:
0 error(s); 0 warning(s); 0 fix (es); 0 row(s); time: 0h: 0m: 0s
Test Folder Result:
0 error(s); 0 warning(s); 0 fix (es); 101 row(s); time: 0h: 0m: 0s
Now in test 3 (reference count verification) of total 3 tests;
100% complete.
 ISINTEG Completion
Before you execute any command on the database, please make sure that QUICKEDITMODE is not checked in command prompt properties as it may pause the process upon left click.
 Quickeditmode disabled
In most cases, the best way to run soft recovery is to mount any database in a storage group. Because all databases in a storage group share a single stream of log files, soft recovery occurs at the level of the entire storage group and not at the level of the individual database.
In some special circumstances, there are advantages to running soft recovery using Eseutil.exe. The most common scenarios are:
- You want to recover a storage group that has a missing database.
- You want to recover an individual database “out of place” without affecting other databases or the storage group’s log files.
The complete syntax for the Eseutil.exe soft recovery function, listing all possible switches, is:
ESEUTIL /r enn /L[path to log files] /s[path to checkpoint file] /d[path to database file] /i
Example: ESEUTIL /r e01 /Lf:mdbdata /sc:exchsrvrmdbdata /dg:mdbdata /i
— Missing log file —
First process is to make a note of which log files does the database require to make itself to a clean shutdown state
To know this, run eseutil /mh which will show you the logs required:
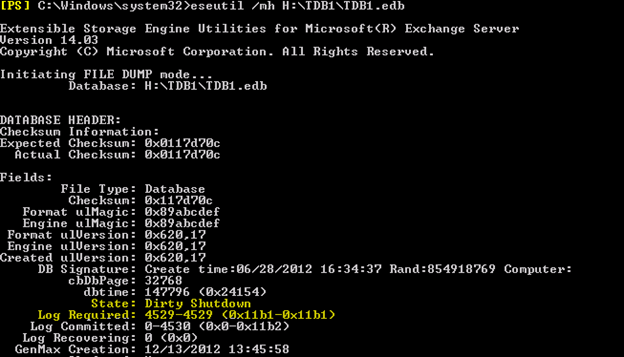
So here we need the logs:
E06000011B1 – Ox means the prefix of the log name
Now, try to find if you have this log file intact.
Mostly it maybe the E00.log file
In my case, I had the E00.log and E00tmp.log
Which means the server crashed when a new E00.log was in the process of being created.
Now try to perform soft recovery and recover the database.
Exchange gives you an option of lossy recovery which lets you ignore missing logs as outlined here:
Exchange 2007: Operation terminated with error -939586631 The restore environment information isn’t found or cannot be opened:http://msexchangeguru.com/2010/07/27/e2k7-restore-939586631/
So try the command:
Eseutil /r E0n /l “Log file location” /d “Database Location” /a /i
- E0n – Name of the log file sequence like E00, E01, E02 etc
- /a – This is the key. This switch will allow a lossy recovery option
- /i – will override database mismatch
If this doesn’t work, simply try the following before you decide to repair the DB.
NOTE: BACKUP ALL YOUR DATABASE and LOGS
Rename the CHECKPoint file which is E06.chk in my case
The checkpoint file remembers the last played log in our case won’t help.
Now create a newfolder – LOGS and copy all 300 logs to that location till the E06000011B1 log file
Now make a copy of “E06000011B1.log” and rename it to E00.log and place in the same location
You can use eseutil /mk “E06000011B1.log” to know the LGen number of the log
Make sure the checkpoint file is renamed.
Now run the soft recovery command again and “DELETE THE NEW E00.LOG” that you created while soft recovery is running
Eseutil /r E06 /l “NEW log file location” /d “DB Location” /a /i
This is tricky process. Read again – while the soft recovery is proceeding, you need to delete the E00.log file and once the recovery completes, the database will be in clean shutdown state.
Before mounting the database again, clear all logs in the database location so that we can start with a new set of log files and BACKUP right away.
Let’s say the database need two log files to make itself clean – E06000011B1 and E06000011B2 and you have E00.log and E00tmp.log in the logs location, simply look for E00.log and E00tmp.log number using the command eseutil /mk and rename E00 to E06000011B1.log and E00tmp.log to E06000011B2.log and make a copy of E06000011B2.log and make it E00.log which we can delete while soft recovery is running.
The reason I mentioned you need atleast 300 logs is because soft recovery is a lighting fast process and it wont let you delete the E00.log if it doesn’t have enough logs to replay to the database.
You can repeat the steps several times but – delete the CHECKPOINT file everytime or it will fail instantly.
Categorised as: Exchange, Microsoft
Leave a Reply
You must be logged in to post a comment.