I used the below commands to remove the pki key-pair and clear the certificate that was causing the issue, which resolved my issue.
Instead of clearing all of the certificates, you can select the individual certificate ID that you are having issues with by adding certificate-id after PKI.
I was doing some troubleshooting in my Hyper-V cluster, and I had to remove a node from the Cluster and re-add it. While doing this, I came up with an error saying “The Computer “Clusternode.Domain” is joined to a cluster”, Here, “Clusternode” is my node name and “Domain” is my domain name.
When I was doing this, I noticed that my Windows “Cluster” service was set to automatically.
To resolve this issue, I had to use Windows PowerShell as an Administrator and use the below commands:
get-service -Name “Cluster Service” | Set-Service –StartupType Disabled or you can set the Windows service status to disabled by accessing the “service.msc” console.
Type “Import-Module FailoverClusters” as the second step
You can also use the netdom.exe tool from RSAT to reset the local computer password. Sign in failed machine with the local Administrator account (by typing, “.Administrator” to the logon window), open the elevated cmd.exe prompt, and run the following command:Netdom resetpwd /Server:DomainController /UserD:Administrator /PasswordD:Password
Server — the domain name;
UserD — username with domain admin or delegated privileges;
I spent many hours troubleshooting and opening several support tickets with Microsoft, but in the end, I was able to fix the problem on my own. I believe it would be helpful for others to share my documentation of these procedures.
The help from Microsoft O365 support was quite disappointing. They seemed to repeatedly ask the same questions and took an extended three/seven days to either respond to calls or provide updates on the tickets. The situation was so frustrating that I had to open several more tickets just to receive a reply to my first ticket.
Regardless, when attempting to move a mailbox from on-premises Exchange to Exchange Online using the New-MoveRequest command or through a migration batch via the O365 portal, you might encounter an error similar to the one shown below. The error is so misleading as it suggests that your proxy is unavailable, and this could be because the service is too busy or because no endpoint was found listening at the specified address, yet when you check your settings, all your tests show the connection is successful, and everything is working fine.
Write-ErrorMessage : |Microsoft.Exchange.MailboxReplicationService.MRSRemoteTransientException|The call to ‘https://youremaildomain.co.uk/EWS/mrsproxy.svc’ failed. Error details: The HTTP service located at https://youremaildomain.co.uk/EWS/mrsproxy.svc is unavailable. This could be because the service is too busy or because no endpoint was found listening at the specified address. Please ensure that the address is correct and try accessing the service again later. –> The remote server returned an error: (503) Server Unavailable.. At C:\Users\shiraj\AppData\Local\Temp\tmpEXO_32eh1auq.tyy\tmpEXO_32eh1auq.tyy.psm1:1159 char:13
FullyQualifiedErrorId : [Server=CWLP123MB7447,RequestId=39b8a568-9c17-c07c-dac7-d60b66e22c06,TimeStamp=Thu, 10 Aug 2023 16:54:21 GMT],Write-ErrorMessage
If you have done your basic checks, like enabling proxy in the EWS virtual directory
Make sure you can get a response from the EWS virtual directory proxy address.
If you are still experiencing difficulties, this means the mailbox database server is not issued the same certificate as IIS; note how W and S are assigned in the before and after image below.
However, when assigning the certificate to the backend mailbox database server using ECP, the only option accessible is SMTP, and IIS is not available.
This must be done with the Enable-ExchangeCertificate command, as shown in the previous image.
Conclusion: The same public SSL is required when the CAS server connects to the backend mailbox database server.
I hope this helps someone save hours of troubleshooting.
Cluster transition states during Cluster OS Rolling Upgrade
To ensure uninterrupted operation of cluster workloads during the Cluster OS Rolling Upgrade process, a technique is employed whereby a cluster workload is moved from a node running an older version of Windows Server to a node running a newer version. This is achieved through the utilization of compatibility mode, wherein the nodes running the newer version of Windows Server are made to appear as if they are operating on the same older version of Windows Server. For instance, when upgrading a Windows Server 2016 cluster to Windows Server 2019, the Windows Server 2019 nodes temporarily function in a Windows Server 2016 compatibility mode. Additionally, a new cluster mode known as “mixed-OS mode” has been introduced, enabling the coexistence of nodes with different Windows Server versions within the same cluster (refer to Figure 1).
Figure 1: Cluster operating system state transitions
A Windows Server cluster enters mixed-OS mode when a node running a newer version of Windows Server is added to the cluster. The process is fully reversible at this point – newer Windows Server nodes can be removed from the cluster, and nodes running the existing version of Windows Server can be added to the cluster in this mode. The process is not reversible once the Update-ClusterFunctionalLevel PowerShell cmdlet is run on the cluster. In order for this cmdlet to succeed, all nodes must be running the newer version of Windows Server, and all nodes must be online.
Transition states of a four-node cluster while performing Rolling OS Upgrade
This section illustrates and describes the four different stages of a cluster with shared storage whose nodes are upgraded from Windows Server 2012 R2 to Windows Server 2016. The process is the same for later versions of Windows Server.
“Stage 1” is the initial state – we start with a Windows Server 2012 R2 cluster.
Figure 2: Initial State: Windows Server 2012 R2 Failover Cluster (Stage 1)
In “Stage 2”, two nodes have been paused, drained, evicted, reformatted, and installed with Windows Server 2016.
Figure 3: Intermediate State: Mixed-OS mode: Windows Server 2012 R2 and Windows Server 2016 Failover cluster (Stage 2)
At “Stage 3”, all of the nodes in the cluster have been upgraded to Windows Server 2016, and the cluster is ready to be upgraded with Update-ClusterFunctionalLevel PowerShell cmdlet.
Note
The process can be fully reversed at this stage, and Windows Server 2012 R2 nodes can be added to this cluster.
Figure 4: Intermediate State: All nodes upgraded to Windows Server 2016, ready for Update-ClusterFunctionalLevel (Stage 3)
After the Update-ClusterFunctionalLevel cmdlet is run, and the cluster enters “Stage 4”, where new Windows Server 2016 cluster features can be used.
Figure 5: Final State: Windows Server 2016 Failover Cluster (Stage 4)
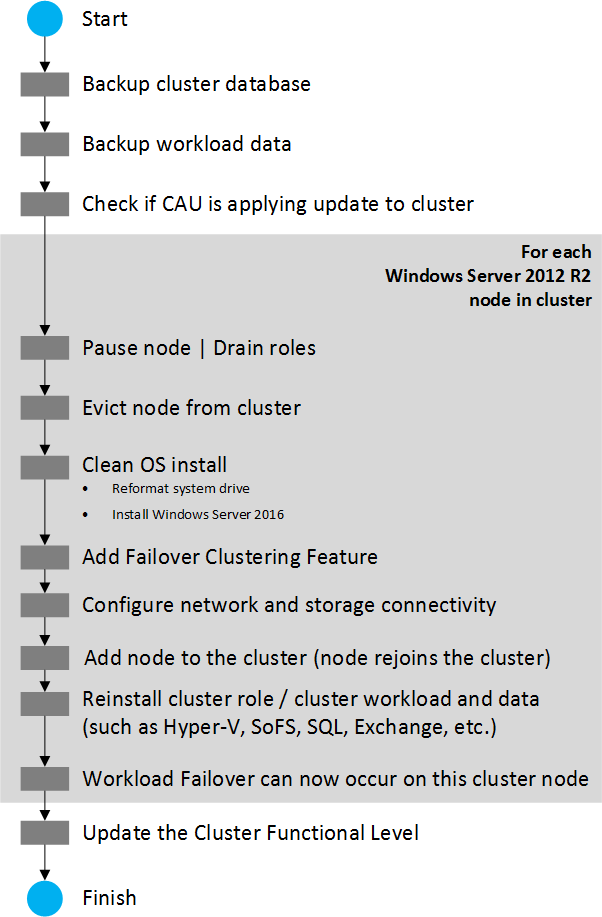
Cluster OS Rolling Upgrade Process
This section describes the workflow for performing Cluster OS Rolling Upgrade.
Figure 6: Cluster OS Rolling Upgrade Process Workflow
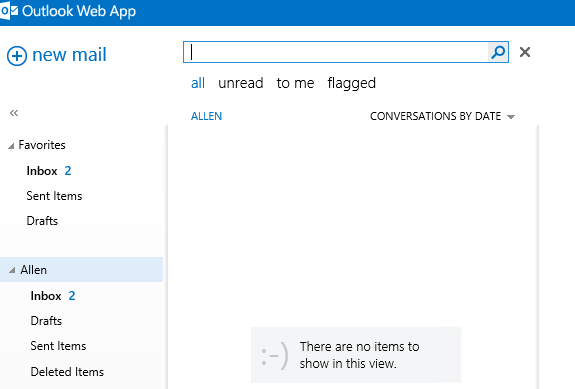
As with all previous versions of OWA, Exchange 2013 and Exchange 2016 have a search function that is above the mail column, as seen below.
When you do a search in OWA 2013, no results would be showing, no matter what information is the search keywords. No matter what, no search results were found. In Exchange 2013, the search index is stored in the Mailbox store where the users are located.
To resolve this issue and build the OWA 2013 or OWA 2016 and the Exchange search index again, we needed to do the following. This error may also occur with Outlook clients that are not in cached mode.
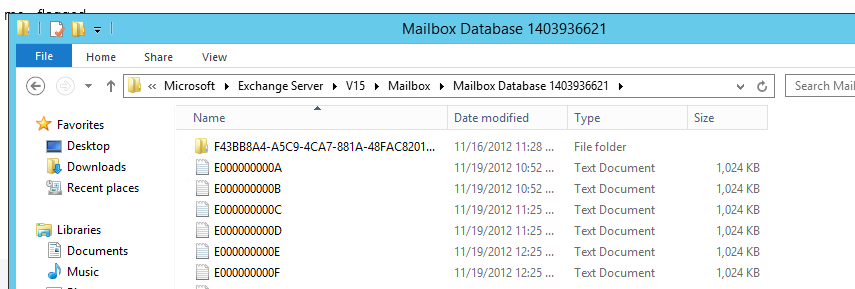
In Exchange RTM navigate to services and stop the Microsoft Exchange Search service. In Exchange, CU1 and CU2 stop both the Exchange Search services (Exchange Host Search and Exchange Search service) and the Search Host Controller. Once done, locate the folder on your server where the Mailbox database is where the user is trying to search. For example, mine is here.
The netstat command, it can show details about individual network connections, overall and protocol-specific networking statistics, and much more, all of which could help troubleshoot certain kinds of networking issues.
Execute the netstat command alone to show a relatively simple list of all active TCP connections, which, for each one, will show the local IP address (your computer), the foreign IP address (the other computer or network device), along with their respective port numbers, as well as the TCP state.
-a
This switch displays active TCP connections, TCP connections with the listening state, as well as UDP ports that are being listened to.
-b
This netstat switch is very similar to the -o switch listed below, but instead of displaying the PID, it will display the process’s actual file name. Using -b over -o might seem like it’s saving you a step or two but using it can sometimes greatly extend the time it takes netstat to fully execute.
-e
Use this switch with the netstat command to show statistics about your network connection. This data includes bytes, unicast packets, non-unicast packets, discards, errors, and unknown protocols received and sent since the connection was established.
-f
The -f switch will force the netstat command to display the Fully Qualified Domain Name (FQDN) for each foreign IP address when possible.
-n
Use the -n switch to prevent netstat from attempting to determine hostnames for foreign IP addresses. Depending on your current network connections, using this switch could considerably reduce the time it takes for netstat to fully execute.
-o
A handy option for many troubleshooting tasks, the -o switch displays the process identifier (PID) associated with each displayed connection. See the example below for more about using netstat -o.
-p
Use the -p switch to show connections or statistics only for a particular protocol. You can not define more than one protocol at once or execute netstat with -p without defining a protocol.
protocol
When specifying a protocol with the -p option, you can use tcp, udp, tcpv6, or udpv6. If you use -s with -p to view statistics by protocol, you can use icmp, ip, icmpv6, or ipv6 in addition to the first four I mentioned.
-r
Execute netstat with -r to show the IP routing table. This is the same as using the route command to execute route print.
-s
The -s option can be used with the netstat command to show detailed statistics by protocol. You can limit the statistics shown to a particular protocol by using the -soption and specifying that protocol, but be sure to use -s before -pprotocol when using the switches together.
-t
Use the -t switch to show the current TCP chimney offload state instead of the typically displayed TCP state.
-x
Use the -x option to show all NetworkDirect listeners, connections, and shared endpoints.
-y
The -y switch can be used to show the TCP connection template for all connection. You cannot use -y with any other netstat option.
time_interval
This is the time, in seconds, that you’d like the netstat command to re-execute automatically, stopping only when you use Ctrl-C to end the loop.
/?
Use the help switch to show details about the netstat command’s several options.
Make all that netstat information in the command line easier to work with by outputting what you see on the screen to a text file using a redirection operator. See How to Redirect Command Output to a File for complete instructions.
Netstat Command Examples
Here are several examples showing how the netstat command might be used:
Show Active TCP Connections
netstat -f
In this first example, we execute netstat to show all active TCP connections. However, we want to see the computers that we’re connected to in FQDN format [-f] instead of a simple IP address.
Here’s an example of what you might see:
Active Connections
 Proto Local Address Foreign Address State
 TCP 127.0.0.1:5357 VM-Windows-7:49229 TIME_WAIT
 TCP 127.0.0.1:49225 VM-Windows-7:12080 TIME_WAIT
 TCP 192.168.1.14:49194 75.125.212.75:http CLOSE_WAIT
 TCP 192.168.1.14:49196 a795sm.avast.com:http CLOSE_WAIT
 TCP 192.168.1.14:49197 a795sm.avast.com:http CLOSE_WAIT
 TCP 192.168.1.14:49230 TIM-PC:wsd TIME_WAIT
 TCP 192.168.1.14:49231 TIM-PC:icslap ESTABLISHED
 TCP 192.168.1.14:49232 TIM-PC:netbios-ssn TIME_WAIT
 TCP 192.168.1.14:49233 TIM-PC:netbios-ssn TIME_WAIT
 TCP [::1]:2869 VM-Windows-7:49226 ESTABLISHED
 TCP [::1]:49226 VM-Windows-7:icslap ESTABLISHED
As you can see, there were 11 active TCP connections when netstat was executed in this example. The only protocol (in the Proto column) listed is TCP, which was expected because we didn’t use -a.
You can also see three sets of IP addresses in the Local Address column—the actual address of 192.168.1.14 and both IPv4 and IPv6 versions of the loopback addresses, along with the port each connection is using. The Foreign Address column lists the FQDN (75.125.212.75 didn’t resolve for some reason) along with that port as well.
Finally, the State column lists the TCP state of that particular connection.
Show Connections and Process Identifiers
netstat -o
In this example, netstat will be run normally so it only shows active TCP connections, but we also want to see the corresponding process identifier [-o] for each connection so that we can determine which program on the computer initiated each one.
Here’s what the computer displayed:
Active Connections
 Proto Local Address Foreign Address State PID
 TCP 192.168.1.14:49194 75.125.212.75:http CLOSE_WAIT 2948
 TCP 192.168.1.14:49196 a795sm:http CLOSE_WAIT 2948
 TCP 192.168.1.14:49197 a795sm:http CLOSE_WAIT 2948
You probably noticed the new PID column. In this case, the PIDs are all the same, meaning the same program on the computer opened these connections.
To determine what program is represented by the PID of 2948 on the computer, open Task Manager to the Processes tab, and note the Image Name listed next to the PID we’re looking for in the PID column.1
Using the netstat command with the -o option can be very helpful when tracking down which program uses too big a share of your bandwidth. It can also help locate the destination where some kind of malware, or even an otherwise legitimate piece of software, might send information without your permission.
While this and the previous example were both run on the same computer and within just a minute of each other, you can see that the list of active TCP connections is considerably different. This is because your computer is constantly connecting to, and disconnecting from, various other devices on your network and over the internet.
Show Specific Connections Only
netstat -0 | findstr 28604
The above example is similar to what we’ve already looked at, but instead of displaying all connections, we’re telling the command to show only the connections that are using a specific PID, 28604 in this example.
A similar command could be used to filter out the connections with a CLOSE_WAIT state, by replacing the PID with ESTABLISHED.
Show Protocol-Specific Stats
netstat -s -p tcp -f
Here, we want to see protocol specific statistics [-s] but not all of them, just TCP stats [-ptcp]. We also want the foreign addresses displayed in FQDN format [-f].
This is what that netstat command produced for us:
TCP Statistics for IPv4 Active Opens = 77 Passive Opens = 21 Failed Connection Attempts = 2 Reset Connections = 25 Current Connections = 5 Segments Received = 7313 Segments Sent = 4824 Segments Retransmitted = 5Active Connections Proto Local Address Foreign Address State TCP 127.0.0.1:2869 VM-Windows-7:49235 TIME_WAIT TCP 127.0.0.1:2869 VM-Windows-7:49238 ESTABLISHED TCP 127.0.0.1:49238 VM-Windows-7:icslap ESTABLISHED TCP 192.168.1.14:49194 75.125.212.75:http CLOSE_WAIT TCP 192.168.1.14:49196 a795sm.avast.com:http CLOSE_WAIT TCP 192.168.1.14:49197 a795sm.avast.com:http CLOSE_WAIT
As you can see, various statistics for the TCP protocol are displayed, as are all active TCP connections at the time.
Show Updated Network Stats
netstat -e -t 5
In this final example, netstat shows some basic network interface statistics [-e] that are continually updated in the command window every five seconds [-t5].
Various pieces of information, which you can see here and that we listed in the -e syntax above, are displayed.
The command only automatically executed one extra time, as shown by the two tables in the result. Note the ^C at the bottom, indicating that the Ctrl+C abort command was used to stop the re-running of the command.
Netstat Related Commands
The netstat command is often used with other networking related Command Prompt commands like nslookup, ping, tracert, ipconfig, and others.
[1] You might have to manually add the PID column to Task Manager. You can do this by selecting PID after right-clicking the column headings in the Process tab. If you’re using Windows 7 or on older Windows OS, select the PID (Process Identifier) checkbox from View > Select Columns in Task Manager. You might also have to choose Show processes from all users from the bottom of the Processes tab if the PID you’re looking for isn’t listed.
Occasionally, Microsoft renames products and services to clarify their purpose, apply a consistent brand, or combine them into a single offering.
Below is a list of recent product name changes that are part of (or are related to) Microsoft 365. Each entry has a link to the announcement, a link to the official product page, and the announcement date or date that the rename took effect.
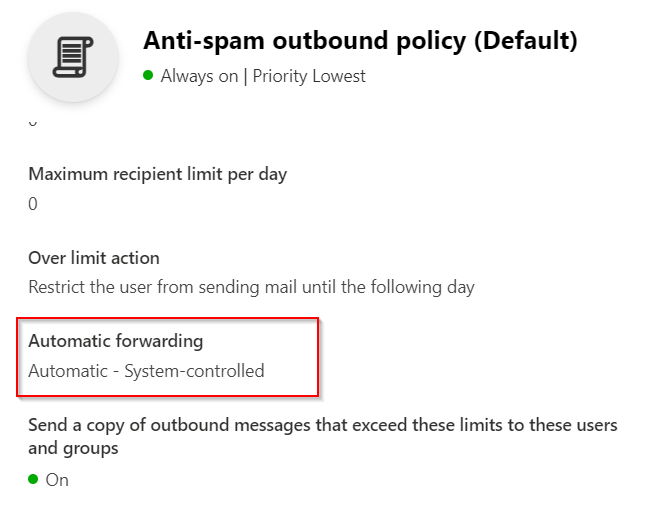
By default, Microsoft 365 Defender sets up an Anti-Spam outbound policy. And the policy default sets Automatic Forwarding to “Automatic: System Controlled.”
Error: “Remote Server returned ‘550 5.7.520 Access denied. Your organization does not allow external forwarding. Please contact your administrator for further assistance. AS(7555)”
Since we do not want to modify this default policy, we can create a policy (with a higher priority) that defines certain users or groups to allow forwarding.
Go to www.office.com and log into the tenant. (do not log into the destination email address tenant)
Open the Admin Center
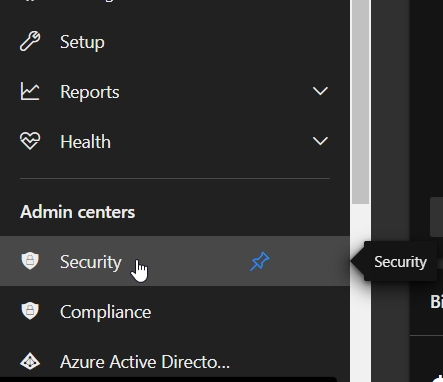
Next, click Show All (admin centres) and then click Security.
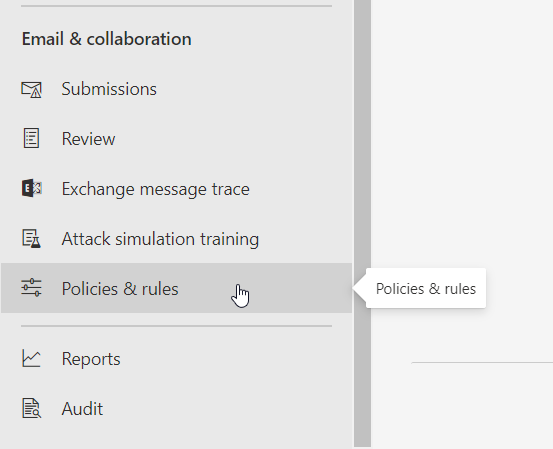
5. Next, in the Security / Microsoft 365 Defender Admin Center, under Email & Collaboration, click on Policies & rules.
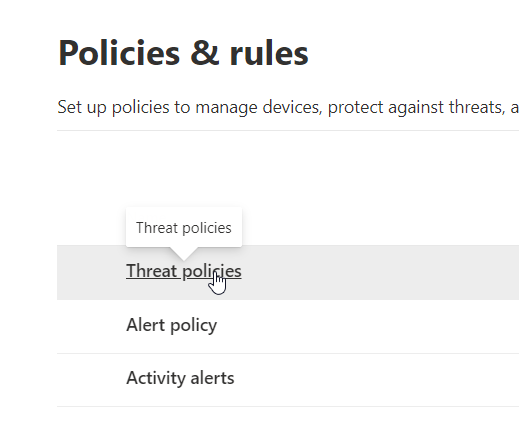
6. Here, click on Threat Policies
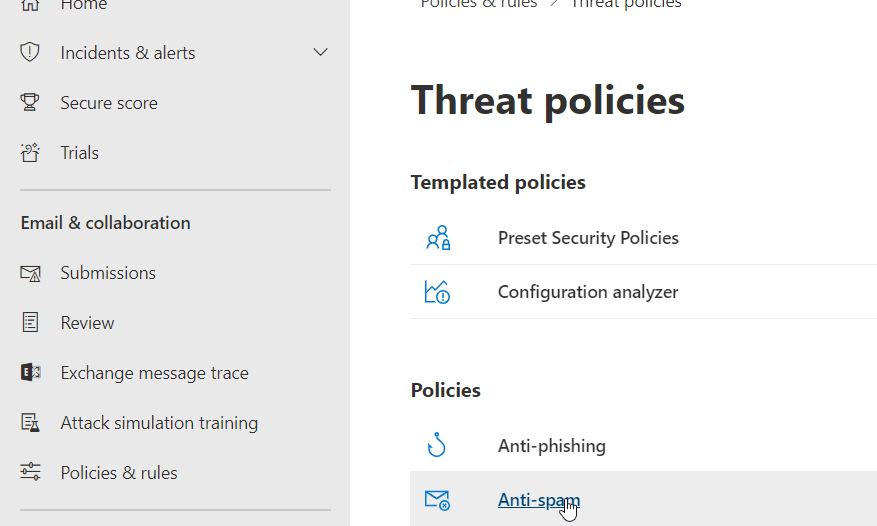
7. Under Threat policies, click Anti-Spam.
8. Under the Default Anti-Spam outbound policy (Default), we will probably find Automatic Forwarding is set to Automatic – System-Controlled
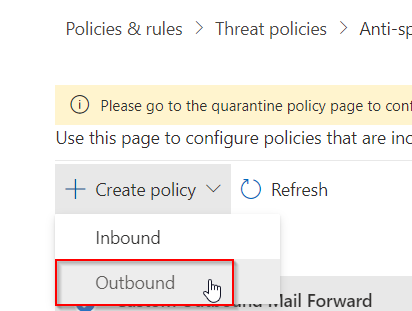
9. Close the Default Policy and then at the top of the screen, click the + Create Policy drop-down and choose Outbound
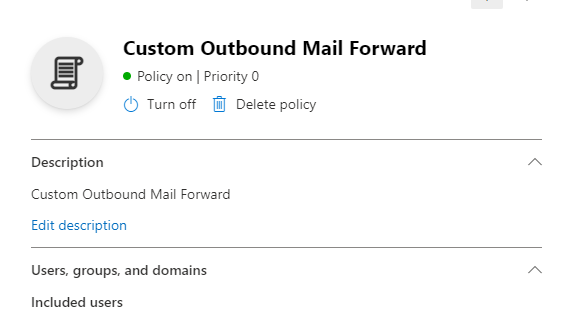
10. In the new Outbound policy, edit the description to something like “Custom Outbound Mail Forward“, and add the Users or Groups to the policy (whom you want to give the ability to forward.)
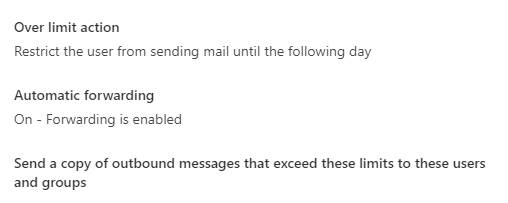
11. At the bottom of the new custom policy change Automatic Forwarding to: On – Forwarding is enabled
12. Save and close the new policy, and that should do it. Try sending some test messages to see if the forward works correctly. We may need to change the new policy’s Priority to 0 if something still isn’t working. Also, don’t forget to double-check the Automatic Forwarding on the mailbox itself.
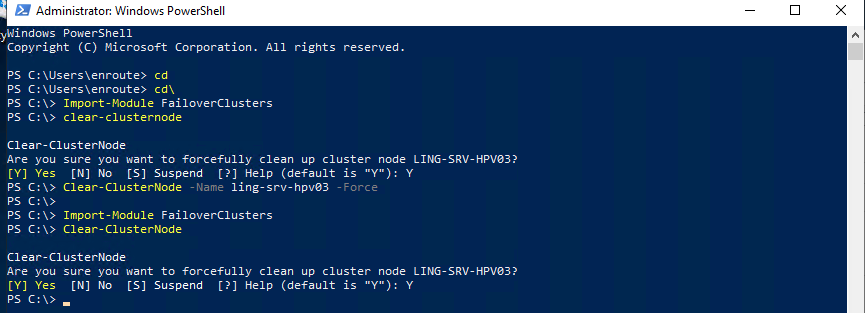
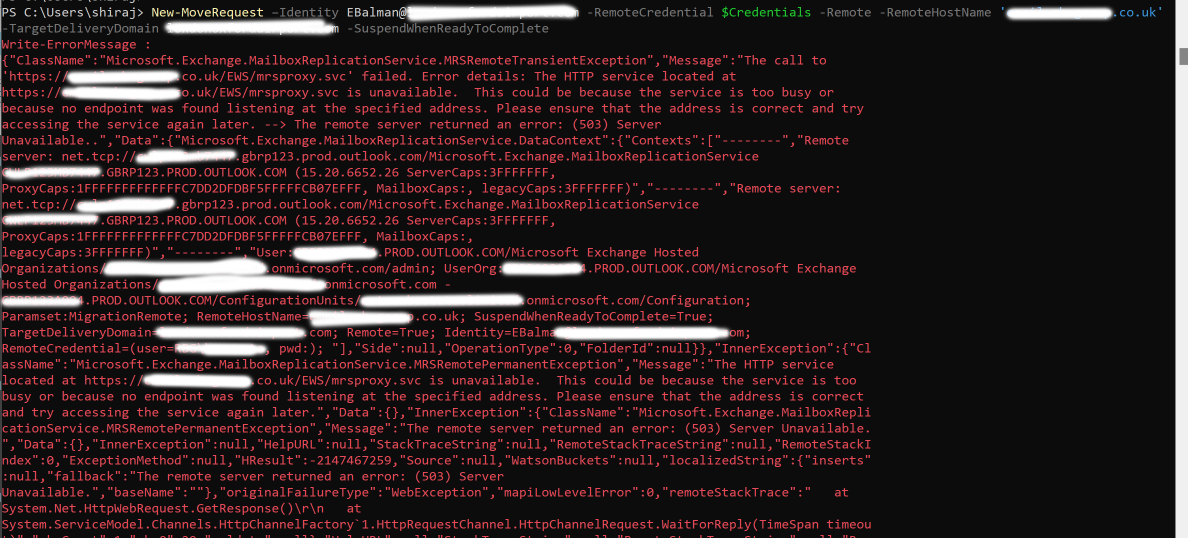
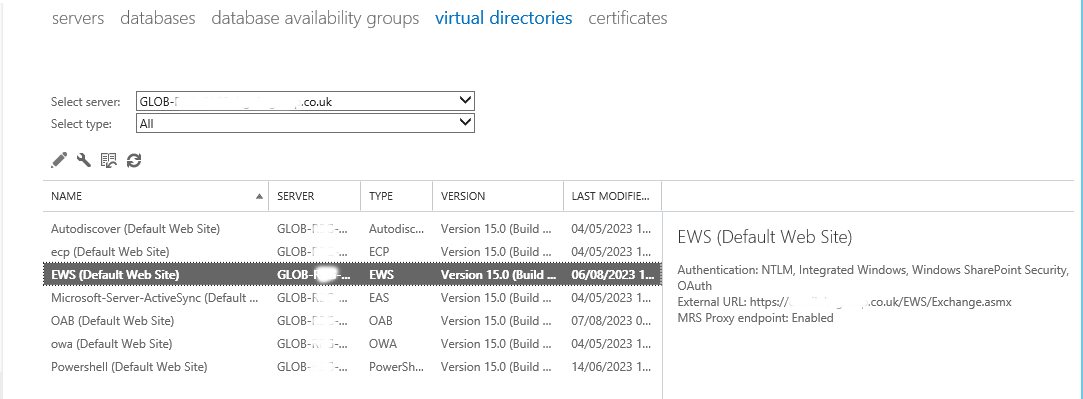
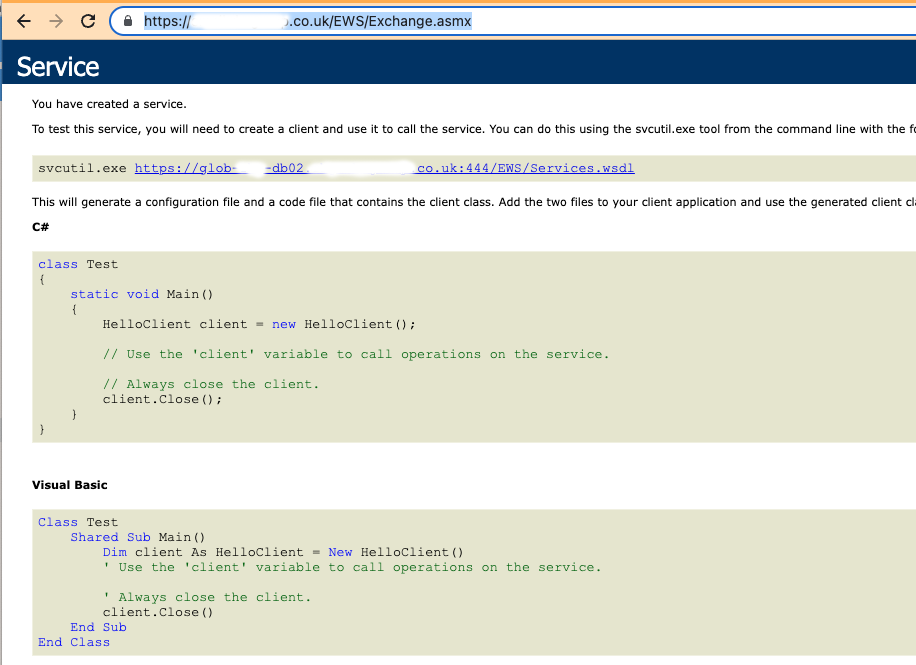

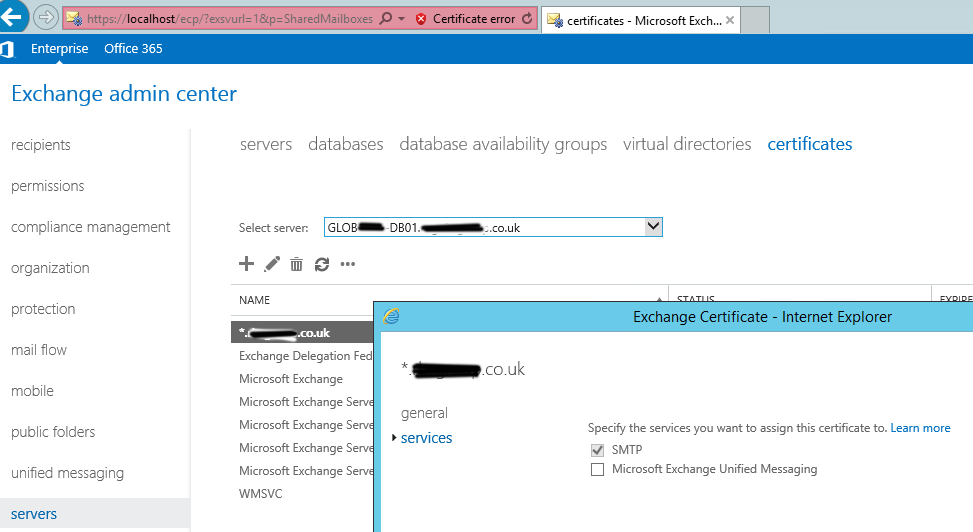
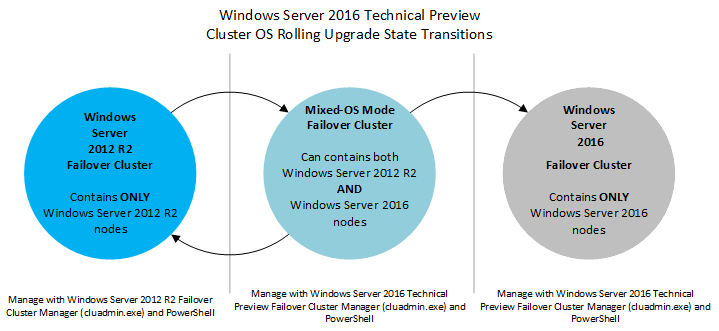

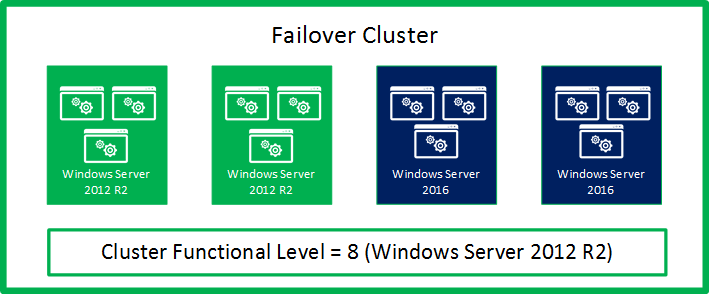

 Figure 5: Final State: Windows Server 2016 Failover Cluster (Stage 4)