It can be difficult getting the PHP’s default mail functions to work when you run an apache server on windows instead of a unix environment. I ran into this problem with my server (running XAMPP), and thought others may benefit from a quick how-to. Another slight problem I had to get working was using an SMTP server that requires SSL connections (gmail for one). I didn’t realize that most recent XAMPP releases have sendmail built in already. This takes part of the hassel out, but we still have some configuring to do.
First, ensure that you have an XAMPP release that does include the fake sendmail program.
Next, go to the XAMPP directory (often C:\xampp\), then open the ’sendmail’ subdirectory. You’ll most likely see the following files (default):
sendmail.exe
readme.html
sendmail.ini
sendmail_example.ini
license.html
Open the file sendmail.ini – this is where all of your SMTP server configurations will go, for example: SMTP Username, Password, Host, Port, etc
My sendmail.ini file looks something like this:
; configuration for fake sendmail
[sendmail]
smtp_server=smtp.gmail.com
smtp_port=465
; SMTPS (SSL) support
; auto = use SSL for port 465, otherwise try to use TLS
; ssl = alway use SSL
; tls = always use TLS
; none = never try to use SSL
smtp_ssl=auto
default_domain=brettshaffer.com
error_logfile=error.log
; if your smtp server requires authentication, modify the following two lines
auth_username=<USERNAME / EMAIL ADDRESS HERE>
auth_password=<PASSWORD HERE>
Note that this is a very simple setup. The variable names are fairly obvious, so simply fill in the SMTP server, port, ssl mode, username, password, and default domain / error log if you’d like.
GMail requires an SSL connection, so my config was setup to use SSL port 465 and smtp_ssl=auto. If SSL is not necessary for your SMTP server, simply set smtp_ssl=none.
Once the configuration is setup, make sure to save changes, then exit.
If you are going to use SSL connections, you will need two additional files, available here ” http://searchartists.co.uk/sendmail/sendmail-SSL.zip” (as of Feb 2008) – if this link no longer works, use the contact form and let me know. or try http://glob.com.au/sendmail/
Extract the two compressed files (libeay32.dll and ssleay32.dll) to the same directory as sendmail.exe (for me, C:\xampp\sendmail\)
Now, everything on the sendmail’s end is setup – now we just need to let the server know its there!
Edit your PHP.ini file:
XAMPP installations often have multiple files. If you are doubtful of the correct one, you can always go through and change them all. But before you do that, change the php.ini in \xampp\apache\bin\.
Look for the following line:
sendmail_path = “C:\xampp\sendmail\sendmail.exe -t”
Uncomment the line (if already commented) by removing the semicolon at the start.
Ensure that the path to sendmail.exe is correct (this is correct for me).
Save and exit php.ini
Restart the apache server and everything should work!
Comment if you have a question.
Procedure
Exchange 2007 SP1
To use the Exchange Management Shell to configure the authentication method to be the same for both the /rpc virtual directory in IIS and Outlook 2007
Set-OutlookAnywhere -Name Server01 -DefaultAuthenticationMethod <Basic or NTLM>
To use the Exchange Management Shell to configure authentication for Outlook Anywhere
use https://192.168.10.200/certsrv selecet – request new certificate
select – advance then open c:certrequest_exch003.txt using notepad copy the content and past and download the certificate.
To use the Exchange Management Shell to import a certificate
This command will return multiple certificates if there are several certificates that match the host name that you specified. Therefore, make sure that you select the thumbprint of the correct certificate for your request.
when works it shoud say:
Completed 1 calls in 60 ms
16 T/S or 60.000 ms/T The RPC Ping Utility test succeeded.
OR you get error like:
Enter password for RPC/HTTP proxy:
Exception 1722 (0x000006BA)
Number of records is: 2
ProcessID is 6656
System Time is: 11/7/2008 7:38:57:753
Generating component is 14
Status is 0x6BA, 1722
Detection location is 1398
Flags is 0
NumberOfParameters is 2
Long val: 0x4
Long val: 0x6ba
ProcessID is 6656
System Time is: 11/7/2008 7:38:57:753
Generating component is 13
Status is 0x6BA, 1722
Detection location is 1418
Flags is 0
NumberOfParameters is 0
C:Usersadministrator.yourdomain>
How to Use Basic Authentication and SSL to Connect to the Store’s Port
Syntax:
RpcPing –t ncacn_http –s ExchangeMBXServer -o RpcProxy=RpcProxyServer -P “user,domain,password” -I “user,domain,password” -H 1 –F 3 –a connect –u 10 –v 3 –e 6001
How to Use Basic Authentication, SSL, and Mutual Authentication to Connect to the Store’s Port
Syntax:
RpcPing –t ncacn_http –s ExchangeMBXServer -o RpcProxy=RpcProxyServer -P “user,domain,password” -I “user,domain,password” -H 1 –F 3 –a connect –u 10 –v 3 –e 6001 –B msstd:server_certificate_subject
How to use NTLM Authentication and Non-SSL to Connect to DsProxy Service
when works it shoud say:
Completed 1 calls in 60 ms
16 T/S or 60.000 ms/T The RPC Ping Utility test succeeded.
If its not working it will give the error and each error means:
Exception 1722 (0x000006BA)
RPC Server is unavailable The RPC service cannot be contacted. You may receive this response because there are problems with the RPC Proxy server (if this is the case, you can use the –E argument to verify that the RPC Proxy server is available), because the service stopped on Exchange 2003 backend server (for example store), because the Exchange 2003 backend server is down, because the ValidPorts registry key does not permit access to this server, because the ValidPorts registry key does not permit this port, because you tried to to access the EMP when it was not published (neither the –e switch or port 593 were available), or because you tried to access UUID when EMP was not published (for example, you used the –a switch without port 593 being available.).
Exception 5 (0x00000005)
Access denied. You receive this response when you have incorrect –P credentials, you have incorrect –I credentials, if the user account is disabled, or if the Mutual Authorization failed. For more details about this response, use the –E argument.
To verify that the CA certificate is published correctly in Active Directory, run the following command
OutlookAnywhere work internally but don’t work from Externally, this could be problem with IPv6 and DNS. On testing of Outlook connection internally directory services are using TCP/IP and rest using HTTPS. by applying the fix below resolved the problem.
[PS] C:WindowsSystem32>
I fixed the problem by editing the host file in c:windowssystem32driversetc on the 2008 server hosting Exchange:
127.0.0.1 localhost
#::1 localhost
10.0.x.x yourexchange
10.0.x.x yourexchange.internal.FQDN Notice the hash mark in front of the IPV6 address for the local host and added two entries, the netbios name and the FQDN of the exchange server and its internal IP addresss. – In IIS changed the Autodiscover folder authentication to Windows Authentication
– Tested the Autodiscover using Test-OutlookWebservices.
[PS] C:WindowsSystem32>Test-OutlookWebServices -Identity Administrator | format-list
– changed OAB settings in Exchange to point to external url.
OutlookAnywhere work internally but don’t work from Externally, this could be problem with IPv6 and DNS. On testing of Outlook connection internally directory services are using TCP/IP and rest using HTTPS. by applying the fix below resolved the problem.
[PS] C:WindowsSystem32>
I fixed the problem by editing the host file in c:windowssystem32driversetc on the 2008 server hosting Exchange:
127.0.0.1 localhost
#::1 localhost
10.0.x.x ummexc01
10.0.x.x ummexc01.ummnorva.local
Notice the hash mark in front of the IPV6 address for the local host and added two entries, the netbios name and the FQDN of the exchange server and its internal IP addresss.
OutlookAnywhere work internally but don’t work from Externally, this could be problem with IPv6 and DNS. On testing of Outlook connection internally directory services are using TCP/IP and rest using HTTPS. by applying the fix below resolved the problem.
[PS] C:WindowsSystem32>
I fixed the problem by editing the host file in c:windowssystem32driversetc on the 2008 server hosting Exchange:
127.0.0.1 localhost#::1 localhost10.0.x.x ummexc0110.0.x.x ummexc01.ummnorva.local
Notice the hash mark in front of the IPV6 address for the local host and added two entries, the netbios name and the FQDN of the exchange server and its internal IP addresss.
Exchange 2003 with iPhone
Things to remember:
Exchange is SP2 is minimum requirement and install all latest patch is recommended.
Microsoft Exchange 2003 has Service Pack 2 Installed
I would also install .Net framework 3.5 or above as well, as we are dealing with IIS and website.
Test IIS (Internet Information Server) components for proper connectivity (check event log for OMA error)
Open your browser and type: http://your-exchange-server-external–dns-name/oma
(Outlook Mobile Access) if you are using https then use that https instead of http.
Open your browser and type: http://your-exchange-server-external–dns-name/exchange
(Outlook Webmail Access) if you are using https then use that https instead of http.
Configure iPhone to your Exchange Server
There only FOUR components that are typically necessary for a proper exchange – iPhone setup
Email Address
Exchange User Id
Exchange Password
Server Address (Also known as Outlook Web Address)
If you have error on OMA try the instruction below
Method 2
Important Method 2 should be used only in an environment that has no Exchange Server 2003 front-end server. The registry changes should be made only on the server on which the mailboxes are located.
Create a secondary virtual directory for Exchange that does not require SSL, and then add a registry value to point to the new virtual directory.
Important This section, method, or task contains steps that tell you how to modify the registry. However, serious problems might occur if you modify the registry incorrectly. Therefore, make sure that you follow these steps carefully. For added protection, back up the registry before you modify it. Then, you can restore the registry if a problem occurs. For more information about how to back up and restore the registry, click the following article number to view the article in the Microsoft Knowledge Base:
322756 (http://support.microsoft.com/kb/322756/ ) How to back up and restore the registry in Windows Note These steps affect both Outlook Mobile Access connections and Exchange ActiveSync connections. After you follow these steps, both Outlook Mobile Access and Exchange ActiveSync connections use the new virtual directory that you create.
Disable the forms-based authentication for the Exchange virtual directory
To create a secondary virtual directory for Exchange that is based on steps 1 through 7 of the following procedure, make sure that forms-based authentication is disabled for the Exchange virtual directory before you make the copy. Before you follow these steps, disable forms-based authentication in Exchange System Manager. Then restart Internet Information Services (IIS). To do this, follow these steps:
Open Exchange Manager.
Expand Administrative Groups, expand the first administrative group, and then expand Servers.
Expand the server container for the Exchange Server 2003 server that you will be configuring, expand Protocols, and then expand HTTP.
Under the HTTP container, right-click the Exchange Virtual Server container, and then click Properties.
Click the Settings tab, clear the Enable Forms Based Authentication check box, and then click OK.
Close Exchange Manager.
Click Start, click Run, type IISRESET/NOFORCE, and then press ENTER to restart Internet Information Services (IIS).
Create a secondary virtual directory for Exchange server
You must use Internet IIS Manager to create this virtual directory for Exchange ActiveSync and Outlook Mobile Access to work. If you are using Windows Server 2003, follow these steps:
Start Internet Information Services (IIS) Manager.
Locate the Exchange virtual directory. The default location is as follows:
Web Sites\Default Web Site\Exchange
Right-click the Exchange virtual directory, click All Tasks, and then click Save Configuration to a File.
In the File name box, type a name. For example, type ExchangeVDir. Click OK.
Right-click the root of this Web site. Typically, this is Default Web Site. Click New, and then click Virtual Directory (from file).
In the Import Configuration dialog box, click Browse, locate the file that you created in step 4, click Open, and then click Read File.
Under Select a configuration to import , click Exchange, and then click OK.
A dialog box will appear that states that the “virtual directory already exists.”
Select the Create a new virtual directory option. In the Alias box, type a name for the new virtual directory that you want Exchange ActiveSync and Outlook Mobile Access to use. For example, type exchange-oma. Click OK.
Right-click the new virtual directory. In this example, click exchange-oma. Click Properties.
10. Click the Directory Security tab.
11. Under Authentication and access control, click Edit.
12. Make sure that only the following authentication methods are enabled, and then click OK:
Integrated Windows authentication
Basic authentication
13. On the Directory Security tab, under IP address and domain name restrictions, click Edit.
14. Click the option for Denied access, click Add, click Single computer and type the IP address of the server that you are configuring, and then click OK twice.
15. Under Secure communications, click Edit. Make sure that Require secure channel (SSL) is not enabled, and then click OK.
16. Click OK, and then close the IIS Manager.
17. Click Start, click Run, type regedit, and then click OK.
19. Right-click Parameters, click to New, and then click String Value.
20. Type ExchangeVDir, and then press ENTER. Right-click ExchangeVDir, and then click Modify.
NoteExchangeVDir is case-sensitive. If you do not type ExchangeVDir exactly as it appears in this article, ActiveSync does not find the key when it locates the exchange-oma folder.
21. In the Value data box, type the name of the new virtual directory that you created in step 8. For example, type /exchange-oma. Click OK.
22. Quit Registry Editor.
23. Restart the IIS Admin service. To do this, follow these steps:
Click Start, click Run, type services.msc, and then click OK.
In the list of services, right-click IIS Admin service, and then click Restart.
24. If you want to reuse Forms-based Authentication on the Exchange server, follow these steps to re-enable Forms-based Authentication on the /Exchange virtual directory in Exchange System Manager.
Open Exchange Manager.
Expand Administrative Groups, expand the first administrative group, and then expand Servers.
Expand the server container for the Exchange Server 2003 server that you will be configuring, expand Protocols, and then expand HTTP.
Under the HTTP container, right-click the Exchange Virtual Server container, and then click Properties.
Click the Settings tab, click to select the Enable Forms Based Authentication check box, and then click OK.
Close Exchange Manager.
Click Start, click Run, type IISRESET/NOFORCE, and then press ENTER to restart Internet Information Services (IIS).
Note If the server is Microsoft Windows Small Business Server 2003 (SBS), the name of the Exchange OMA virtual directory must be exchange-oma.
The integrated setup of Microsoft Windows Small Business Server 2003 creates the exchange-oma virtual directory in IIS. Additionally, it points the ExchangeVDir registry key to /exchange-oma during the initial installation. Other SBS wizards, such as the Configure E-mail and Internet Connection Wizard (CEICW) also expect the virtual directory name in IIS to be exchange-oma.
There are some nasty, nasty SNMP vulnerabilities that have recently been revealed. Many different products are affected. See the CERT Advisory Here. This inspired us to upgrade our Cisco. To upgrade the IOS on your Cisco router, you have a couple of options. You can either upgrade via TFTP, or you can use the console. We used a 1600 router, so the procedure below is quite specific. Your mileage may vary.
To use TFTP, you need to download and install TFTP. Here is one source for TFTP. This version also works fine on XP.
First of all, before you touch anything, you should list your configuration using the command:
show config
Print your config to paper, just in case. Your config should stay during the IOS upgrade, but you never know what could happen. You may want to make sure you have console access to the router, as well as the ability to connect to it via the ethernet port. You can temporarily change the address on the ethernet port if you wish by entering:
conf term
At the (config)# prompt select the interface:
int eth0
then
ip address x.x.x.x y.y.y.y
where x is the ip address and y is the subnet mask. Use the earlier show config command so you can set it back when you are done. You could also enter a secondary address instead. Whatever you like.
You can find out what the name of your current flash image is by:
show flash
The next thing you should do is copy your current image (flashimage) up to the TFTP server:
copy flash:flashimage tftp://ipaddress/flashimage
You should see an entry like this in the log of your tftp server:
Receiving 'flashimage' file from x.x.x.x in binary mode
Copy your current image twice if you wish, to different file names, just to be safe. Browse Cisco to be very sure you have the right image. If you load the wrong image of IOS, your router won’t work. Pay attention to the amount of RAM your system has, and how much the upgraded IOS needs. IOS 12.2 needs more RAM than 12.0, and Cisco isn’t lying about this. When you are happy you have the right image:
You will be asked if you want to erase the current image. Say yes. When it is done loading, change your eth0 IP if needed, and remove any old boot references:
conf term
no boot system flash oldflashimagename
boot system flash flashimage
exit
Now copy your config:
copy running-config startup-config
Reload, and you are set:
reload
Now, when you reboot all should come up ok. If it doesn’t, you will have to use the console port and xmodem to load an image that does work, and this is painful. Here is how to do it.
Pretty much, you just hit ctrl-break (At least with the version of HyperTerminal we used) when the router boots to get into rommon. Minicom or other terminal programs may have different sequences. Try ctrl-c, esc, etc. After you successfully enter rommon, you just:
rommon> xmodem -cf fileimagename
then, from your terminal program, send the file using xmodem. On our 1600, we had to do this at 9600 baud. We couldn’t figure out how to change our router to transfer faster than 9600, although we did see some references to how to do it. At 9600 baud, it takes about 50 minutes to reload IOS. After you are done uploading the image, remove the old boot references and copy config to start as above. If all else fails, you could go back to the flash image that you copied via TFTP.
Summary: A guide to setting up a Cisco 837 ADSL router to work with a ADSL Broadband service over a BT line. Examples of broadband services where this works are BT Broadband , Eclipse Broadband or NewNet Broadband and most ADSL over BT lines. Be careful when choosing your router that you ensure you get an ADSL router (PPPoA) if you have a BT phoneline style broadband or make sure you get a DSL router (PPPoE) if you have the NTL ethernet type. The guide should also work for the Cisco SOHO 97 router or and other cisco routers that support ADSL.
Target Audience: Anyone who wishes to use a more robust and functional router for their ADSL / broadband connection.
Scenarios:: If you have an ADSL service account that gives more than one public or static IP address. Using a Cisco 837 (and most Cisco routers with broadband ADSL) router you can use each of the IP addresses that your ISP broadband provider has given you. This is great for people who want to host their own mail or web servers. This is especially useful if you are using SSL because SSL generally requires that each website has its own dedicated IP address . Another good use is if you have a remote device such as a web camera or reboot PDU that might require it’s own public IP address. With some broadband connections you can get multiple public ip addresses for example BT business broadband you get 5 usable addresses.
Pros: Robust Router, Allows multiple IP public / WAN addresses, It can be good lesson and will assist learning Cisco IOS if you are an IT network person who is interested in this area.
Cons: More Expensive than a domestic or ‘house wife’ router from Netgear or D-Link etc. The router is not plug and play and requires more setup. The web based interface is very slow and virtually pointless so you have to get your hands dirty and enter command line statements.
Where to pick up Cisco router 837 up cheaply: You guessed it – E-bay. E-bay is full of IT professionals who are selling surplus or ‘aquired’ routers they have left over from projects or upgrades. Make sure they give you the enable password or better still reset it to default configuration and the Cisco serial cable (blue in colour normally) if you don’t have one.
Installing the Router
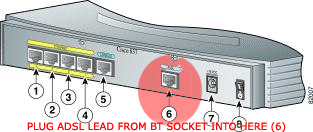
Step 1 Physically Installing the router.
The router is light weight and is not physically big. It is not rack mountable type of router so can be put on a shelf or on a cupboard. Plug in the ADSL or WAN cable into the ADSL or WAN socket labelled (6) on the below diagram and the other end into the microfilter BT socket which has the ADSL enabled.
Plug the Blue Serial cable into the back of your PC. Warning Modern laptops have done away with RS232 serial ports and just give you USB ports. You will need an RS232 type serial port to configure this router – but you can get USB to RS232 converters. Plug the other end into the console port on the back of the Cisco 837 router. You will also need to make a note of the com port you are using.
Power on the Cisco router – plug in the mains ideally into a power surge protecter if you have one (these routers aren’t cheap). And power it on with the on / off rocker switch at the back of the router.
Plug your PC’s ethernet adapter into one of the built in 4-port switch ports on the back of the Cisco 837. Assign an IP address to your PC’s ethernet work adapter. In this example my PC has an address of 192.168.1.10. Also assign a valid Internet name server or DNS server to your PC so your computer can resolve domain names such as www.google.com or www.davidstclair.co.uk.
Step 2 Setting up the Link to PC and the Router
Now your router has been physically connected to the ISP network and to your PC you are ready to configure it to talk to the PC.
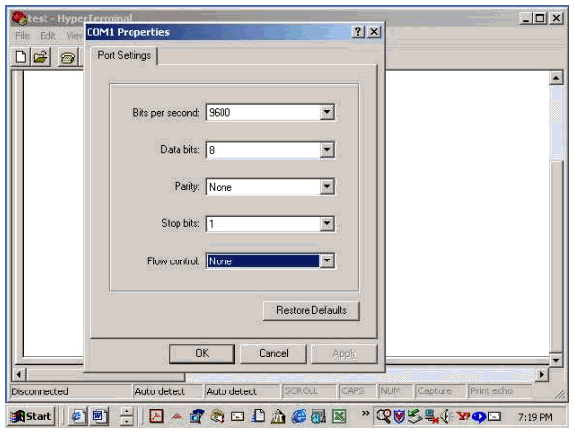
Fire up a Hyper Terminal Session (or what ever your prefered Terminal Emulator Procomm/ PUTTY works just as good). Create a new Hyperterminal connection and set the settings to be choose the com port your Cisco cable is plugged into and set up the com properties like so:
Bits per sec : 9600
Data bits : 8
Parity : none
Stop bits : 1
Flow control : none
Click okay and then hit return or enter on your PCs keyboard a couple of times. You should see a router> prompt
To alter the routers configuration we need to enter privileged mode to do that with your HyperTerminal session prompt type
enable {hit return}
You will be prompted to enter a password. If the router is at it’s factory defaults it will have no password and just hitting return key will do it. If it is not a fresh build enter the password (known as the enable password or secret password if it is using the more secure password)
Now erase the existing configuration to make sure it is nice and fresh for you to setup.
write erase {hit return}
Now reboot the unit:
reload
After a moment the router will restart
Now type
enable {hit return}
to enter privileged mode and go into configuration mode to begin configuring the router from the terminal (your hyper terminal session)
configure terminal {hit return}
Issue the command below to set a password, replace the word SECRETSQUIRRELPASSWORDYOUCHOOSE with one of your own
Setup the Ethernet interface. The following command will set your routers IP address. Set it to an IP address suitable for your network -i.e one that matches your PC. My PC is set to 192.168.1.10 so I will set this router to be the 192.168.1.1 and then return to my PCs network config and make sure my PC uses 192.168.1.1 as its default gateway. I will also use the “ip nat inside” command to let my internal PC which has an RFC1918 non publicly routable address connect to the internet.
This command will take you into ethernet0 editing mode
interface Ethernet0
These commands will configure the interface
Description Ethernet
ip address 192.168.0.1 255.255.255.0
no ip redirects
no ip unreachables
no ip proxy-arp
ip nat inside
exit this interface configuration mode
exit
Now setup the ATM interface (the broadband internet facing interace that plugs into the BT line). On the line pcv 0/38 you may have to change this to one your ISP provides you with.
interface ATM0
no ip address
no ip redirects
no ip unreachables
no ip proxy-arp
no atm ilmi-keepalive
dsl operating-mode auto
pvc 0/38
encapsulation aal5mux ppp dialer
dialer pool-member 1
exit this interface configuration mode
exit
Now setup the virtual interface called dialer0. This is where you actually put in the login details provided by your ISP. Unlike some leased lines such as an E1 or framerelay you may have setup before, you actually have to provide a chap password for the connection to work. In fact it is a bit like the ISDN routers you may have setup in the past. Remember to change the ppp chap lines in my example to suit YOUR broadband account connection details
interface Dialer0
ip address negotiated
ip virtual-reassembly
encapsulation ppp
dialer pool 1
dialer-group 1
no cdp enable
ppp authentication chap callin
ppp chap hostname myuser@adsl.user.name.com
ppp chap password 0 adslpassword
NOTE! Some ISPs require some additional chap settings. If when you type in
show ip int d0
You receive a message about ‘ip address will be assigned’ but no actual ip address has been assigned as yet you may need these additional commands:
ppp pap sent-username myuser@adsl.user.name.com 0 adslpassword
ppp ipcp mask request
ppp ipcp route default
ppp ipcp address accept
exit this interface configuration mode
exit
Setup the default route so traffic fot the net goes out via the “dialer” interface
ip route 0.0.0.0 0.0.0.0 Dialer0
Setup the NAT to allow enable traffic to pass
ip nat inside source list 1 interface Dialer0 overload
From your PC try to connect to a website
If it worked you are in business.
Write the configuration to NVRAM to the router so the device will not forget it when it is rebooted
write mem
Your Out of Office settings cannot be displayed…what’s wrong?
Ever seen this error message when you try to run the Out of Office assistant from within Outlook 2007? “Your Out of Office settings cannot be displayed, because the server is currently unavailable. Try again Later.”
You will notice this with mailboxes homed on Exchange 2007 mailbox servers, using Microsoft Office Outlook 2007. When you try to set the Out of Office assistant using Outlook Web Access, it works just fine, as can be seen below:
But what can cause this problem?
Reason 1: Wrong Autodiscover Service settings
Reason 2: Wrong certificate
Reason 3: Wrong permission settings on the EWS virtual directory.
Reason 4: Logged on with another user account
Let’s review all these reasons, and possible solutions.
Reason 1: Wrong Autodiscover Service settings
To review the settings retrieved by Outlook 2007, click on Ctrl and right-click the Outlook symbol in the System Tray, this will allow you to check the Autoconfiguration settings, as can be seen below:
If you see a wrong URL listed, like one that isn’t reachable for the client, you can change the URL by using the Exchange Management Shell cmdlet Set-WebServicesVirtualDirectory.
Reason 2: Wrong certificate
You should make sure that the certificate is a valid one, and is listed as the certificate its common name, or is one of the SAN on the certificate.
Check the URL, and check the certificate as can be seen below:
Reason 3: Wrong permission settings on the EWS virtual directory.
Out of Office assistant does not work if in IIS, the anonymous user has received permission on the EWS virtual directory! So remove the Anonymous user, and run IISRESET to restart IIS.
Reason 4: Logged on with another user account If all other reasons are not causing the problems, you may want to check this one. If you open the mailbox of user X, while logged on as user Y, your Out of Office assistant will not work, even if you have provided the credentials of user X when starting Outlook 2007! You will need to log on as user X, or you will need to start Outlook 2007 and run it as user X 🙂
How to troubleshoot a computer with Open Firmware Password enabled If you cannot access the Open Firmware Password application and need to troubleshoot your computer by:* resetting the PRAM * starting up in Single-user mode * starting up in Verbose mode * starting from CD-ROM
Then follow these steps:
1. Start up into Open Firmware by pressing and holding the Command-Option-O-F key combination during startup.
2. At the Open Firmware prompt, type: reset-nvram
3. Press Return.
4. When prompted for your password, enter it and press the Return key. It responds OK.
5. At the Open Firmware prompt, type: reset-all
6. Press Return.
The computer restarts and you are now be able to reset the PRAM and startup in Single-user mode, Verbose mode, or from CD-ROM.
Click Start, and then click Run.
In the Open box, type regedit, and then click OK.
In the navigation pane, locate and then click the following registry key:
HKEY_LOCAL_MACHINE\Software\Microsoft\WindowsNT\Current Version\WPAEvents
In the topic pane, right-click OOBETimer, and then click Modify. Change at least one digit of this value to deactivate Windows.
Click Start, and then click Run.
In the Open box, type the following command, and then click OK.
%systemroot%\system32\oobe\msoobe.exe /a
Click Yes, I want to telephone a customer service representative to activate Windows, and then click Next.
Click Change Product key.
Type the new product key in the New key boxes, and then click Update.
If you are returned to the previous window, click Remind me later, and then restart the computer