Connect a Cisco 837 router to BT ADSL
Connect a Cisco 837 router to BT ADSL
Summary: A guide to setting up a Cisco 837 ADSL router to work with a ADSL Broadband service over a BT line. Examples of broadband services where this works are BT Broadband , Eclipse Broadband or NewNet Broadband and most ADSL over BT lines. Be careful when choosing your router that you ensure you get an ADSL router (PPPoA) if you have a BT phoneline style broadband or make sure you get a DSL router (PPPoE) if you have the NTL ethernet type. The guide should also work for the Cisco SOHO 97 router or and other cisco routers that support ADSL.
Target Audience: Anyone who wishes to use a more robust and functional router for their ADSL / broadband connection.
Scenarios:: If you have an ADSL service account that gives more than one public or static IP address. Using a Cisco 837 (and most Cisco routers with broadband ADSL) router you can use each of the IP addresses that your ISP broadband provider has given you. This is great for people who want to host their own mail or web servers. This is especially useful if you are using SSL because SSL generally requires that each website has its own dedicated IP address . Another good use is if you have a remote device such as a web camera or reboot PDU that might require it’s own public IP address. With some broadband connections you can get multiple public ip addresses for example BT business broadband you get 5 usable addresses.
Pros: Robust Router, Allows multiple IP public / WAN addresses, It can be good lesson and will assist learning Cisco IOS if you are an IT network person who is interested in this area.
Cons: More Expensive than a domestic or ‘house wife’ router from Netgear or D-Link etc. The router is not plug and play and requires more setup. The web based interface is very slow and virtually pointless so you have to get your hands dirty and enter command line statements.
Where to pick up Cisco router 837 up cheaply: You guessed it – E-bay. E-bay is full of IT professionals who are selling surplus or ‘aquired’ routers they have left over from projects or upgrades. Make sure they give you the enable password or better still reset it to default configuration and the Cisco serial cable (blue in colour normally) if you don’t have one.
Installing the Router
Step 1 Physically Installing the router.
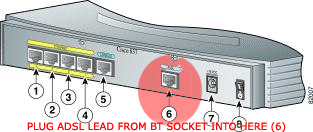
The router is light weight and is not physically big. It is not rack mountable type of router so can be put on a shelf or on a cupboard. Plug in the ADSL or WAN cable into the ADSL or WAN socket labelled (6) on the below diagram and the other end into the microfilter BT socket which has the ADSL enabled.
Plug the Blue Serial cable into the back of your PC. Warning Modern laptops have done away with RS232 serial ports and just give you USB ports. You will need an RS232 type serial port to configure this router – but you can get USB to RS232 converters. Plug the other end into the console port on the back of the Cisco 837 router. You will also need to make a note of the com port you are using.
Power on the Cisco router – plug in the mains ideally into a power surge protecter if you have one (these routers aren’t cheap). And power it on with the on / off rocker switch at the back of the router.
Plug your PC’s ethernet adapter into one of the built in 4-port switch ports on the back of the Cisco 837. Assign an IP address to your PC’s ethernet work adapter. In this example my PC has an address of 192.168.1.10. Also assign a valid Internet name server or DNS server to your PC so your computer can resolve domain names such as www.google.com or www.davidstclair.co.uk.
Step 2 Setting up the Link to PC and the Router
Now your router has been physically connected to the ISP network and to your PC you are ready to configure it to talk to the PC.
Fire up a Hyper Terminal Session (or what ever your prefered Terminal Emulator Procomm/ PUTTY works just as good). Create a new Hyperterminal connection and set the settings to be choose the com port your Cisco cable is plugged into and set up the com properties like so:
Bits per sec : 9600
Data bits : 8
Parity : none
Stop bits : 1
Flow control : none
Click okay and then hit return or enter on your PCs keyboard a couple of times. You should see a router> prompt
To alter the routers configuration we need to enter privileged mode to do that with your HyperTerminal session prompt type
enable {hit return}
You will be prompted to enter a password. If the router is at it’s factory defaults it will have no password and just hitting return key will do it. If it is not a fresh build enter the password (known as the enable password or secret password if it is using the more secure password)
Now erase the existing configuration to make sure it is nice and fresh for you to setup.
write erase {hit return}
Now reboot the unit:
reload
After a moment the router will restart
Now type
enable {hit return}
to enter privileged mode and go into configuration mode to begin configuring the router from the terminal (your hyper terminal session)
configure terminal {hit return}
Issue the command below to set a password, replace the word SECRETSQUIRRELPASSWORDYOUCHOOSE with one of your own
enable secret SECRETSQUIRRELPASSWORDYOUCHOOSE {hit return}
Setup the Ethernet interface. The following command will set your routers IP address. Set it to an IP address suitable for your network -i.e one that matches your PC. My PC is set to 192.168.1.10 so I will set this router to be the 192.168.1.1 and then return to my PCs network config and make sure my PC uses 192.168.1.1 as its default gateway. I will also use the “ip nat inside” command to let my internal PC which has an RFC1918 non publicly routable address connect to the internet.
This command will take you into ethernet0 editing mode
interface Ethernet0
These commands will configure the interface
Description Ethernet
ip address 192.168.0.1 255.255.255.0
no ip redirects
no ip unreachables
no ip proxy-arp
ip nat inside
exit this interface configuration mode
exit
Now setup the ATM interface (the broadband internet facing interace that plugs into the BT line). On the line pcv 0/38 you may have to change this to one your ISP provides you with.
interface ATM0
no ip address
no ip redirects
no ip unreachables
no ip proxy-arp
no atm ilmi-keepalive
dsl operating-mode auto
pvc 0/38
encapsulation aal5mux ppp dialer
dialer pool-member 1
exit this interface configuration mode
exit
Now setup the virtual interface called dialer0. This is where you actually put in the login details provided by your ISP. Unlike some leased lines such as an E1 or framerelay you may have setup before, you actually have to provide a chap password for the connection to work. In fact it is a bit like the ISDN routers you may have setup in the past. Remember to change the ppp chap lines in my example to suit YOUR broadband account connection details
interface Dialer0
ip address negotiated
ip virtual-reassembly
encapsulation ppp
dialer pool 1
dialer-group 1
no cdp enable
ppp authentication chap callin
ppp chap hostname myuser@adsl.user.name.com
ppp chap password 0 adslpassword
NOTE! Some ISPs require some additional chap settings. If when you type in
show ip int d0
You receive a message about ‘ip address will be assigned’ but no actual ip address has been assigned as yet you may need these additional commands:
ppp pap sent-username myuser@adsl.user.name.com 0 adslpassword
ppp ipcp mask request
ppp ipcp route default
ppp ipcp address accept
exit this interface configuration mode
exit
Setup the default route so traffic fot the net goes out via the “dialer” interface
ip route 0.0.0.0 0.0.0.0 Dialer0
Setup the NAT to allow enable traffic to pass
ip nat inside source list 1 interface Dialer0 overload
From your PC try to connect to a website
If it worked you are in business.
Write the configuration to NVRAM to the router so the device will not forget it when it is rebooted
write mem
Categorised as: Cisco, Hardware/Software, Networking
Leave a Reply
You must be logged in to post a comment.