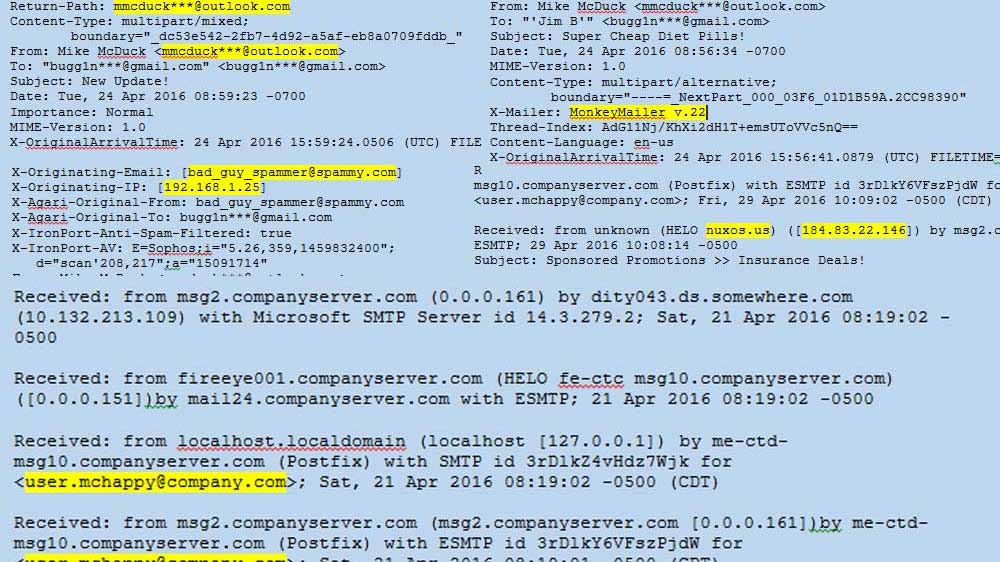
Email headers contain important information about the origin and path an email took before arriving at its final destination, including the sender’s IP address, internet service provider, email client, and even location. The information could be used to block future emails from the sender (in the case of spam) or to determine the legitimacy of a suspicious email. A review of the headers can also help to identify “header spoofing,” a strong indication the email was sent with malicious intent.
Understanding the Header Fields
Email headers are read chronologically from the bottom up and can be broken down into three main categories: 1) Message Information 2) X-Headers and 3) Server Relay Information. There is a convenient tool for analyzing headers available online at http://mxtoolbox.com/EmailHeaders.aspx. Simply copy and paste the headers into the tool, and it will analyze the server relays and convert the headers into an easy to read format.
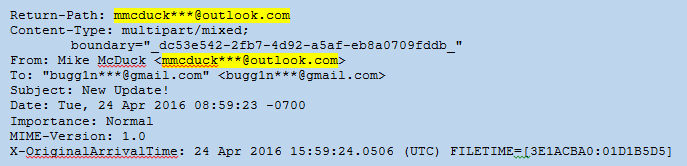
Message Information: Includes commonly recognized email header fields, such as To:, From:, Subject:, Date:, To:, as well as useful fields like Message-ID:, Return-Path:, ReplyTo:, among others. These fields are the most easily spoofed because they are specified by the sender’s mail client. They are usually found near the bottom of the headers as they are the first to be added.
Figure 1: Headers – Message Info
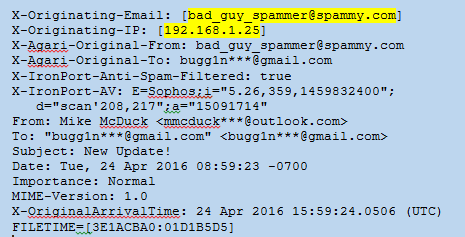
X-Headers: These fields are added to the email by security devices such as email anti-virus scanners as it traverses the internet and internal networks. The X-Headers may not be in order and are often intermixed within the Message Info and Server Relay headers. Not all X-Headers will be present in every case. In the example below there is an X-Originating-Email: that reveals the true sender was bad_guy_spammer@spammy.com and not mmcduck***@outlook.com. Sometimes there is an X-Originating-IP as well. The headers below also show that the email was scanned by Agari Email Security and IronPort devices.
Figure 2: Headers – X-Headers
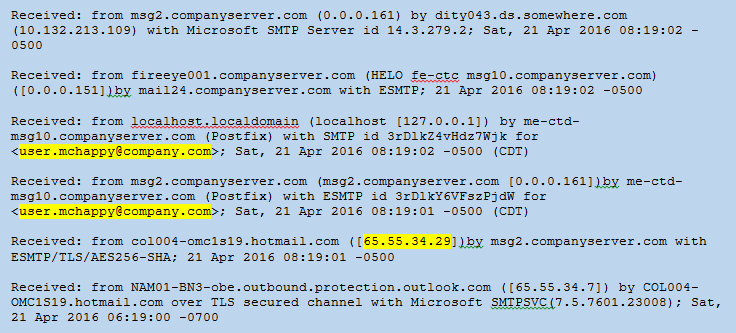
Server Relay Information: Each time a server relay receives an SMTP message, it will add a new Received: line at the beginning of the header block. A typical email received by a user on a corporate network will show many server relays both before and after being delivered to the corporate email servers (companyserver.com). These will be in chronological order starting from the bottom up.
Figure 3: Headers: Server Relay
Analyzing Headers
By analyzing the server relay information in chronological order from the bottom-up, you can get a picture of where the message travelled. Each receiving mail server adds the name and IP address of the server that delivered the message. The server name may reveal the domain of the sender relay, and a Who-Is lookup of the IP may give you a geographic location. In the case of messages sent via Gmail and other large email service providers, this may only lead you back to the location of the email servers or even the corporate headquarters of the provider (i.e. Mountain View, CA). If you are lucky, the headers will include an X-Originating-IP that may reveal the sender’s internet service provider and narrow down the sender’s location.
If you are looking at spam email headers from a network security perspective, it is important to identify the IP address/domain that delivered the email to your frontline email server, the security device in front of your email server. This is called the “originating IP” (not the same as X-Originating-IP). It is the first field added to the headers that can be 100% trusted because it was added by your own security device/server. The server relay header will read “Received: from some.external.domain ([some.IP]) by your.company.device ([your.IP]).” Potentially, everything before this entry could be spoofed, but, as your server is reporting it received an email from some.external.domain ([some.IP]) and is the one adding it to the headers, you should be able to trust it. Once you know which external IP delivered the message, there is a free reputation service provided by Cisco at https://www.senderbase.org/. The service gives IP addresses and domains a reputation rating (Known spammer IP’s and domains received “Poor” reputations). The originating IPs can be blocked at the externally facing firewalls on a case by case basis, by reputation, or both. Figure 4 shows an email received by msg2.companyserver.com and the originating IP/domain is highlighted. Figure 5 shows the “Poor” rating the IP received from SenderBase.org.
Figure 4: Headers – Originating IP
Figure 5: SenderBase.org – Reputation Rating
It is important to look for evidence of spoofing or alteration of header data in the Message Information headers. The spammer can easily alter these headers within their email client or by using specialized software. The most common field to spoof is the From: field. In the example in Figure 2, the sender changed the From: field to display “Mike McDuck <mmcduck***@outlook.com>” but the true sender was revealed by the X-Originating-Email field. It is not uncommon for spammers to use the recipient’s own name and email address in the From: field in order to increase the chances the recipient will open the email (“Why did I send this email to myself?”). The spammer will use any trick he or she can think of to deceive the recipient. Keep in mind the Return-Path: and Reply-To: can also be spoofed, depending on whether the spammer wants to receive the reply messages or not. Sometimes the To: field will also be altered to hide the intended recipient’s address.
The Message-ID is another good place to identify spoofing. The Message-ID is a unique identifier of digital messages and is difficult to alter as it is added by the mail server that processes the email. Because it has to be unique, it is common for message systems to use a date/time stamp followed by the sender’s domain name (example: CAF4Ths+hsd84G9sedaD@mail.gmail.com). If the sender domain in the From: field does not match the Message-ID, you might be dealing with a spoofed message.
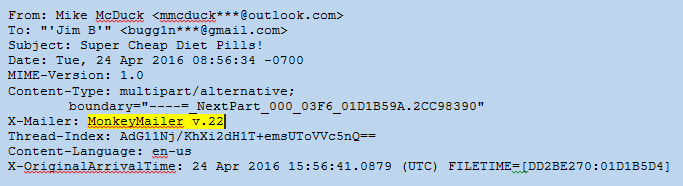
The majority of spam emails are generated by servers capable of producing millions of messages per day. Sometimes those servers are running programs that populate the “X-Mailer” field with the name of the mail client that was used. Legitimate emails will usually include a known mail client (i.e. Microsoft Outlook 16.0, Outlook Express, iPad Mail), but the spammer mail clients may be something less common (see Figure 6) or even obscured through random, nonsense characters.
Figure 6: Headers – Mail Client
Now What?
At first glance, email headers can seem confusing and overwhelming. Once you begin to understand the fields in the headers and what they can reveal about the message, you will find very useful information buried in the seemingly endless lines of text. The next step will be determining what you can do with the evidence you find. Stay tuned to for future blog posts on using the headers to identify/block spam and to detect targeted phishing emails.
When sending from a Mobile device via the ActiveSync service the device fails to send.
Some devices may return an error indicating that “The message that was sent to the server was rejected because the message was too large”. (Apple iPad iOS). Not all mobile devices behave this way and may just keep the message in the outbox folder and retried until removed from the folder.
CAUSE
Ther are number of reasons, couple of them listed below.
CAUSE 1
First one I have found is ActiveSync limit set to 10MB (%ExchangeInstallPath%ClientAccess\Sync\web.config maxRequestLength=”10240″)
CAUSE 2
A global IIS restriction preventing uploads larger than 49152 Bytes.
IIS 7.5 sets a default value of 49152 Bytes for the “UploadReadAheadSize” value which limits the amount of bytes allowed in the entity body of a request and the number of bytes a Web server will read into a buffer and pass to an ISAPI extension.
Diagnosis:
Navigate within IIS to the “Sites” node.
Determine the ID for the “MailEnable Protocols” website
Next navigate to the IIS log files path: C:\inetpub\logs\LogFiles
Locate the W3SVC(ID) folder, where ID is the number of the website ID above in step 2.
Sort the log files by “Date Modified’ and then open the latest log files in respect to the date/time you sent the message from the mobile device.
The above log snippets report a 413 error in the line which indicates the “Request Entity is too large”.
CAUSE 3
Incorrect authentication settings in Exchange Server Virtual Directory.
RESOLUTION – 1
Change the limit set on web.config, note this settings below for Frontend backed servers with different CAS and Mailbox server. For single server web.config is located in
C:\Program Files\Microsoft\Exchange Server\v14\ClientAccess\Sync\web.config has the following lines of code:
<system.web> <!– Allow maximum 10 megs of content –> <httpRuntime madRequestLength=”10240″ />
maxAllowedContentLength="30000000 bytes" Not present by default (see comments).
bytes
Mailbox
%ExchangeInstallPath%ClientAccess\Sync\web.config
maxRequestLength="10240"
kilobytes
Mailbox
%ExchangeInstallPath%ClientAccess\Sync\web.config
<add key="MaxDocumentDataSize" value="10240000">
bytes
Comments on ActiveSync limits
By default, there is no maxAllowedContentLength key in the web.config files for ActiveSync. However, the maximum message size for ActiveSync is affected by the maxAllowedContentLength value that is applied to all web sites on the server. The default value is 30000000 bytes (30 MB). To see these values for ActiveSync on Client Access Servers and Mailbox servers in IIS Manager, perform the following steps:
Do one of the following steps:
On Client Access servers, open IIS Manager, navigate to Sites > Default Web Site and select Microsoft-Server-ActiveSync.
On Mailbox servers, open IIS Manager, navigate to Sites > Exchange Back End and select Microsoft-Server-ActiveSync.
Verify Features View is selected, and double-click Configuration Editor in the Management section.
Click the dropdown arrow in the Section field, navigate to system.webServer > security and select requestFiltering.
In the results, expand requestLimits, and you’ll see maxAllowedContentLength and the default value 30000000 (bytes).
To change the maxAllowedContentLength value, enter a new value in bytes, and click Apply. You need to change the value on Client Access servers and on Mailbox servers. After you change the value in IIS Manager, a new maxAllowedContentLength key is written to the corresponding web.config file (%ExchangeInstallPath%FrontEnd\HttpProxy\Sync\web.config on Client Access servers, and %ExchangeInstallPath%ClientAccess\Sync\web.config on Mailbox servers).
To change the maximum message size for ActiveSync clients, you need to change the value of maxRequestLength in the web.config file on Client Access servers and Mailbox servers, MaxDocumentDataSize in the web.config file on Mailbox servers, and maxAllowedContentLength in IIS Manager on Client Access servers and Mailbox servers.
RESOLUTION – 2
Open a Windows command prompt with administrator rights and navigate to the following location: C:\inetpub\AdminScripts
Run the following command: cscript adsutil.vbs set w3svc/14/uploadreadaheadsize 51200000
Where “14” in the above command is the website ID
RESOLUTION – 3
Check the virtual directory authentication settings in the Exchange server for EWS (Default Web Site), it should be Integrated windows authentication only and for
Microsoft-Server-ActiveSync (Default Web Site) authentication set to Basic authentication and ignore client certificate
If you are an Exchange administrator, then using the Set-MailboxAutoReplyConfiguration Exchange PowerShell command is the supported and native way to go to enable Automatic Replies without logging on to the mailbox itself.
So onto the printer side. Open the webpage to configure the device (Enhanced web Service, shortened from here on as EWS)
EWS > Connectivity > SMTP
Which will show you this (normally I would pre-fill this with your settings, but since I don’t know your settings because of your SMTP server not showing them on its website, I’m using GMAIL as my example.
Basically:
1. Device Email and SMTP AUTH user name have to match
2. The 2 password boxes are pretty self-evident.
3. Validation Type absolutley needs to be set to On Device
4. SMTP server address is whatever Media Temple says to use from the link above, the port number too, and the Connection Security (maybe called Encryption) too.
Of course the SMTP server name can be the IP address or the hostname of the server, but to use the hostname, you have to make sure DNS is correct on the printer EWS > Connectivity > Ethernet > DNS > Edit
And if HTTPS is enabled on the printer, or SSL/TLS/STARTTLS is being used for Encryption, then the time must be correct to within 3 minutes EWS > System > Date& Time
If you set it up correctly and get odd faults (017-714 for instance, try updating the firmware, the launch firmware has issues with SHA-2), you can get the latest firmware right here
“From” email in HESK settings (General tab) is set to your Office365 email address
“From” name in HESK settings (General tab) is NOT set to an email address – Microsoft security policies will reject sending emails if the From name is an email address
» POP3 fetching
To fetch mail from Office365 server enter these details:
Open up SSMS RUN AS ADMINISTRATOR and connect here:\\.\pipe\MICROSOFT##WID\tsql\query
Open a query window, run this query:
SELECT TOP 1000 [Id],[Name] FROM [RDCms].[rds].[Server]
Look at the list of servers in the NAME column. Find your dead server and note the ID number in the ID column. For this example, lets say my id is “5”. The ID for your system will most likely be different so don’t just copy and paste the below commands, make sure you change the ID to what you actually need to remove.
—-MAKE SURE YOU HAVE A DATABASE BACKUP OR SYSTEM CHECKPOINT OR SYSTEM BACKUP OR SOMETHING BEFORE PROCEEDING—-
Run the following query to remove the dead SESSION HOST server from the database:
use RDCms; delete from rds.RoleRdsh where ServerID = ‘5’;
I also needed to remove the server from the rds.Server table:
use RDCms; delete from rds.Server where Id = ‘5’;
Note, the above covers the session host role. If you have a server with other roles there are other tables you can look at and delete by id. Just right-click on the table (after drilling down in object explorer in to the RDCms database) and “Select Top 1000 rows” to see if your server ID is listed there.
You can use the following powershell command from an elevated powershell prompt (before and after to confirm the server is gone) to list out RDS servers:get-RDServer
—
Conclusion: Once everything is deleted out of the DB, close SSMS and then close and re-open Server Manager. Now you can get to your Remote Desktop Services management screen and get on with your life!
I can’t seem to download emails on my iPhone, can sign into OWA and get it working on any version on Outlook, but it won’t download email on iPhone.
I’m able to successfully configure the email on phone but when I go into the mail app, and try to download the emails, I get an error “the connection to the server failed”.
FIX: Issue was the DCs weren’t replicating. Once I forced it to replicate in Sites and Services, emails started coming in automatically.
Description: PowerShell cmdlet to view inbox rules is Get-InboxRule. First grab all mailboxes in the organisation and store the UserPrincipalName in a variable. Here we are storing it in a variable called “Users”
Then for each user we are going to get the InboxRule and select several attributes:
MailboxOwnerID
Name
Description
Enabled
RedirectTo
MoveToFolder
ForwardTo
The entire list of attributes we can grab per mailbox is:
Enabled
Identity
InError
ErrorType
Name
Priority
RuleIdentity
SupportedByTask
Legacy
BodyContainsWords
ExceptIfBodyContainsWords
FlaggedForAction
ExceptIfFlaggedForAction
FromAddressContainsWords
ExceptIfFromAddressContainsWords
From
ExceptIfFrom
HasAttachment
ExceptIfHasAttachment
HasClassification
ExceptIfHasClassification
HeaderContainsWords
ExceptIfHeaderContainsWords
FromSubscription
ExceptIfFromSubscription
MessageTypeMatches
ExceptIfMessageTypeMatches
MyNameInCcBox
ExceptIfMyNameInCcBox
MyNameInToBox
ExceptIfMyNameInToBox
MyNameInToOrCcBox
ExceptIfMyNameInToOrCcBox
MyNameNotInToBox
ExceptIfMyNameNotInToBox
ReceivedAfterDate
ExceptIfReceivedAfterDate
ReceivedBeforeDate
ExceptIfReceivedBeforeDate
RecipientAddressContainsWords
ExceptIfRecipientAddressContainsWords
SentOnlyToMe
ExceptIfSentOnlyToMe
SentTo
ExceptIfSentTo
SubjectContainsWords
ExceptIfSubjectContainsWords
SubjectOrBodyContainsWords
ExceptIfSubjectOrBodyContainsWords
WithImportance
ExceptIfWithImportance
WithinSizeRangeMaximum
ExceptIfWithinSizeRangeMaximum
WithinSizeRangeMinimum
ExceptIfWithinSizeRangeMinimum
WithSensitivity
ExceptIfWithSensitivity
ApplyCategory
ApplySystemCategory
CopyToFolder
DeleteMessage
DeleteSystemCategory
ForwardAsAttachmentTo
ForwardTo
MarkAsRead
MarkImportance
MoveToFolder
PinMessage
RedirectTo
SendTextMessageNotificationTo
StopProcessingRules
MailboxOwnerId
IsValid
ObjectState
RunspaceId
Description
Finally, export the information to a CSV. The -Append parameter is necessary so it doesn’t overwrite the csv file as it moves onto the next mailbox.
PowerShell Script :
NOTE: To run in Office 365 you must first connect to Office 365