Installing your OwnCloud on Windows Server 2008

Windows 7 and Windows Server 2008
You must move the data directory outside of your public root. (See advanced install settings)
This section describes how to install ownCloud on Windows with IIS.
It assumes that you have a vanilla, non-IIS enabled Windows machine – Windows 7 or Server 2008. After enabling IIS, the steps are essentially identical for Windows 7 and Windows Server 2008.
For installation, physical access or a remote desktop connection is required. You should leverage MySQL as the back end database for ownCloud. If you do not want to use MySQL, it is possible to use Postgres or SQLite instead. Microsoft SQL Server is not yet support.
Enabling SSL is not yet covered by this section.
If you make your desktop machine or server available outside your LAN, you must maintain it. Monitor the logs, manage the access, apply patches to avoid compromising the system at large.
There are 4 primary steps to the installation, and then a 5th step required for configuring everything to allow files larger than the default 2MB.
- Install IIS with CGI support – enable IIS on your Windows machine.
- Install PHP – Grab, download and install PHP.
- Install MySQL – Setup the MySQL server manager and enable ownCloud to create an instance.
- Install ownCloud – The whole reason we are here!
- Configure upload sizes and timeouts to enable large file uploads – So that you can upload larger files.
Activate IIS with CGI Support
Windows 7
- Go to Start –> Control Panel –> Programs.
- Under Programs and Features, there is link titled Turn Windows Features on and Off. Click on it.
- There is a box labeled Internet Information Services, expand it.
- Expand World Wide Web Services and all the folders underneath.
- Select the folders as illustrated in the picture below to get your IIS server up and running.
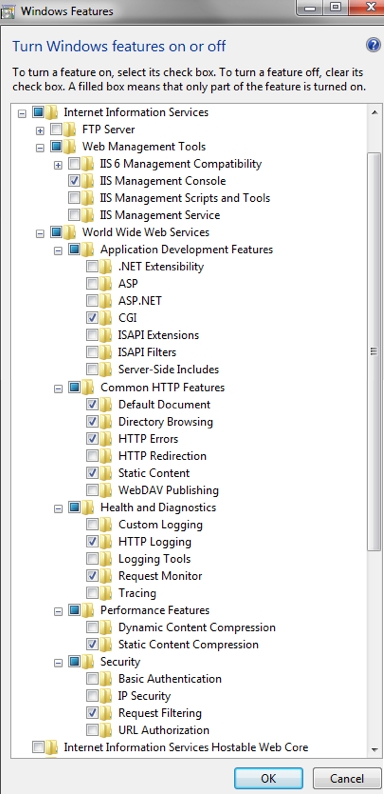 Windows Features required for ownCloud on Windows 7
You do not need an FTP server running, so you should tune that feature off for your server. You definitely need the IIS Management Console, as that is the easiest way to start, stop, restart you server, as well as where you change certificate options and manage items like file upload size. You must check the CGI box under Application Development Features, because CGI is how you enable PHP on IIS.
You have to turn off WebDAV publishing or the Windows WebDAV conflicts with the ownCloud WebDAV interface. This might already be turned off for you, just make sure it stays that way. The common HTTP features are the features you would expect from a web server. With the selections on this page, IIS will now serve up a web page for you.
Restart IIS by going to the IIS manager (Start –> IIS Manager). Select your website, and on the far right side is a section titled Manage Server. Make sure that the service is started, or click Start to start the services selected. Once this is complete, you should be able to go to a web browser and navigate to http://localhost`.
This should open the standard IIS 7 splash page, which is just a static image that says your web server is running. Assuming you were able to get the splash page, it is safe to say your web server is now up and running.
Windows Server 2008
- Go to Start –> Control Panel –> Programs.
- Under Programs and Features, there is link titled Turn Windows Features on and Off. Click on it.
- This will bring up the Server Manager.
- In the server manager, Click on Roles, and then click Add Roles.
- Use the Add Roles Wizard to add the web server role.
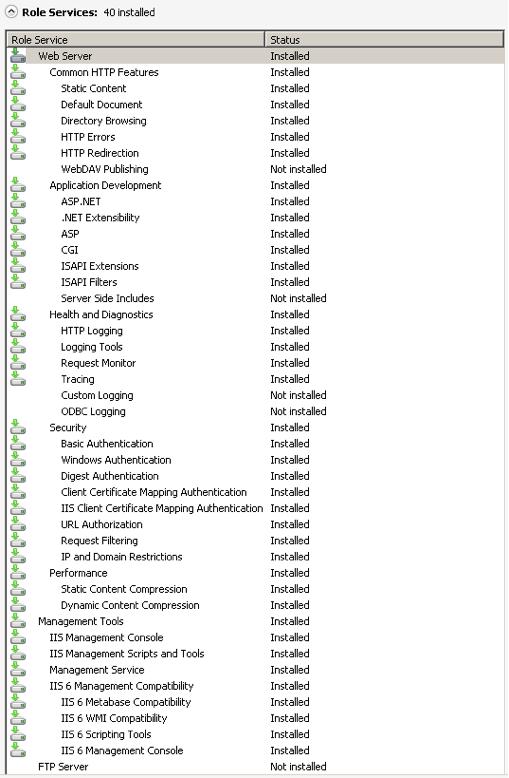 Server roles required for ownCloud
- Make sure that, at a minimum, the same boxes are checked in this wizard that are checked in the Windows 7 Section. For example, make sure that the CGI box is checked under Application Development Features, and that WebDAV Publishing is turned off. With Remote Desktop Sharing turned on, the detailed role service list looks like the figure “Role Services”.
- Restart IIS by going to the IIS manager (Start –> IIS Manager).
- Select your website, and on the far right side is a section titled Manage Server. Make sure that the service is started, or click “Start” to start the services selected.
- Once this is complete, you should be able to go to a web browser and type “localhost”. This should open the standard IIS 7 splash page, which is just a static image that says your web server is running.Assuming you were able to get the splash page, it is safe to say your web server is now up and running. The next part of this “how to” installs PHP on the server.
Installing PHP
This part is also straightforward, but it is necessary to remind you that this is for IIS only.
- Go to the following link and grab the PHP installer for version “VC9 Non Thread Safe” 32 or 64 bit based on your system. http://windows.php.net/download/
If you are using Apache, make sure you grab VC6 instead, lower on the page.
- Once through that login, select the location that is closest to you geographically.
- Run that install wizard once it is downloaded. Read the license agreement, agree, select an install directory.
- Then select IIS FastCGI as the install server.
- Take the default selections for the items to install, and click next. Then click install.
- And, after a few minutes, PHP will be installed. On to MySQL.
Installing MySQL
This part installs MySQL on your Windows machine.
- Point your browser to http://dev.mysql.com/downloads/ and download the latest community edition for your OS – the 32 or 64 bit version. Please download the MSI Installer as it will make life easier.
- Once downloaded, install MySQL (5.5 at the time of writing). Select the Typical installation.
- When that finishes, check the box to launch the MySQL Instance Configuration Wizard and click Finish.
- Select a standard configuration, as this will be the only version of MySQL on this machine.
- Select to install as a windows service, and Check the Launch the MySQL Server Automatically button.
- Select the modify security settings box on the next page, and enter a password you will remember. You will need this password when you configure ownCloud.
- Uncheck enable root access from remote machines” for security reasons.
- Click execute, and wait while the instance is created and launched.
- Click Finish when this is all complete.
Take particular note of your MySQL password, as the user name root and the password you select will be necessary alter on in the ownCloud installation. As an aside, this link is an excellent resource for questions on how to configure your MySQL instance, and also to configure PHP to work with MySQL. This, however, is not strictly necessary as much of this is handled when you download ownCloud.
More information in this topic can be found in a tutorial on the IIS web site.
Installing ownCloud
- Download the latest version of ownCloud from http://owncloud.org/download.
- It will arrive as a tar.bz2 file, and I recommend something like jZip for a free utility to unzip it.
- Once you have the ownCloud directory unzipped and saved locally, copy it into your wwwroot directory (probablyc:inetpubwwwroot).
You cannot install directly into the directory wwwroot from jzip, as only the administrator can unzip into the wwwroot directory. If you save it in a different folder, and then move the files into wwwroot in Windows explorer, it works. This will install ownCloud locally in your root web directory. You can use a subdirectory called owncloud, or whatever you want – the www root, or something else.
- It is now time to give write access to the ownCloud directory to the ownCloud server: Navigate your windows explorer over to inetpub/wwwroot/owncloud (or your installation directory if you selected something different).
- Right click and select properties. Click on the security tab, and click the button “to change permissions, click edit”.
- Select the “users” user from the list, and check the box “write”.
- Apply these settings and close out.
- Now open your browser and go to http://localhost/owncloud (or localhost if it is installed in the root www directory). This should bring up the ownCloud configuration page.
- At this page, you enter your desired ownCloud user name and password for the administrator, and expand the little arrow.
- Select MySQL as the database, and enter your MySQL database user name, password and desired instance name – use the user name and password you setup for MySQL earlier in step 3, and pick any name for the database instance.
The owncloud admin password and the MySQL password CANNOT be the same in any way.
- Click next, and ownCloud should have you logged in as the admin user, and you can get started exploring ownCloud, creating other users and more!
Configuring ownCloud, PHP and IIS for Large File Uploads
Before going too nuts on ownCloud, it is important to do a couple of configuration changes to make this a useful service for you. You will probably want to increase the max upload size, for example. The default upload is set to 2MB, which is too small for even most MP3 files.
To do that, simply go into your PHP.ini file, which can be found in your C:Program Files (x86)PHP folder. In here, you will find a PHP.ini` file. Open this in a text editor, and look for a few key attributes to change:
- upload_max_filesize – change this to something good, like 1G, and you will get to upload much larger files.
- post_max_size – also change this size, and make it larger than the max upload size you chose, like 1G.
There are other changes you can make, such as the timeout duration for uploads, but for now you should be all set in the PHP.ini file.
Now you have to go back to IIS manager and make one last change to enable file uploads on the web server larger than 30MB.
- Go to the start menu, and type iis manager.
- Open IIS Manager Select the website you want enable to accept large file uploads.
- In the main window in the middle double click on the icon Request filtering.
- Once the window is opened you will see a bunch of tabs across the top of the far right,Select Edit Feature Settings and modify the Maximum allowed content length (bytes)
- In here, you can change this to up to 4.1 GB.
This entry is in BYTES, not KB.
You should now have ownCloud configured and ready for use.
TROUBLESHOOTING
If you get error below:
ownCloud is NOT installed
download of ownCloud source file failed.
SSL certificate problem, verify that the CA cert is OK. Details: error:14090086:SSL routines:SSL3_GET_SERVER_CERTIFICATE:certificate verify failedSSL certificate problem, verify that the CA cert is OK. Details: error:14090086:SSL routines:SSL3_GET_SERVER_CERTIFICATE:certificate verify failed
Set this two options below to FALSE in the webinstaller php file (i.e: setup-owncloud.php):
curl_setopt($ch, CURLOPT_CERTINFO, TRUE);
curl_setopt($ch, CURLOPT_SSL_VERIFYPEER, TRUE);
from TRUE to FALSE and try again.
If you get error with time zone
Make the following change for time zone in your php.ini file under Module settings
date.timezone =”Europe/London”
Categorised as: Hardware/Software
Leave a Reply
You must be logged in to post a comment.