Memorise

Unable to open ILO3 with TLS 1.2

In this case I was unable to connect to ILO3 on HP DL 380 G7 with Internet Explorer 11 from Windows 8.1 client workstation. ILO Firmware version was 1.20. Starting from Windows 8.1 and Internet Explorer 11 all TLS protocols are enabled and supported by default:

ILO was not failing back to lower version of TLS if TLS 1.2 was selected. After unselecting TLS 1.2 from Internet Explorer 11, I was able to connect to ILO interface. This is issue was resolved with later version ILO firmware. So, after patching the server with latest ILO firmware, I was able to connect to ILO3 interface using Internet Explorer 11 with TLS 1.2  selected.


Subnet Mask Cheat Sheet

IPv4 Subnet Mask Cheat Sheet


Addresses Netmask Amount of a Class C
/31 2 255.255.255.254 1/128
/30 4 255.255.255.252 1/64
/29 8 255.255.255.248 1/32
/28 16 255.255.255.240 1/16
/27 32 255.255.255.224 1/8
/26 64 255.255.255.192 1/4
/25 128 255.255.255.128 1/2
/24 256 255.255.255.0 1
/23 512 255.255.254.0 2
/22 1024 255.255.252.0 4
/21 2048 255.255.248.0 8
/20 4096 255.255.240.0 16
/19 8192 255.255.224.0 32
/18 16384 255.255.192.0 64
/17 32768 255.255.128.0 128
/16 65536 255.255.0.0 256
/15 131072 255.254.0.0 512
/14 262144 255.252.0.0 1024
/13 524288 255.248.0.0 2048
/12 1048576 255.240.0.0 4096
/11 2097152 255.224.0.0 8192
/10 4194304 255.192.0.0 16384
/9 8388608 255.128.0.0 32768
/8 16777216 255.0.0.0 65536

Guide to IPv4 subnets

/25 — 2 Subnets — 126 Hosts/Subnet

Network # IP Range Broadcast
.0 .1-.126 .127
.128 .129-.254 .255

/30 — 64 Subnets — 2 Hosts/Subnet

Network # IP Range Broadcast
.0 .1-.2 .3
.4 .5-.6 .7
.8 .9-.10 .11
.12 .13-.14 .15
.16 .17-.18 .19
.20 .21-.22 .23
.24 .25-.26 .27
.28 .29-.30 .31
.32 .33-.34 .35
.36 .37-.38 .39
.40 .41-.42 .43
.44 .45-.46 .47
.48 .49-.50 .51
.52 .53-.54 .55
.56 .57-.58 .59
.60 .61-.62 .63
.64 .65-.66 .67
.68 .69-.70 .71
.72 .73-.74 .75
.76 .77-.78 .79
.80 .81-.82 .83
.84 .85-.86 .87
.88 .89-.90 .91
.92 .93-.94 .95
.96 .97-.98 .99
.100 .101-.102 .103
.104 .105-.106 .107
.108 .109-.110 .111
.112 .113-.114 .115
.116 .117-.118 .119
.120 .121-.122 .123
.124 .125-.126 .127
.128 .129-.130 .131
.132 .133-.134 .135
.136 .137-.138 .139
.140 .141-.142 .143
.144 .145-.146 .147
.148 .149-.150 .151
.152 .153-.154 .155
.156 .157-.158 .159
.160 .161-.162 .163
.164 .165-.166 .167
.168 .169-.170 .171
.172 .173-.174 .175
.176 .177-.178 .179
.180 .181-.182 .183
.184 .185-.186 .187
.188 .189-.190 .191
.192 .193-.194 .195
.196 .197-.198 .199
.200 .201-.202 .203
.204 .205-.206 .207
.208 .209-.210 .211
.212 .213-.214 .215
.216 .217-.218 .219
.220 .221-.222 .223
.224 .225-.226 .227
.228 .229-.230 .231
.232 .233-.234 .235
.236 .237-.238 .239
.240 .241-.242 .243
.244 .245-.246 .247
.248 .249-.250 .251
.252 .253-.254 .255

/26 — 4 Subnets — 62 Hosts/Subnet

Network # IP Range Broadcast
.0 .1-.62 .63
.64 .65-.126 .127
.128 .129-.190 .191
.192 .193-.254 .255

/27 — 8 Subnets — 30 Hosts/Subnet

Network # IP Range Broadcast
.0 .1-.30 .31
.32 .33-.62 .63
.64 .65-.94 .95
.96 .97-.126 .127
.128 .129-.158 .159
.160 .161-.190 .191
.192 .193-.222 .223
.224 .225-.254 .255

/28 — 16 Subnets — 14 Hosts/Subnet

Network # IP Range Broadcast
.0 .1-.14 .15
.16 .17-.30 .31
.32 .33-.46 .47
.48 .49-.62 .63
.64 .65-.78 .79
.80 .81-.94 .95
.96 .97-.110 .111
.112 .113-.126 .127
.128 .129-.142 .143
.144 .145-.158 .159
.160 .161-.174 .175
.176 .177-.190 .191
.192 .193-.206 .207
.208 .209-.222 .223
.224 .225-.238 .239
.240 .241-.254 .255

/29 — 32 Subnets — 6 Hosts/Subnet

Network # IP Range Broadcast
.0 .1-.6 .7
.8 .9-.14 .15
.16 .17-.22 .23
.24 .25-.30 .31
.32 .33-.38 .39
.40 .41-.46 .47
.48 .49-.54 .55
.56 .57-.62 .63
.64 .65-.70 .71
.72 .73-.78 .79
.80 .81-.86 .87
.88 .89-.94 .95
.96 .97-.102 .103
.104 .105-.110 .111
.112 .113-.118 .119
.120 .121-.126 .127
.128 .129-.134 .135
.136 .137-.142 .143
.144 .145-.150 .151
.152 .153-.158 .159
.160 .161-.166 .167
.168 .169-.174 .175
.176 .177-.182 .183
.184 .185-.190 .191
.192 .193-.198 .199
.200 .201-.206 .207
.208 .209-.214 .215
.216 .217-.222 .223
.224 .225-.230 .231
.232 .233-.238 .239
.240 .241-.246 .247
.248 .249-.254 .255


IPv6 Subnet Cheat Sheet

IPv6 is a complete and different animal as far as subnetting goes. Please note the yellow rows as
each has special common use or notes. If there is nothing in the “Amount of a /64” column that means
it is to miniscule or to massive to justify calculation. Not much is the same with IPv6 compared to IPv4.
Route aggregation and purpose drive subnetting is something which every enterprise IPv6 deployment will make
use of, or it will fail miserably.


Subnet Addresses Amount of a /64
/128 1
/127 2
/126 4
/125 8
/124 16
/123 32
/122 64
/121 128
/120 256
/119 512
/118 1,024
/117 2,048
/116 4,096
/115 8,192
/114 16,384
/113 32,768
/112 65,536
/111 131,072
/110 262,144
/109 524,288
/108 1,048,576
/107 2,097,152
/106 4,194,304
/105 8,388,608
/104 16,777,216 This is equivalent to an IPv4 Internet or IPv4 /8
/103 33,554,432
/102 67,108,864
/101 134,217,728
/100 268,435,456
/99 536,870,912
/98 1,073,741,824
/97 2,147,483,648
/96 4,294,967,296
/95 8,589,934,592
/94 17,179,869,184
/93 34,359,738,368
/92 68,719,476,736
/91 137,438,953,472
/90 274,877,906,944
/89 549,755,813,888
/88 1,099,511,627,776
/87 2,199,023,255,552 1/8,388,608
/86 4,398,046,511,104 1/4,194,304
/85 8,796,093,022,208 1/2,097,152
/84 17,592,186,044,416 1/1,048,576
/83 35,184,372,088,832 1/524,288
/82 70,368,744,177,664 1/262,144
/81 140,737,488,355,328 1/131,072
/80 281,474,976,710,656 1/65,536
/79 562,949,953,421,312 1/32,768
/78 1,125,899,906,842,620 1/16,384
/77 2,251,799,813,685,240 1/8,192
/76 4,503,599,627,370,490 1/4,096
/75 9,007,199,254,740,990 1/2,048
/74 18,014,398,509,481,900 1/1,024
/73 36,028,797,018,963,900 1/512
/72 72,057,594,037,927,900 1/256
/71 144,115,188,075,855,000 1/128
/70 288,230,376,151,711,000 1/64
/69 576,460,752,303,423,000 1/32
/68 1,152,921,504,606,840,000 1/16
/67 2,305,843,009,213,690,000 1/8
/66 4,611,686,018,427,380,000 1/4
/65 9,223,372,036,854,770,000 1/2
/64 18,446,744,073,709,500,000 This is the standard end user allocation
/63 36,893,488,147,419,100,000 2
/62 73,786,976,294,838,200,000 4
/61 147,573,952,589,676,000,000 8
/60 295,147,905,179,352,000,000 16
/59 590,295,810,358,705,000,000 32
/58 1,180,591,620,717,410,000,000 64
/57 2,361,183,241,434,820,000,000 128
/56 4,722,366,482,869,640,000,000 256
/55 9,444,732,965,739,290,000,000 512
/54 18,889,465,931,478,500,000,000 1,024
/53 37,778,931,862,957,100,000,000 2,048
/52 75,557,863,725,914,300,000,000 4,096
/51 151,115,727,451,828,000,000,000 8,192
/50 302,231,454,903,657,000,000,000 16,384
/49 604,462,909,807,314,000,000,000 32,768
/48 1,208,925,819,614,620,000,000,000 65,536 This is the standard business allocation
/47 2,417,851,639,229,250,000,000,000 131,072
/46 4,835,703,278,458,510,000,000,000 262,144
/45 9,671,406,556,917,030,000,000,000 524,288
/44 19,342,813,113,834,000,000,000,000 1,048,576
/43 38,685,626,227,668,100,000,000,000 2,097,152
/42 77,371,252,455,336,200,000,000,000 4,194,304
/41 154,742,504,910,672,000,000,000,000 8,388,608
/40 309,485,009,821,345,000,000,000,000 16,777,216
/39 618,970,019,642,690,000,000,000,000 33,554,432
/38 1,237,940,039,285,380,000,000,000,000 67,108,864
/37 2,475,880,078,570,760,000,000,000,000 134,217,728
/36 4,951,760,157,141,520,000,000,000,000 268,435,456
/35 9,903,520,314,283,040,000,000,000,000 536,870,912
/34 19,807,040,628,566,000,000,000,000,000 1,073,741,824
/33 39,614,081,257,132,100,000,000,000,000 2,147,483,648
/32 79,228,162,514,264,300,000,000,000,000 4,294,967,296 This is the standard ISP Allocation
/31 158,456,325,028,528,000,000,000,000,000 8,589,934,592
/30 316,912,650,057,057,000,000,000,000,000 17,179,869,184
/29 633,825,300,114,114,000,000,000,000,000 34,359,738,368
/28 1,267,650,600,228,220,000,000,000,000,000 68,719,476,736
/27 2,535,301,200,456,450,000,000,000,000,000
/26 5,070,602,400,912,910,000,000,000,000,000
/25 10,141,204,801,825,800,000,000,000,000,000
/24 20,282,409,603,651,600,000,000,000,000,000
/23 40,564,819,207,303,300,000,000,000,000,000
/22 81,129,638,414,606,600,000,000,000,000,000
/21 162,259,276,829,213,000,000,000,000,000,000
/20 324,518,553,658,426,000,000,000,000,000,000
/19 649,037,107,316,853,000,000,000,000,000,000
/18 1,298,074,214,633,700,000,000,000,000,000,000
/17 2,596,148,429,267,410,000,000,000,000,000,000
/16 5,192,296,858,534,820,000,000,000,000,000,000
/15 10,384,593,717,069,600,000,000,000,000,000,000
/14 20,769,187,434,139,300,000,000,000,000,000,000
/13 41,538,374,868,278,600,000,000,000,000,000,000
/12 83,076,749,736,557,200,000,000,000,000,000,000
/11 166,153,499,473,114,000,000,000,000,000,000,000
/10 332,306,998,946,228,000,000,000,000,000,000,000
/9 664,613,997,892,457,000,000,000,000,000,000,000
/8 1,329,227,995,784,910,000,000,000,000,000,000,000


SRX300 usb serial console driver

Please check if the USB console driver on the below link works for you.

http://www.juniper.net/support/downloads/?p=srx550#sw

Please follow the below link to set this up.

http://www.juniper.net/techpubs/en_US/release-independent/junos/topics/task/operational/services-gat

For SRX 340, you can use this driver srx_usbdriver-2

For Mac OS X, download the driver, if needed, from https://www.silabs.com/products/development-tools/software/usb-to-uart-bridge-vcp-drivers


Drivers for Juniper Networks BX Series System Console

Windows XP-7 32bit driver
https://blog.shiraj.com/wp-content/uploads/2022/10/Juniper_windows_xp_7_32bit-.zip

Windows7-10 64bit Driver
https://blog.shiraj.com/wp-content/uploads/2022/10/Juniper_windows_7_10_64bit-.zip

Sources:

https://supportportal.juniper.net/s/article/SRX-USB-drivers-for-Juniper-Networks-System-Console?language=en_US

Silabs.com

https://community.silabs.com/s/article/drivers-for-juniper-networks-bx-series-system-console?language=en_US


Error: “We couldn’t create a new partition or locate an existing one

Symptom:

You try to install Windows 8 (CP), and encountered the following error:

We couldn’t create a new partition or locate an existing one.  For more information, see the Setup log files.”


Resolution:

Try to following methods:

1)Check if you have an SD Card in the system. If you do, you remove it and run setup again.

2) Once the setup fails to find the partition, just close the setup window (the top-right-hand side red X does the job).

From that point, you should be brought back at the initial setup screen.Choose “Repair” then go to the advanced tools and start the command line.

Start DISKPART.

Type LIST DISK and identify your SSD disk number (from 0 to n disks).

Type SELECT DISK <n> where <n> is your SSD disk number.

Type CLEAN

Type CREATE PARTITION PRIMARY

Type ACTIVE

Type FORMAT FS=NTFS QUICK

Type ASSIGN

Type EXIT twice (one to get out of DiskPart, the other to exit the command line tool)


CPU usage is too high with Yosemite and an external monitor, kernel_task spikes to 600%+

After reading number of blog and days of internet search, the solution worked for me. The kernel will keep looping some very simple tasks, e.g. getting the date, therefore ‘consuming’ (with the highest priority) the majority of the CPU in a bid to cool the system down.

The solution mentions on other blog about removing ACPI_SMC_PlatformPlugin.kext, under /System/Library exist many kernel extensions, and the relevant one is the IOPlatformPluginFamily.kext.  There suggestion was to disable the plist for your model of computer that was located in that kext’s Contents/PlugIns/ACPI_SMC_PlatformPlugin.kext (a sub kext!).  First, My MacBook Pro didn’t have a relevant plist, and second, disabling that entire kext (simply by renaming it to something else so Mac OS X wouldn’t find and load it) did not help, this should work for earlier Macs, not for newer Mac.

I have tried many things, but this works.

  1. Disable kext by renaming it
    cd /System/Library/Extensions/IOPlatformPluginFamily.kext/Contents/Plugins
    sudo mv X86PlatformShim.kext X86PlatformShim.kext.disabled
    
  2. Clear kext cache (not sure if this is needed)
    touch /System/Library/Extensions/
    
  3. Restart

You may get Operation not permitted error. Apple has enabled a new default security oriented featured called System Integrity Protection.

Turning Off Rootless System Integrity Protection in OS X El Capitan 10.11 +

Again, the vast majority of Mac users should not disable rootless. Disabling rootless is aimed exclusively at advanced Mac users. Do so at your own risk, this is not specifically recommended.

  1. Reboot the Mac and hold down Command + R keys simultaneously after you hear the startup chime, this will boot OS X into Recovery Mode
  2. When the “OS X Utilities” screen appears, pull down the ‘Utilities’ menu at the top of the screen instead, and choose “Terminal”
  3. Type the following command into the terminal then hit return:

csrutil disable; reboot

  1. You’ll see a message saying that System Integrity Protection has been disabled and the Mac needs to restart for changes to take effect, and the Mac will then reboot itself automatically, just let it boot up as normal

You can also issue the command by itself without the automatic reboot like so:

csrutil disable


The trust relationship between this workstation and the primary domain failed

If you know the local admin password you can login to server then user netdom.exe to reset the password if you don’t have local admin password then unplug the network login using cached credential then plug the network and use netdom.exe to reset the machine password.


netdom.exe resetpwd /s:<server> /ud:<user> /pd:*

<server> = a domain controller in the joined domain

<user> = DOMAIN\User format with rights to change the computer password

An error occurs in Microsoft Dynamics CRM using Claims Based Authentication

In ADFS Management Console update the Federation metadata URLs and do an IIS reset on CRM server. Next, restart the ADFS service.

If above steps do not resolve the issue please follow below steps:-

1. On the Microsoft Dynamics CRM server, go to Deployment Manager and disable the Claims Based Authentication

2. On the Microsoft Dynamics CRM server, click the Start menu, select Run and type iisreset to complete an IIS reset

3. Re-configure Claims-Based Authentication from Deployment Manager keeping all the settings same

4. Re-configure IFD through the Microsoft Dynamics CRM Deployment Manager

5. On the Microsoft Dynamics CRM server, click the Start menu, select Run and type iisreset to complete an IIS reset

6. In ADFS Management Console on the ADFS server, update the corresponding Federation Metadata URLs

a. Go to the ADFS Server and open the ADFS management Console

b. Click Relying Party Trusts to display the internal and external relying party trusts

c. Right-click each and select Update Federation Metadata

d. Go to the Microsoft Dynamics CRM server, click the Start menu, select Run and type iisreset to complete an IIS reset

e. Next, browse to Service on the ADFS server and restart the ADFS service

This also resolved few other issue below.

High CPU Usage on Microsoft CRM 2015 and Microsoft CRM 2015 Email Router Server

When renewing Expired AD FS 2.0 Token Signing Certificates, Depending on your AD FS configuration you may have automatic certificate rollover enabled.  This can be checked via Get-ADFSProperties

To configure automatic rollover:

Set-ADFSProperties -AutoCertificateRollover $true

reboot the server.


How to recover file from Crypto locker or Ransomware using shadow copy

First list all the shadow copy you have using vssadmin list shadows command as below

C:\resources\dosdev\dosdev\x86>vssadmin list shadows

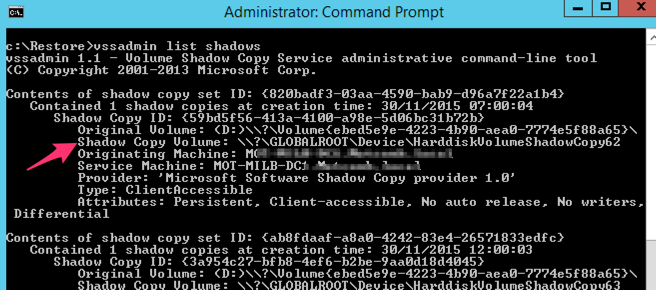
After you run the command if you have any shadow copy it will show the result as below, if you get the result similar to below then download a copy of dosdev.exe, just google ‘dosdev.exe download’ you will need that to mount the shadow copy as drive letter.

Contents of shadow copy set ID: {85e1a1e5-e6dd-4479-ab11-769930317777} Contained 1 shadow copies at creation time: 30/11/2015 7:00:04 AM Shadow Copy ID: {c152023d-6a53-46a5-ae90-eac06d7b1f0d} Original Volume: (S:)\\?\Volume{1d09abf5-50bb-4619-ae1a-582285e37e1f}\ Shadow Copy Volume: \\?\GLOBALROOT\Device\HarddiskVolumeShadowCopy62 Originating Machine: MACSRVR.mac.macltd.com Service Machine: MACSRVR.mac.macltd.com Provider: ‘Microsoft Software Shadow Copy provider 1.0’ Type: ClientAccessible Attributes: Persistent, Client-accessible, No auto release, No writers, Differential Contents of shadow copy set ID: {b1ceef12-fa9a-4aae-961a-1212df929c27}

I have underlined the time of shadow copy that I want to restore then copy the path of shadow copy. Navigate to directory where dosdeve.exe is and type dosdev v: then then paste the link you copied, see example below.

C:\resources\dosdev\dosdev\x86>dosdev v: \\?\GLOBALROOT\Device\HarddiskVolumeSha dowCopy62

You should get result as below

v:: The operation completed successfully.

then change the directory to V:

C:\resources\dosdev\dosdev\x86>dir v:
Volume in drive V is Studio1
Volume Serial Number is 18FA-38CD
Directory of V:\

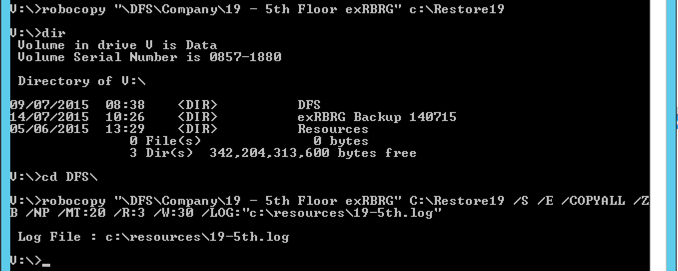
now I have the shadowcopy as drive I can start robocopy, there are different robocopy command you can use 2 examples below, one copy everything other copy only the changes

V:\>robocopy “SKETCHUP VERSION 8″ S:\new /S /E /COPYALL /ZB /NP /MT:20 /R:3 / W:30 /LOG:”c:\resources\HR.log”

Log File : c:\resources\HR.log

V:\Studio 1\JOBS\STUDIO\SKYIT\Skyit Rainforest\05_SRR Ede Project\CREATIVE\3D>ro bocopy “SKETCHUP” S:\new /S /E /COPYALL /ZB /NP /MT:20 /R:3 /W:30 /LOG:”c:\resou rces\HR.log”

Log File : c:\resources\HR.log

There is bit more you can do with robocopy the files from your shadow copy.

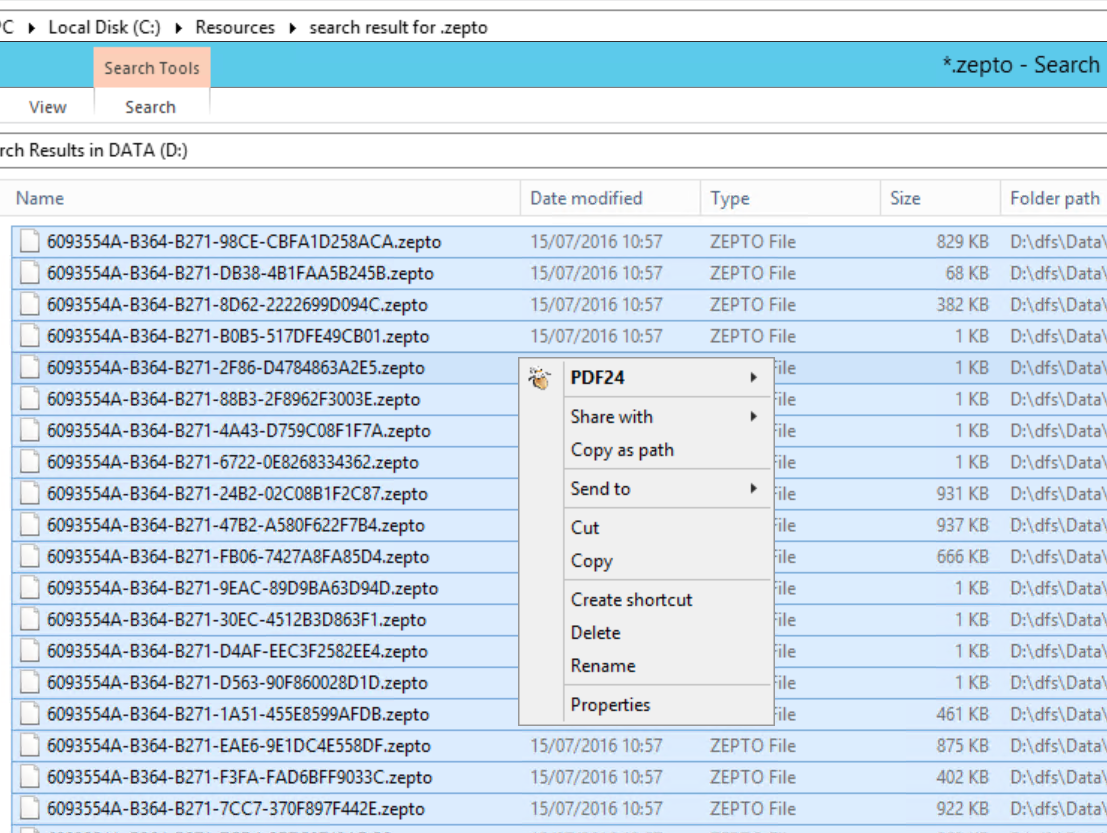
One of my client had Crypto Locker virus with extension .zepto and encrypted number of different directory in shared drive. This is what I have done to recover, first logged on to the server did a search for *.zepto on the top level drive, in my case it was D:\ then I copied the search result to text file, it sound simple to copy search result to text file, if you haven’t done this before then how do you do it. You select the first line of search scroll to last line then ->hold shift and right click -> you get drop down menu select “Copy as Path” then you can open a notepad and paste.

now you have all the path in text file. using the dosdev process as above, I mounted the shadow copy that I want to copy from then run the robocopy command as below,

robocopy /e “V:\dfs\Data\SHARED\PROJECTS” “D:\dfs\Data\SHARED\PROJECTS” /log:c:\project.txt /tee

use this if you have access denied error

robocopy /e /ZB “V:\DFS\WaysOfWorking” “D:\DFS\WaysOfWorking” /log:c:\wayofworking.txt /tee

What this does is check all files and folder copy anything missing or different. I tried going to previous version in windows and browsing the copy then copy the file I needed but for this huge amount of data 10TB, didn’t wanted to do folder by folder also when it hit long file name or path then it stop copying, robocopy is the only way I found to be accurate.

Then I gone back to my search and deleted all the files that ware highlighted.

or you can use command prompt
c:\>del *.zepto /a /s

  • c:\>del *HELP_instructions.html /a /s

Mac’s and serial TTY’s (Using usb to serial adapter with MAC)

Screen

It’s not actually necessary to download an install extra software, as you can use the Mac OS X built in Terminal and screen. Screen lacks some features, but it does include VT100/ANSI terminal emulation, and can be extremely useful.

  1. Open an OS X terminal session (window)
  2. Find the right TTY device. Type: ls /dev/cu.*

With the USB-Serial adapter plugged in, you’ll get a list, including something like this:

$ ls /dev/cu.*
/dev/cu.Bluetooth-Modem		/dev/cu.iPhone-WirelessiAP
/dev/cu.Bluetooth-PDA-Sync	/dev/cu.usbserial

The 'man screen' page

  1. Then type: screen /dev/cu.usbserial 9600 (in this example).


    The 9600 at the end is the baud rate. You can use any standard rate,


    eg, 9600, or 19200 for a Sig Server!

  1. To quit the screen app, type CTRL-A, then CTRL-.

Type man screen in Terminal for further information on screen. (use ‘enter’ or ‘space’ to scroll, and ‘q’ to quit).


Running Microsoft Security Essentials on Server 2012

What to do

Here’s what needs to be done to get things up and running on Server 2012. First go here and download Security Essentials. Once downloaded right click on the (mseinstall.exe) executable en choose properties. Locate the ‘Compatibility’ tab and go to the ‘Compatibility mode’ section (see first screenshot below). Check “Run this program in compatibility mode for:” and select Windows 7 from the dropdown menu. Next, open up a command prompt and run it with administrative privileges. And finally ‘Browse’ to where you stored SE and run the (mseinstall.exe) executable with the additional /disableoslimit parameter. Below is a screenshot of how this will look.

Properties

Command Prompt