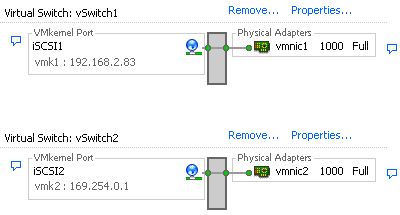
In an iSCSI setup (software initiator or HBA), if your host has more than one pNIC, there are two types of configuration you can build. First one a two vSwitches type of configuration where you have a separate vSwitch for each network adapter and VMKernel iSCSI port pair in a 1:1 mapping as shown on the picture below,
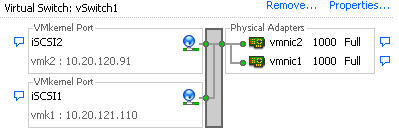
The second type, my preferred one particularly in my home lab, an one vSwitch type of configuration where multiple network adapter and VMKernel iSCSI port pairs sharing the same vSwitch as shown on the picture below:
For that kind of config, when you have a single vSwitch with multiple VMKernel iSCSI ports, something many time overlooked by the admins is the binding. Indeed in such very specific case, single vSwitch configuration, the default binding is not optimized. Although it works, you won’t have the redundancy and multipathing you would expect! Indeed by default the VMKernel iSCSI ports you add are all bind to a single vmnic.
The iSCSI SAN Configuration Guide for vSphere 4.1 is clear about such configuration. Youmust override the default setup and make sure that each port maps to only one active NIC. But that’s only half of what needs to be done to configure properly your VMKernel iSCSI ports!
So after you map VMKernel iSCSI ports to network adapters, the second step consists of using theesxcli command to bind the VMKernel iSCSI ports (vmk) to the iSCSI adapters (vmhba). The following example shows how to connect the VMKernel iSCSI ports vmk1 and vmk2 to the software iSCSI adapter vmhba33.
Connect vmk1 to vmhba33: esxcli swiscsi nic add -n vmk1 -d vmhba33
Connect vmk2 to vmhba33: esxcli swiscsi nic add -n vmk2 -d vmhba33
Verify vmhba33 configuration: esxcli swiscsi nic list -d vmhba33 -> Both vmk1 and vmk2 should be listed.
If you display the Paths view for the vmhba33 adapter through the vSphere Client, you see that the adapter uses two paths to access the same target. The runtime names of the paths are vmhba33:C1:T1:L0 and vmhba33:C2:T1:L0. C1 and C2 in this example indicate the two network adapters that are used for multipathing.
Make sure to have a read at this VMware KB for an issue I ran into because I skipped step# 6, page 37 of the iSCSI SAN Configuration Guide when setting up iSCSI in my home lab
A video is much better to get the whole picture so I invite you to watch this one below:
The fact that you need to use both the vCenter Client and the vSphere CLI to achieve properly this type of configuration is a bit annoying and can lead to errors or I would say to incompleted configuration. Indeed, even half configured it works and therefore you might think the work is successful, I have redundancy and multi-pathing but actually you haven’t!
Recreating a missing .vmdk descriptor file on ESX.
Access the ESX command line and navigate to the virtual disk (you can use putty) list the file in Virtual Machines directory: [root@esx03 ONLINEBACKUP]# ls -ltr *.vmdk
you should see something like -rw——- 1 root root 107374182400 Jul 19 07:32 ONLINEBACKUP-flat.vmdk [root@esx03 ONLINEBACKUP]# less *.vmx | grep -i virtualdev ethernet0.virtualDev = “e100”
so here its usuing “lsilogic” next piece of information is exact size of the flat .vmdk file. to identify the sexact size of the flat. vmdk virtual disk: ls -l *.-flat.vmdk should see something like
but the .vmdk desctiptor file missing. two piece of information we need to recreate this missing file,
1) type of scsi controller and
2) vmdk file size identify the scsi controller type in use by the virtual disk: less *.vmx | grep -i virtualdev you shold see something like scsi0.virtualDev = “lsilogic”
in this case the file size is 107374182400 now we need to use the vmkfstools command to create a temporary virtual disk (flat.vmdk) and as associated .vmdk descriptor file use the command: vmkfstools -c filesize -a scsi type -d thin filename.vmdk so for my example it will look like this
vmkfstools -c 107374182400 -a lsilogic -d thin temp.vmdk
so now we have a tem.vmdk file exact size as -flat.vmdk with all the associated files, just to check: ls -ltr *.vmdk
this will list temp descriptor .vmdk file which we will now use to resolve the issue. rename the temp.vmdk file to match the problem -flat.vmdk to do this use: mv temp.vmdk ONLINEBACKUP.vmdk
now we need to change the descriptor file, we need to edit the desctiptor file to now point to the correct -flat.vmdk file
use:vi ONLINEBACKUP.vmdk
the part you need to change is Extent description and replace them temp-flat.vmdk with correct filename-flat.vmdk in my example it will be ONLINEBACKUP.vmdk and save changes.
there is one more part you need to check if the original vmdk was thin provisioned, if the original -flat file was not think provisioned the remove the line from desctiptor title “dd.thinProvisioned = “1”
you can verify if the original was thin provisioned or not by: du -h *.vmdk
take a not of the temp-flat.vmdk and original vmdk file. that should do the trick. start the VM.
Outlook client doesn’t update folders automatically. On the status bar instead of “All folders are up to date” message “This folder was last updated on …” is displayed.
Your Microsoft Exchange 2010 server logs the following error:
Event ID: 9646
Type: Error
Source: MSExchangeIS
Description:
Mapi session "/o=First Organization/ou=Administrative Group/cn=Recipients/cn=user"
exceeded the maximum of 500 objects of type "objtFolder".
The number of server-side objects that are allowed by clients is limited to prevent a single client from the exhausting resources on the Exchange server.
2. Right click ParametersSystem and create New -> Key
3. Enter MaxObjsPerMapiSession and confirm creation of the new sub-key
4. Right click newly created key, create new DWORD value called objtFolder and give it a decimal value bigger than default 500.
5. Create another DWORD value called objtFolderView and give it the same value.
There’s no need to restart Exchange server or even MSExchangeIS service. Give it some time and things will settle down. You might need to restart Outlook client to start synchronising folders again.
Exchange Server 2007 issues itself a self-signed certificate for use with services like SMTP, IMAP, POP, IIS and UM. The certificate is issued for a period of one year.
The self-signed certificate meets an important need – securing communication paths for Exchange services by default. Nevertheless, one should treat these certificates as temporary. Although the self-signed certificates work perfectly well for internal SMTP communication between Hub Transport servers, and between Hub Transport and Edge Transport servers, it’s not recommended to use them for any client communication on an ongoing basis. For most deployments, you will end up procuring a certificate from a trusted 3rd-party CA (or perhaps an internal CA in organizations with PKI deployed).
Should you decide to leave the self-signed certificate(s) on some servers and continue to use them, these will need to be renewed when they expire — just as you would renew certificates from 3rd-party or in-house CAs.
To renew the certificate for server e12postcard.e12labs.com, a server with CAS and HT roles installed:
To create a new certificate with an exportable private key, use the PrivateKeyExportable parameter. For example:
New-ExchangeCertificate -PrivateKeyExportable $true
If the existing certificate is being used as the default SMTP certificate, you will get the following prompt. The default SMTP certificate is used to encrypt SMTP sessions between transport servers in your organization.
Confirm
Overwrite existing default SMTP certificate,
‘C5DD5B60949267AD624618D8492C4C5281FDD10F’ (expires 8/22/2008 7:20:34 AM), with certificate ’3DA55740509DBA19D1A43A9C7161ED2D0B3B9E3E’ (expires 1/28/2009 7:37:31 AM)?
[Y] Yes [A] Yes to All [N] No [L] No to All [S] Suspend [?] Help
(default is “Y”):
Type y to continue. A new certificate is generated.
The old certificate is enabled for IIS, POP, IMAP and SMTP. The new certificate generated using the above command is enabled only for POP, IMAP and SMTP – IIS is missing.
You can enable the certificate for IIS (in addition to any other services it may already be enabled for — it adds to existing values of the certificate’s Services property).
Note: Once you enable a certificate for a particular Exchange Server service, there’s no way to disable it (for that service). You must remove the certificate (if the certificate is CA-issued, export the certificate along with its private key before you do so), import it again and enable it for the services you need to. This is generally not a concern with self-signed certificates— you can generate additional self-signed certificates and optionally remove the old one, since there’s no CA interaction or costs involved.
Setting the Services parameter to None does not do anything in this case.
Enable-ExchangeCertificate : The certificate with thumbprint XXXXXXXXX was found but is not valid for use with Exchange Server
(reason: PrivateKeyMissing).
At line:1 char:27
+ Enable-ExchangeCertificate -Thumbprint XXXXXXXXX -Services “IIS”
The above error can as a result of multiple reasons. CSR was created with IIS and attempted to be installed through the Exchange Management Shell (EMS), CSR was created in EMS on another Exchange Server, a damaged certificate, or Windows simply “forgets” where it placed the PrivateKey for the certificate. It doesn’t happen all the time, but sometimes the error can be a nuisance.
Option #1: Repair Damaged Certificate (Windows Server 2003/2008)
Open MMC and add the Certificate Snap-In for the Local Computer account.
Double-Click on the recently imported certificate.
Note: In Windows Server 2008 it will be the certificate missing the golden key beside it.
Select the Details tab.
Click on the Serial Number field and copy that string.
Note: You may use CTRL+C, but not right-click and copy.
Open up a command prompt session. (cmd.exe aka DOS Prompt)
Type: certutil -repairstore my “SerialNumber” (SerialNumber is that which was copied down in step 4. Remove any space & special characters)
After running the above command, go back to the MMC and Right-Click Certificates and select Refresh (or hit F5 in the MMC)
Double-Click on the problem certificate. At the bottom of this window (General tab) it should state: “You have a private key that corresponds to this certificate.“
Note: In Windows Server 2008 there will be a golden key to the left of the certificate, so there is no need to double-click the certificate.
Now that the Private Key is attached to the certificate, please proceed to enable Exchange Services via Enable-ExchangeCertificate.
This guide is intended to provide step by step instructions on how to migrate from Small Business Server 2003 to Windows 2008 R2 with Exchange 2010.
For this migration to work you will need the following software:
Windows Small Business Server 2003 (SBS 2003)
Windows 2008 Server or Windows 2008 R2 Server
Exchange Server 2010
Microsoft Office Filter Pack from here: http://www.microsoft.com/downloads/details.aspx?FamilyID=60c92a37-719c-4077-b5c6-cac34f4227cc&displaylang=en
Windows SharePoint Services 3.0 with integrated Service Pack 2.Only the version with Integrated Service Pack 2 will install on Windows 2008 R2. You can download it from here: http://www.microsoft.com/downloads/details.aspx?familyid=9FB41E51-CB03-4B47-B89A-396786492CBA&displaylang=en
Microsoft SQL Server Management Studio Express which can be downloaded from: http://www.microsoft.com/downloads/details.aspx?FamilyID=c243a5ae-4bd1-4e3d-94b8-5a0f62bf7796&displaylang=en You will need to download both the 32bit and 64bit versions
Steps required:
Health Checks on Small Business Server 2003
Join new Windows 2008 Server to the domain as a member server
Prepare Active Directory for Windows 2008 R2 Server
Make Windows 2008 R2 Server a Domain Controller of the Existing Small Business Server 2003 Domain
Transfer DHCP Service
Install Exchange 2010
Installing Exchange 2010 SSL Certificate
Migrate Exchange Data
Migrate SharePoint Services
Migrate shared user data
Uninstall Exchange 2003 from Small Business Server 2003
Transfer all 5 FSMO roles to Windows 2008 Domain Controller
DCPROMO SBS 2003 server so it is no longer a domain controller and remove from network
It’s important that the steps are followed in order as different stages make different changes to the way in which your server operates. For example you MUST make the 2008 server a domain controller before you install Exchange.
Step 1 – Health Checks on Small Business Server 2003
The absolute first thing you need to do is take a SYSTEM STATE backup of your Small Business Server as well as a full system backup. There is little chance of the data getting lost but the SYSTEM STATE backup backs up Active Directory so that if it all goes wrong we can recover it if needed.
What you then need to do on the SBS 2003 server is to make sure you have all the latest available updates. This means you should at a minimum have:
Windows 2003 Service Pack 2
Windows Small Business Server Service Pack 1
Microsoft Exchange 2003 Service Pack 2
Once you have installed all of the above, run Windows Update and make sure you select the option in the blue banner bar across the top for Microsoft Update. Microsoft Update will then allow you to update all Microsoft products installed on the server providing a more comprehensive update solution. Keep running the check and installing all updates until there are no more available.
Check the health of your Active Directory by running DCDIAG, if there is anything reported as an error fix it before moving on.
Run the Small Business Server 2003 Best Practices Analyser from here: http://www.microsoft.com/downloads/details.aspx?familyid=3874527A-DE19-49BB-800F-352F3B6F2922&displaylang=en
Make sure you fix any problems the analyser identifies. If you cannot, then why not raise a question on Experts Exchange to have the Experts there help you?
A common problem that can cause this migration to fail is that the SBS 2003 server does not have its own IP address listed for DNS in the network properties under TCP/IP. If this is the case, update it so that it does (do not use the loopback 127.0.0.1 address).
Step 2 – Join new Windows 2008 Server to the domain as a member server
To join a Windows 2008 Server to the Small Business Server domain we need to first ensure that it is receiving a correct IP Address
Allow the Windows 2008 Server to receive a DHCP Address from your Small Business Server. Run an IPCONFIG /ALL to check this. The DNS Server entry is probably the most important. This should be configured to use the IP Address of your Small Business Server for DNS.
To test, it might be worth just pinging the SBS 2003 server from a command prompt just to check the name can be resolved by doing the following:
Click Start > Run > type CMD and then click OK
type PING SBS2003SERVERNAME
If you get a good response then we can try and join the 2008 server to the domain.
To Join the Server to the Domain, do the following:
Click Start and right click on Computer and select properties
From the screen that opens under the section called Computer name, domain, and workgroup settings click Change settings. Then click on Change
At this point if you haven’t already specified the name of your new server you can do so
Check the radio button next to where it says Domain and enter the domain name that the Small Business Server 2003 belongs to
Click OK
At which point you will be prompted for a username and password for a user that has permissions to add the computer to the domain
Once you have added your credentials and click OK you will then be informed the server requires restarting. Please restart to resume the migration
Step 3 – Prepare Active Directory for Windows 2008 R2 Server
The first step of this process is to raise the Functional Levels of the SBS 2003 server. This involves raising the domain and forest functional level of Active Directory and the Operational mode of Exchange Server.
To raise the Domain Functional Level do the following:
Click Start > Administrative Tools > Active Directory Users and Computers
Right click on the domain name and select Raise Domain Functional Level
In the drop down box select Windows Server 2003 and click OK (if this has already been done don’t worry)
To raise the Forest Functional Level do the following:
Click Start > Administrative Tools > Active Directory Domains and Trusts
Right click where it says Active Directory Domains and Trusts and select Raise Forest Functional Level.
And we also need to raise the Exchange Operational Mode. To do this, you need to do the following:
Click Start > All Programs > Microsoft Exchange > System Manager
Right click on the Organisation name right at the top of the list and select properties
In the dialogue box check the Operational Mode, if it says Mixed Mode click the Change Mode button and say yes to the dialogue box asking if you want to change to native mode
Before we can add the Windows 2008 Server as a domain controller to the SBS 2003 domain, we need to prepare Active Directory.
To do this use the following procedure whilst working on the Small Business Server
Insert the Windows 2008 DVD in to the Small Business Server. Ignore the autorun message that appears telling you this version is incompatible by clicking OK
Open a command prompt (Start > Run > CMD) and run the commands below
NOTE: X: refers to the drive letter that has been assigned to your DVD Drive.
X:supportadprepadprep32 /forestprep
After the above command you will be prompted to confirm you wish to proceed by typing the letter C and pressing Enter
X:supportadprepadprep32 /domainprep
X:supportadprepadprep32 /domainprep /gpprep
X:supportadprepadprep32 /rodcprep
Step 4 – Make Windows 2008 R2 Server a Domain Controller of the Existing Small Business Server 2003 Domain
To make the Windows 2008 Server a Domain Controller is fairly straight forward, we simply click Start > Run and type DCPROMO click OK.
This will check that the Active Directory Services Binaries are installed and if they are not, it will install them. It will then start the Active Directory Domain Services Installation Wizard.
On the first screen, there is no need to check the ‘Use Advanced mode Installation’ check box, just simply click next. On the operating System Compatibility screen click next.
On the ‘Choose a Deployment Configuration’ screen, select the radio box for Existing Forest and Add a domain controller to an existing domain. Then Click next.
On the ‘Network credentials’ screen, the name of the domain should have been detected automatically. Check this is correct. If you are logged in as a user that has domain admin privileges then you can use the My Current logged on credentials option. If not, click the set button and add the username and password that has domain admin privileges as shown in the screen above. Click Next.
The following screen will give you the results of a domain search and ask you which domain you want to add this domain controller to. As you are upgrading Small Business Server there should only be one. Click Next.
The next screen will give you an option to select the site for the new domain controller. If you have more than one Active Directory Site ensure that you select the correct one if it hasn’t been done by default. Click next.
On the ‘Additional Domain Controller Options’ screen, make sure that both the DNS Server and the Global Catalog options are both checked. Click Next. The error message regarding DNS Delegation can safely be ignored. Click Yes on this dialog to continue.
If you have separate folders where you want to store your log files, SYSVOL share and the Active Directory database then these can be specified on the next screen. To be honest I keep them all as defaults. Once done, click Next.
On the following screen, you are asked to set a password for Directory Services Restore Mode Administrator (DSRM). Please note this is NOT the Domain Administrator password. This password is used to boot the Domain Controller into Directory Services Restore Mode which is used for recovering corrupt/deleted/failed Domain Controllers. Make a note of this password and keep it somewhere safe (in a fire safe for example).
Click Next on the following 2 screens. The wizard will then start the promotion of the server to a domain controller (I always check the box on this screen to reboot on completion – This way you can leave it and come back to it knowing that it will be ready to continue).
Once rebooted your new server will be a domain controller, DNS server and Global Catalog server in your Small Business Server Domain.
Step 5 – Transfer DHCP Service
By default the Small Business Server will be the DHCP Server (if it isn’t and you’re using something else for DHCP, then you will simply need to update the DNS configuration this device is giving out so that it points to the 2008 Server instead of the 2003 Server) we will need to transfer this to the new server.
We can start this process by installing the DHCP Service.
To install DHCP, open up Server Manager and under Roles, click Add Role. From the list, select DHCP Server and click Next then next on the Introduction to DHCP Server screen.
On the network Connection Bindings screen you should have your primary IP address listed. As you will be installing Exchange on this server it’s not recommended to have a multi-homed server but if you do make sure the LAN card and IP is the only one selected. Click next.
NOTE: A multi-homed server is a server that has multiple IP addresses assigned to multiple Network Interface Cards. Normally these types of servers would be used as routers. Whilst Exchange can be made to work in this environment, it’s not recommended.
On the Specify IPv4 DNS Server Settings check the following settings:
Check the parent domain name is correct
Make sure that the IP Address listed for Preferred DNS server IPv4 Address is the address of the new Windows 2008 Server
Remove any entry in the Alternate DNS Server IPv4 Settings as these will not be required
Click next
Click next accepting the default settings on the WINS screen.
On the Add or Edit DHCP Scopes screen, click Add. This will present you with the Add Scope dialog box.
On this screen enter the following details:
scope name
the start IP address
the end IP address
(This should be the same as the DHCP Scope you have configured on the Small Business Server).
Uncheck the box that says Activate this scope (we don’t want it just yet)
The subnet mask should have been calculated automatically but if it isn’t correct then please change it to ensure it is
Enter the default gateway; this will be the router on your network
You will notice in the scope I am creating, I have started from 192.168.10.15 this is so that I have 15 addresses that I can assign to fixed addresses. My Small Business Server and Windows 2003 server will have an address below 192.168.10.15 but I might also have printers, photocopiers, and wireless access points that also need fixed IP addresses. I have also left 192.168.10.254 available to use for my router.
Once you have completed all the details, click OK and then Next.
Accept the default setting on the ‘Configure DHCPv6 Stateless Mode’ and the Specify IPv6 DNS Server Settings.
On the ‘Authorize DHCP Server’ screen, select to use the current credentials and click Next, then Install on the confirmation screen.
The DHCP Server service is now installed on the Windows 2008 server.
Before we can switch over, we need to make some changes to the Small Business Server DHCP settings. Whilst we can just turn one off and turn the other on this will cause you to have to release and renew the settings on the client machines manually for them to pick up the new DHCP Service. The alternative is to wait the 4 days before your client machines request an IP address renewal.
To make the required changes, do the following on the Small Business Server:
Navigate to Start > Administrative Tools > DHCP this will open the DHCP snap-in
Right click on the Scope listed under your Small Business Server and select properties
In the section titled ‘Lease duration for DHCP clients’ we are going to change it to 2 hours from the default of 8 days. Click OK
Then under Address Leases, highlight all DHCP Leases, right click and select delete. NOTE: If you have any reserved addresses make sure they are not highlighted otherwise they will be deleted also.
This action will cause all DHCP clients to renew their addresses and gain an address that has a 2 hour lease. Check the Address Leases and refresh until you are happy that all the clients now have an IP address. (You might want to leave this overnight just to make absolutely sure)
Once you are happy that all the clients have now got a 2 hour lease from the Windows 2008 server do the following:
Navigate to Start > Administrative Tools > DHCP
Expand the Windows 2008 servername and IPv4 then right click on the scope listed
Select Activate
This will start the DHCP Service on the 2008 server and deactivate the service on the Small Business Server (this will happen automatically because when Small Business Server detects another DHCP server on the network it shuts its own down).
You will now find that in approximately 1 to 2 hours time, all your clients will start picking up IP addresses from the Windows 2008 Server.
You can now disable the DHCP Server service on the Small Business Server. DO NOT disable the DHCP Client service, as this plays a part in DNS registration.
Now that all the clients are using the new Windows 2008 Server for DHCP and DNS, we need to make sure that the Small Business Server is also using the Windows 2008 Server for DNS. To do this modify the TCP/IP properties of the network card and change the Primary DNS servers IP address to that of the Windows 2008 Server. Do not enter anything in the Secondary DNS server.
Once you have done this restart the NETLOGON service so that the DNS entries are added to the Windows 2008 DNS.
Step 6 – Install Exchange 2010
Because we performed all the diagnostic checks at the start, the installation of Exchange 2010 should be fairly straight forward. Please note that even though the installation of any version of Exchange Server on a domain controller is supported by Microsoft, it is not a recommended configuration. But since we are migrating from Small Business Server the chances are you still want to stick with a single server configuration.
The first step is to install the pre-requisites on Windows 2008 to allow the Exchange 2010 installation to complete. This can be done very easily using the Windows PowerShell.
To do this, please use the following steps:
Click Start > All Programs > Accessories > Windows PowerShell
Once the PowerShell is opened run the following commands:
Import-Module ServerManager
There is no notification this has completed you will just see a flashing cursor waiting for input. This command will allow us to add server roles and features via the PowerShell command.
This command will install all the pre-requisites for the Mailbox, Hub Transport and Client Access roles on to the Windows 2008 Server. This will replicate what you currently have on the Small Business Server.
Once the server has restarted after the above command, launch the Windows Powershell again and run the following command:
This will set the Net.Tcp Port Sharing Service to Automatic instead of Manual
Install the Microsoft Office Filter Pack (which you should have downloaded earlier from the top list of required software).
Once we have done this, we need to prepare Active Directory for the Exchange 2010 installation.
Unlike previous versions, Exchange 2010 will detect if the schema updates have been done and do them if not, I prefer to see this happen.
To prepare Active Directory for Exchange 2010 we need to do the following:
Insert the Exchange 2010 DVD in to the Windows 2008 Server
Open a command prompt (Start > Run > CMD)
Run D:setup /PrepareLegacyExchangePermissions
Run D:setup /PrepareSchema
There is an additional command which is: setup /PrepareAD /OrganizationName: but I am going to let the Exchange Server installation do this part
Start the Exchange installation from the DVD. On the initial splash screen that opens, click Step 3: Choose Exchange Language Options, select the appropriate option then click Step 4: Install Microsoft Exchange. The Exchange Installation Wizard will then start.
The first screen you see is the Introduction screen, click Next. Read, agree to and accept the license agreement screen.
This screen allows us to choose the type of installation. As it’s assumed the Exchange 2010 server is a direct replacement for Small Business Server and all roles will be installed on a single server, we simply select Typical Exchange Server Installation and Click next.
If we were separating our roles out on to different servers we would select Custom Exchange Server Installation and then click next.
This screen allows us to specify what URL will be used for accessing our Outlook Web App from outside of the network. Whatever you put in here you will need to make sure you have a DNS A record for it in your EXTERNAL DNS server. In the later steps you will also need to use this name in your SSL Certificate Request. (CSR)
Check the box ‘The Client Access role server will be internet-facing’ and then specify the URL you will use, do not add https:// or anything at the end i.e. /owa. Click next.
This screen is asking us to specify the Exchange 2003 server that the installation will create a routing group connector for. This is essential for mailflow between the servers. Click Browse, the list should be generated automatically and you will be able to select the Small Business Server from the list. Click OK and then next.
Choose on the next screen if you wish to participate in the Customer Improvement program and then click next. At this point the readiness checks will be performed to ensure your infrastructure is ready for Exchange 2010.
The results of the readiness check should show a warning on the Organisation Prerequisites, this is normal and it’s because we didn’t run the setup /PrepareAD /OrganizationName: command earlier on. This can safely be ignored as the setup will perform this task for us.
The other cautionary warning you will see on my screen capture is simply because I haven’t installed the Office Filter Pack so you will only see this if you didn’t follow the step earlier. Once you click install, the wizard will Install Exchange Server 2010. And we are looking for the screen below. All green.
Now that Exchange is installed, using the Exchange Management Console, navigate to Server Configuration > Hub Transport. Here there will be 2 Receive Connectors listed.
The one we will be dealing with is the one that starts with the word Default and is followed by the name of the Exchange 2010 server. Right click on this Receive Connector and select properties. Under the Permission Groups tab, check the box for Anonymous Users. If this box is not checked then servers sending mail to you will not be able to connect. Your e-mails with therefore be rejected.
One final task before we move on, is to reconfigure any firewall/router rules you may have for ports 25 and 443 to allow the Exchange 2010 server to now deal with SMTP traffic and Outlook Web App.
Step 7 – Installing Exchange 2010 SSL Certificate
Exchange 2010 installs with a self-signed certificate by default. Whilst this will work, it will cause browser errors in the form of untrusted websites, Outlook errors for Autodiscover (which is used for free/busy information & Offline Address Book) and errors when using mobile devices and Outlook Anywhere. Whilst for the most part there are ways around these problems, I won’t be covering them in this article because my recommendation, as any other Exchange specialist would recommend, would be to use a 3rd party certificate. You can purchase certificates that work with all versions of Exchange from http://www.exchangecertificates.com
Unlike earlier versions of Exchange, we have a nice easy to use wizard in the Exchange Management Console for certificate generation. This makes installing commercial certificates in Exchange 2010 much easier and less prone to error.
To start the New Exchange Certificate wizard do the following:
Click Start > All Programs > Microsoft Exchange Server 2010
Navigate to Microsoft Exchange On-Premises > Server Configuration
In the Actions pane click New Exchange Certificate
This will start the New Exchange Certificate Wizard
Enter a friendly name for the certificate. This can be whatever you like, but standard practice is to use the company name or something that can identify your company. Click Next
DO NOT Select to create a wildcard certificate unless you plan on buying a certificate for your entire domain, which is not required for Exchange to function. Click Next
On the following screen pull down the arrows for:
Client Access Server (Outlook Web App)
Client Access Server (Exchange ActiveSync)
Client Access Server (Web Services, Outlook Anywhere, and Autodiscover)
Make sure all the URLs are correct (examples can be found in my screen capture above) and then click Next.
Confirm the entries on the next page (it’s worth noting on this screen that the address shown in bold is what is known as a Common Name). This could be important later as Outlook Anywhere requires the common name to be the same as the URL used in the RPC connection. In most of my configurations I use the owa.gkvirtualdomain.co.uk as the common name. To do this, highlight the URL and click the Set as Common Name option. Click next when finished.
You then need to complete your organisation information as shown in the screen above. Then click New on the next screen. And then finish.
You can then open the file you have specified to create the request with, copy and paste the entire contents into the 3rd party vendors website and follow their instructions for submitting it.
Once you receive the signed certificate, right click on the certificate request located as above and select Complete Pending Request. Follow the instructions to import the certificate you have just received.
Step 8 – Migrate Exchange Data
Now we have Exchange installed, it’s time to migrate the data over. We will start with the easy part as a bit of a break from the previous 6 steps.
To migrate the user mailboxes, open Exchange Management Console and navigate to Recipient Configuration > Mailbox. Highlight the mailboxes you want to move (the mailboxes that are on the Exchange 2003 server will appear as Legacy Mailboxes, as pictured above), right click on them and select New Local Move Request.
When the New Local Move Request wizard opens, click the browse option to select the Windows 2008/Exchange 2010 server mail store and click OK, then click next.
On the following screen, select what you would like to do when the wizard encounters corrupt messages. You have two options: either to skip only the corrupt message or to skip the whole mailbox. Click next and on the following screen click New.
Once the move requests have been verified, we should see the screen above. All the mailboxes you selected should hopefully show a green tick. Please note that during the move mailbox process, the user will not have access to their mailbox as it is moved “offline”.
The next stage is to migrate the Public Folders. To do this complete the following steps on the SBS 2003 Server:
Click Start > All Programs > Microsoft Exchange Server > System Manager
Navigate to Administrative Groups > First Administrative Group > Servers > Servername > First Storage Group
Right click on the Public Folder Store and select Move All Replicas. The only option that should appear in the list is your Exchange 2010 server. Click OK.
Now that we have moved the data to the Exchange 2010 server it’s best to leave this for a day or so to a) make sure all the data is moved before we perform any other Exchange related tasks. b) allow all the outlook clients to update automatically with the new server settings.
Step 9 – Migrate SharePoint Services
If you are using companyweb for an intranet/document storage etc. then you will also need to migrate this. If you are not using SharePoint then simply skip this step.
First thing you will need to do is to install the Windows SharePoint Services 3.0 which you downloaded as part of the pre-requisites. This is the free version of SharePoint Services. Only the version with Integrated Service Pack 2 will install on Windows 2008 R2.
Once you have downloaded Windows SharePoint Services 3.0, double click to start the installation on the Windows 2008 Server. Read, agree to and accept the license agreement and click continue. Select Basic installation. This will install the standard single site installation.
Once the installation has finished, launch the SharePoint Products and Technologies Configuration Wizard. Click next on the welcome screen and Yes to confirm you are OK with the services being restarted.
NOTE: While IIS restarts, the Outlook Web App will be temporarily unavailable.
On the final screen, check the box to ‘Run the SharePoint Products and Technologies Configuration Wizard now’ and click Close.
Click Next on the welcome screen and Yes to confirm you are OK with the services being restarted. The wizard will run through again and complete the configuration. Once finished click close.
Make sure you install the 32bit version on the Small Business Server and the 64bit version on the Windows 2008 server.
The next step we need to complete is to run a pre-scan on the current database to allow Windows SharePoint Service 3.0 to upgrade it when we move it to the Windows 2008 server.
Perform the following steps to achieve this:
Copy the C:Program FilesCommon FilesMicrosoft SharedWeb Server Extensions12Binprescan.exe which can be found on the Windows 2008 server to the Small Business Server. It doesn’t matter where you put this
Launch a command prompt (Start > Run > CMD)
From the command prompt run: prescan /V http://companyweb and press enter
Once you have done this still, working on the Small Business server perform the following tasks:
Navigate to Start > Administrative Tools > Internet Information Services (IIS)
Navigate to servername > Web Sites and right click on companyweb and select stop
We now need to launch the SQL Server Management Studio Express, this can be done by:
Click Start > All Programs > Microsoft SQL Server 2005 > SQL Server management Studio Express
In the dropdown list on the connection screen, ensure that SERVERNAMESHAREPOINT is selected and click connect
Before we perform any additional steps, we are going to take a backup of the database used for companyweb. Follow these steps to perform a backup:
Expand the Databases folder
Locate the database called STS_SBSSERVERNAME_1 right click on the database and select Tasks then Backup
On the backup screen, the only section you need to change is the destination. Make sure the “backup to” is set to disk and then click Add.
If you receive the error message above, don’t panic, it’s easily solved by using the following procedure:
Click Start > Run > Type regedit > Click OK
Navigate to HKEY_LOCAL_MACHINESoftwareMicrosoftMicrosoft SQL ServerSharePointMSSQLServer
Right click and create a new String Value called BackupDirectory
Double click the new value to edit it and give it a value of C:
Close Regedit and try clicking the Add button again on the Backup Screen, specify a location for where you would like to save the backup and click OK.
We are now going to detach the database from the SBS 2003 server. Still in SQL Server Management Studio Express, right-click on the STS_SBSSERVERNAME_1 select tasks and then Detach.
Locate the Database and Log file, which by default will be located in C: Program FilesMicrosoft SQL ServerMSSQL$SharePointData on the Small Business Server. You need to copy the STS_SBSSERVERNAME_1.MDF and STS_SBSSERVERNAME_1_LOG.LDF files to a folder on the destination server, don’t copy them in to the SQL Server data folder.
Working on the Windows 2008 server perform the following steps:
Navigate to Start > All Programs > Microsoft SQL Server 2005 > SQL Server Management Studio Express
On the connection window enter \.pipemssql$microsoft##sseesqlquery in the servername box and click connect
Right click on Databases and click attach
Click the Add button and select the STS_SBSSERVERNAME_1.MDF you copied from the Small Business Server earlier
We now need to create the website in IIS. To do this, do the following:
Navigate to Start > Administrative Tools > Internet Information Services (IIS) Manager
Expand the servername
Right click on Sites and select New Site
On the Add Web Site wizard, enter a site name of companyweb, specify a physical path and host name of companyweb as shown in the image above. You can change these if you wish, but keeping the site name/host name the same will mean the URL your clients use will not change.
Launch DNS manager from Start > Administrative Tools > DNS. Expand the forward lookup zone for your internal domain name and locate the CNAME record called companyweb. This should currently be using the Small Business Server’s server name. Double-click this record to edit it and change it to use the Windows 2008 server instead.
And then finally we need to setup SharePoint Service. To do this perform the following steps:
Navigate to Start > Administrative Tools > SharePoint 3.0 Central Administration
Click Application Management
Select Create or Extend Web Application
On the next screen select Create a New Web Application
On the screen that appears, complete the fields as listed below. If nothing is specified, please leave the default settings.
In the IIS Web Site Section choose the following:
Use an Existing Website and then select companyweb from the drop down list
In the Security Configuration Section
Set Authentication Provider to NTLM
Set Allow Anonymous to No
Set Use Secure Socket Layers (SSL) to no
In the Application Pool Section
Use Existing Application pool and Select companyweb from the drop down box
In the Database Name and Authentication Section
Database Server should be set to WINDOWS2008SERVERNAMEMicrosoft##SSEE (where WINDOWS2008SERVERNAME is the name of the Windows 2008 Server)
Database Name should be set to STS_SBSSERVERNAME_1
Database authentication should be set to Windows Authentication (recommended)
In the Search Server Section
Pull down the drop down list and select the Windows 2008 server from the list
Click OK and your SharePoint Website will be created. Once the wizard has finished, from an Internet Browser type in http://companyweb/ and the companyweb website on the Windows 2008 server will be displayed.
Step 10 – Migrate shared user data
NOTE: This section is currently under review as I have been advised that this process does not work correctly.
Because this step is so generic and it could be different for every server, I am not going to go into specifics, only the more general steps that need to be accomplished.
The shares that are in use on the Small Business Server need to be recreated on the Windows 2008 server. One way we can do this is backup the share definitions from the Small Business Server and restore them to the Windows 2008 server. This involves working in the registry so please be careful and follow the instructions accurately. The instructions on how to do this can be found here: http://support.microsoft.com/kb/125996
The next stage is to restore the actual data to the shares. This is a lot easier if you ensure that the folder structure you have on the Small Business Server for shares is replicated on the Windows 2008 server. You can simply use Windows Backup to backup and restore the data. This will keep all permissions and ownership information intact.
You will then need to update any login scripts which will be located in \LOCALHOSTSYSVOL on the Windows 2008 server to ensure that any mapped drives are updated.
You will also need to update any attributes that may be under the Profiles tab in Active Directory Users and Computers for the users themselves.
Step 11 – Uninstall Exchange 2003 from Small Business Server 2003
Hopefully you are arriving at this step a day or two after you have migrated all the mailboxes, if not then I would recommend you leave it for a day or two just to allow all client computers to automatically update the Exchange server setting in outlook. If you uninstall Exchange 2003 from the Small Business Server and this hasn’t happened then the clients will have to be changed manually.
To perform this task we will need Small Business Server 2003 CD 2, which will be asked for during the uninstallation. Before we can do this though, there are a few steps we need to perform otherwise we will not be able to uninstall it.
If you use Recipient Policies that are Manage Mailbox policies, then these will need to be removed. Likewise, if you have Recipient Policies that are used for both e-mail address definition and mailbox management, the settings defined under Mailbox Manager Settings will need to be removed. You DO NOT need to remove your e-mail address policies.
The Recipient Update Service is not used in Exchange 2010 and is therefore not required, so it can be removed. To do this you will need to use ADSI Edit. This can be done by using the following procedure:
click Start > Run > MMC > Click OK
Select File then Add/Remove Snap-in
Click Add and select ADSI Edit and click Add, then close and OK
Right click on the ADSI Edit and select ‘Connect to’. From the drop down under ‘Select a well known Naming Context’, select Configuration and click OK
Expand Configuration > Services > Microsoft Exchange > Organisation Name > Address List Container > Recipient Update Services
Right click on Recipient Update Service (Enterprise Configuration) and select Delete. There may also be a Recipient Update Service (ORGNAME) this also needs to be deleted
Only delete the Recipient Update Service entries under the container; DO NOT delete the container itself or any other entries
The final step in preparation for uninstalling Exchange Server 2003 is to delete the routing group connectors that would have been created as part of the installation. I have highlighted them in the image below. Simply right click on each connector and select delete.
We are now ready to uninstall Exchange 2003. To do this, navigate to Start > Control Panel > Add or Remove Programs. From the list of installed applications, highlight Windows Small Business Server 2003 and click Change/Remove.
Click next on the Welcome screen, and next on the screen that follows. Once the component screen opens pull down the drop down next to Exchange Server and select remove, as shown below. Then click next and next again.
Step 12 – Transfer all 5 FSMO roles to Windows 2008 Domain Controller
Caution needs to be taken when performing this next step. I would advise that ALL of the previous steps need to be completed before this is done as Small Business Server MUST hold all 5 FSMO roles.
Once you are ready, the roles can be transferred as follows. Working on the Windows 2008 server do the following:
Click Start > Administrative Tools > Active Directory Users and Computers
Right click on the domain name and select Operations Masters. You will see the screen below.
On each tab (RID, PDC & Infrastructure) click the change button.
Accept the confirmation that you want each role to be transferred.
That is 3 of the 5 roles transferred. To do the next one, which is the Domain Naming Master we need to do the following:
Click Start > Administrative Tools > Active Directory Domains and Trusts.
Right click where it says Active Directory Domains and Trusts and select Operations Master.
Once again click the Change button and say yes to the notification dialog.
4 down with 1 to go. To move the Schema Master role we need to do the following:
Click Start > Run and type regsvr32 schmmgmt.dll
Click OK to the confirmation
Click Start > Run and type MMC and click OK
Select File > Add/Remove Snap-in from the console
From the list select Active Directory Schema, click Add
Click Close and OK.
Right click on Active Directory Schema and select Change Active Directory Domain Controller
Choose the Windows 2008 Server from the list and click OK
Click OK on the warning Dialog box.
Right click on Active Directory Schema and select Operations Master
Click the Change button and say yes to the notification dialog
That’s all the FSMO roles transferred from the Small Business Server. The next and final step is to demote the server from being a Domain Controller.
Step 13 – DCPROMO SBS 2003 server so it is no longer a domain controller and remove from network
This is the final step of the migration process. If you have made it this far, well done! This is the easy bit!
The first thing we need to do is make sure the Small Business Server is not a Global Catalog Server. Click on Start > Administrative Tools > Active Directory Sites and Services. Locate the Small Business Server as shown in the screen shot below.
Right click on NTDS settings located under the Small Business Server and select properties. Remove the check from the Global Catalog check box and click OK. Close Active Directory Sites and Services snap-in.
The final step is to run DCPROMO. To do this, do the following:
Click Start > Run and type DCPROMO and click OK
Click next on the Welcome screen
DO NOT check the box that says “This server is the last domain controller in the domain” and Click next
Enter a new administrator password for the local administrator user and click next
The server will then remove Active Directory Services from the Small Business Server and it will no longer be a Domain Controller.
Once this has finished, allow the server to restart, login and then shut it down. You have now completed the migration.
If you are still with me, well done! There are a few sections of additional reading below if you would like to know some more detail about some of the processes we have just completed. There is an excellent article from EE Expert tigermatt around the purpose of the FSMO roles which you will find under the further reading section.
You can change ip address using ifconfig command itself. You can use Terminal.
you will need permission to change the IP, use su
Shirajs-MacBook-Pro:~ shiraj$ su
Password:
sh-3.2#
To set IP address 192.168.200.1, enter command: # ifconfig vmnet1 192.168.200.2 netmask 255.255.255.0 up
# ifconfig vmnet1
you can change the /Library/Application Support/VMWare Fusion/vmnet1/dhcpd.conf and have Fusion to statically assign this IP using the following settings:
while searching for mac running slow I found a some info from various sites
Cluttered Desktop
Having too many files and folders on your desktop can slowdown your machine. Put these files into folders in your home directory and create aliases to them on the desktop.
Corrupt Preference Files
Preference files can easily become corrupt and can make programs act weird or run slowly. If your Mac is slow using a particular application you can try deleting its preference file and relaunching he app (applications create a new file when they are relaunched if they can’t find an existing one). It’s worth making a backup of the old file just i case you lose some settings that are hard to replicate.
Smart Playlists on iTunes
Smart playlists can make iTunes slower as they have to reload every time iTunes is launched. Disable live updating by going to File, Edit Smart Playlist and untick Live Updating.
Too Many Widgets on Dashboard
Each Widget on your Dashboard uses memory, again you can check the memory usage of your widgets by using the Activity Monitor. Remove any used or memory hogging widgets using the Dashboard control panel.
Caches, Log files and Temporary Items
It doesn’t hurt to regularly clear out built up Caches, Log files and Temporary Items an easy way to do this is to use an application like OnyX. If you prefer you can delete Caches manually, they can be found in Home/Library/Cache.
Wrong Firmware
Using the wrong Firmware can cause all sorts of problems, keeping your software up to date on a Mac is so easy there is really no excuse. Just click on Software Update in the Apple menu. You can also schedule your Mac to automatically check for updates, go to System Preferences and Software Update and tick Check for updates. You can change the frequency of the checks using the drop down menu.
Not Enough RAM
Software can only take you so far. Upgrading your RAM will probably give you the biggest speed increase out of any of these tips. You can use the Activity Monitor application (under Utilities in the Application folder) to check if your Mac would benefit from more RAM. Click on System Memory tab and have a look at the pie chart at the bottom. If the chart is largely red or orange you are running out of RAM. Also take a look at the Page Ins and Outs numbers, if these are continually increasing, its time to upgrade your RAM.
Permission Conflicts
Some issues with applications loading slowly or acting weird can be remedied by repairing permissions. All files in Mac Os X have a set of permissions, these determine which users or applications can have access to them. Sometimes permissions are incorrect and not what the operating system expects. To repair disk permissions you can use the Disk Utility app (in /Applications/Utilities). Select your startup disk and click th First Aid tab, then click the Repair Disk Permissions button.
Hard Disk Is Nearly Full
Your Mac automatically utilizes free space on your Hard drive as Virtual Memory to free up the RAM. Try to make sure you have 10% free space available for this task.
Lots of Login Items
Removing unwanted or little used programs from your login items. To change your login items go to System Preferences then Accounts and click the Login Items tab.
Unused System Preference Panes
Clearing out unused preference panes can help free up memory and disk space, check under Other in System Preferences to see what you can remove. You can either disable it in its menu or delete it entirely by removing it from ~/Library/PreferencePanes.
Unused Applications Left Running
All running applications use up your memory and CPU resources, quit applications if you are not going to use them for a while. Some programs have memory leakage issues which means they tend to consume more and more memory the longer they are running (again you can spot these in the Activity Monitor) it a a good idea to quit and relaunch these every so often.
Animated Wallpapers
Animated or slide show wallpaper can really impact the performance of your machine so its a good idea to turn this off.
Firefox Overloaded With Extensions
There are loads of awesome Firefox extensions so its easy to get carried away and add too many. Take a few moments to go through your Add-ons (open Firefox and go to tools then Add-ons) and uninstall any you no longer use.
Internet Settings
If you are finding your browser slow try clearing the cache and deleting your history. In Safari you do this by going to the main menu and clicking Reset Safari, tick Clear History and Empty the Cache then Reset. In Firefox go to Preferences, Privacy and click the Clear Now button.
Favicons in Safari or Firefox
You may see an improvement in your browsers performance by deleting your cached Favicons, for Safari just delete the files in /Library/Safari/Icons. If you use Firefox 3 read this useful tutorial on macosxhints.
Massive Mailboxes
If you have a massive mailbox with thousands of messages it’s going to take longer to load. Try to delete messages you no longer need and split larger mailboxes into folders.
1.press Ctrl + Alt + Delete – this will open a menu where you need to:
2.choose “Start Task Manager”. When task manager is started
3.click on “File”, then from the drop down list choose
4.”New Task(Run..)” and when program “run” starts type
5.”explorer.exe” in the white field, then
6.click “ok”, this should solve your problem temporarily (windows should work fine now), if so
7.start the “run” program again and type
8.”regedit” in the white field, then
9.click on “ok”, this will open the Registry Editor program where you will need to
10.open the location:
HKEY_LOCAL_MACHINE \ SOFTWARE \ Microsoft \ Windows NT \ Current Version \ Winlogon -(don’t forget to click on Winlogon, not just that little triangle in front of it) when you done that on the right side will be a list of files
11.double click the “Shell” file
12.change the text in the text box “Value data:” to “explorer.exe”
12b. restart your computer and windows should run as normal.
Check the version of the Macintosh server before proceeding with the installation of the agent. The same can be checked using the following commands.
‘sw_vers’ will display the Mac version.
‘uname -a’ will display the kernel version.
Please confirm that the version is supported by comparing the same with the Software Compatibility List for Backup Exec. The following is the link to the Software Compatibility List for BEWS 12.5
1. Once the version has been confirmed as supported login to the MAC server as ‘root’. If ‘root’ password is not available, use the server admin account.
2. Create a directory on the “/” directory called “rams”.
3. Copy the installer files of RAMS (e.g. BEWS_12.1364_LINUX-UNIX-MAC_AGENTS.tar.gz) to the rams directory on Macintosh system. The installer files can be obtained from
4. Change the permissions to Full Access using command: chmod 777 BEWS_12.1364_LINUX-UNIX-MAC_AGENTS.tar.gz.
5. Extract the installer files using command: tar -zxvf BEWS_12.1364_LINUX-UNIX-MAC_AGENTS.tar.gz.
Note: Do not extract the RAMS installer files on a Windows system and copy the resulting files to the MAC. Doing so will cause difficult to diagnose installation errors. It is important to copy the .gz file to the Mac and extract it there.
6. When using the server admin account, use the “sudo” command to run the installation script. If prompted for a password, enter the password for the server admin account.
Server Admin account : sudo ./installrams
Root account : ./installrams
7. Make sure the MAC system name is correct because it will go through an Initial System Check.
8. A prompt will show for the installation of two Libraries: VRTSvxmsa and VRTSralus.
9. A scan will run to determine if the required space is available on the server.
10. Enter the IP Address (preferred method) or hostname of the Media Server.
11. The packages VRTSvxmsa and VRTSralus will install on the system.
12. RAMS is properly installed.
13. Check the Installation log location and start the Remote Agent Service. When using the server admin account, use the sudo command here as well. The command is sudo /Library/StartupItems/VRTSrams/VRTSrams start.
14. Make sure the Remote Agent for Macintosh Systems (RAMS) is started. Run the command: ps ax | grep beremote. Make sure you find the entry for the process running under /opt/VRTSralus/bin/beremote.
15. If the agent fails to start refer the following document to enable debugging for RAMS to diagnose the service startup failure.
16. Now, go to the Backup Exec console and expand the Macintosh Systems under Favorite Resources of Backup selections. Select the MAC server and a prompt for logon credentials will show. Click on New, create a Logon Account for MAC system with the server admin username and password.
17. Confirm that the MAC Selections can be expanded and selected in the backup selections window.
 To renew the certificate for server e12postcard.e12labs.com, a server with CAS and HT roles installed:
 The old certificate is enabled for IIS, POP, IMAP and SMTP. The new certificate generated using the above command is enabled only for POP, IMAP and SMTP – IIS is missing.
 Test services are working with the new certificate. If it works as expected, the old certificate can be removed:


