Here is a little tutorial on how to Hack your Apple tv, to run Boxee, XBMC and enable a external-hard-drive.
This tutorial is an alternative to atvflash and is completely free!
After you hacked you apple TV with this you can play the following video formats:
– AVI, DivX, Xvid, FLV, WMV, RM and RMVB
– MKV formats supported up to 480p resolution (hardware limited)
– MPEG-1, MPEG-2, MPEG-3 and MPEG-4
– DVD files (VIDEO_TS/VOB)
– AVI support for: AAC, AC3 Audio, H.264, MPEG4, and VBR MP3
– Subtitle support for SSA and SRT
We will install:
– FTP/SFTP/SSH Access – Transfer files to and from the AppleTV
– NitoTV – Play DVD files, enable USB storage and much more
– XBMC – A fully customizable media center software
– Boxee – Watch and share media with your friends
– Sapphire 6.5 – Play and organize media using IMDB database
What you need:
– AppleTV running software v2.3 or later
– Mac running OS X v10.4 or later
– USB Flash Drive – sized 256MB – 2GB recommended drives
– Internet connection
Step 1: Make a usb patchstick
(AppleTV Firmware Download Locations http://www.iclarified.com/entry/index.php?enid=970)
First we need to download the uber USB flash drive creator for the AppleTV, witch can be found onhttp://code.google.com/p/atvusb-creator/The usb flash drive creator will make a patchstick that enables SSH on your Appletv (so you can access the apple tv’s file structure) and installs Boxee and XBMC. The creation of the patchstick is pretty straight forward, just follow the onscreen instructions.
Step 2: Install the patchstick
1) turn of your apple tv (unplug the power)
2) Place the patchstick in the apple tv
3) Turn on your appletv (wait for the patchstick to do its thing)
4) After a minute or the patch should be installed (wait for instructions on your screen)
5) Remove the patchstick and restart your Apple TV.
Boxee, XBMC and SSH should now be installed and enabled on your Apple TV.
Step 3: Access your Appel TV
Because we enabled SSH on the Apple TV , we can now remotely access the Apple TV with Coda or Cyberduck on your Mac computer.
In coda (or an other SSH application) connect to the Apple TV via:
1) Select SFTP (SSH)
2) server: yourappletvip (or the ip-adress of your Apple TV)
3) username: frontrow
4) pass: frontrow
5) Press Connect (you will get access to the Apple TV)
Step 4: Enable external USB drives
Now we have remote access to the Apple TV we can enable external USB drive support.
We will do this by installing NitoTV.
You will need to download Nito tv to your Mac. Download.
(check for latest version on http://wiki.awkwardtv.org/wiki/NitoTV_Take_2)
1) Download Nito tv and unzip.
2) With Coda or Cyberduck login to your Appel TV and copy the content of the nito TV folder (installme and nito TV ) to the Apple TV
3) With the terminal Application>utilities> terminal login into the Apple TV.
4) ssh frontrow@yourappletvip
5) When prompted for a password, enter ‘frontrow’.
6) Now go to the directory where you placed Nito TV on your AppleTV and type the following command:
sudo ./installme (When prompted for a password, enter ‘frontrow’ again.)
7) Now restart your Apple TV. Now Nito tv is installed
Go To Nito tv and Install Smart Installer
That’s It, you can now watch almost any kind of video with your apple TV and use external hard-drives!
Barracuda Spam & Virus Firewall Notes – How to get full root access;
Log in using single users mode – to do this;
a. Power On/reboot
b. At lilo prompt (barracuda splash) quickly hit the tab key
c. Type: Barracuda init=/bin/bash
d. The password is: bimg
You are now booted into single user mode with full root access. Whist
this is limited it will still allow you to remove the barracuda root
password easily. This is done by simply removing it from the /etc/shadow
file for the root user. It can easily be changed afterwards. Be aware
that the Barracuda has a ‘recovery’ partion (3) and it will make sense to
clear the password on this partion too.
Starting with partion 1 (the main ‘running’ partition). In single user
mode it may not mount properly. It can often end up as read only yet
mount -l it states rw. This causes all sorts of wiredness when writing
files, so save any heartache and remount it rw like this;
mount -o remount, -rw /dev/ide/host0/bus0/target0/lun0 /
{if you are using SATA drives they are probably going to be under /dev/
scsi/host0/bus0/target0/lun0/ or software raid /md}
The main /etc/shadow file gives write issues the file system is not
properly mounted, so the root user is not able to force overwrite of the
file. The above remount command fixes that. You can now edit it and force
the writing with the ! operator.
Here is how to edit it;
vim /etc/shadow
move cursor to first line for the root user.
Switch to insert mode by pressing the [i] key
Put cursor at start of password and use the delete key to remove the
encrypted password between the first and second colon – typically
looking like this- $1$2NVlp7G0$EoDgfwGBkSb/LOe7VgfQP/
Make sure you leave the the two colons in place, so the line looks
similar to this- root::12277:0:99999:7:::
Switch VIM to command mode by pressing [ESC]
Write the file with the override option by typing
:w!
Then quit
:q
If you cant do this, check you remounted the file system correctly as
detailed above.
Next we do the same for the recovery partition 3 /etc/shadow password
file. Mount partition 3 so we can edit the file. The mount directory /mnt/
hd should already exist from the building of the appliance (ls -l /mnt to
check – if not mkdir /mnt/hd)
Mount it (again assuming IDE here – modify you path accordingly)
mount /dev/ide/host0/bus0/target0/lun0/part3 /mnt/hd
Repeat the editing on this file /mnt/hd/etc/shadow
When you are done you can unmount it;
umount /dev/ide/host0/bus0/target0/lun0/part3
Finally, stop the barracuda with this command:
halt -fp
When you reboot the unit normally you will be able to log in with
username ‘root’ and no password at the Barracuda log-in prompt. To set a
fresh root password after logging in as root, just issue the ‘passwd’
command and set it to something suitable. Upgrading firmware does not
currenlty overwrite this hack so it’s a set and forget (tested up to
version 4.0.0.31)
Your Barracuda is now fully open an unlocked for root access. What
follows is a list of changes you can make and some security notifcations:
————————————————————————— ———–
First of all Barracuda and the ‘port 25’ redirect. Old versions of the
Barracuda left a nice back door open for support. Port 25 was redirected
to port 22 SSH and 8000 for a Barracuda ranges. As you are not really
likely to have port 25 closed it was a serious back door to leave open.
This has been removed (other back doors may be open) but check by looking
at this file:
/etc/sysconfig/iptables
You don’t want to see this;
-A PREROUTING -s 205.158.110.61 -p tcp -m tcp –dport 25 -j REDIRECT –to-
ports 22
-A PREROUTING -s 205.158.107.65 -p tcp -m tcp –dport 25 -j REDIRECT –to-
ports 8000
If you do comment them out with a #
Whilst in this file you can block all port 22 access from Barracuda by
commenting (#) out:
-A INPUT -s 205.158.110.0/255.255.255.0 -p tcp -m tcp –dport 22 -j
ACCEPT
-A INPUT -s 205.158.110.0/255.255.255.0 -p tcp -m tcp –dport 22 –tcp-
flags SYN,RST,ACK SYN -j ACCEPT
You can also alter the ranges to allow *you* port 22 ssh access from your
local or remote network, just edit one of these line to suit or add your
own;
-A INPUT -s 192.168.200.0/255.255.255.0 -p tcp -m tcp –dport 22 -j
ACCEPT
-A INPUT -s 192.168.200.0/255.255.255.0 -p tcp -m tcp –dport 22 –tcp-
flags SYN,RST,ACK SYN -j ACCEPT
When updating firmware these changes are *lost* so don’t forget to put
them back if you don’t want strangers poking aroung in your Barracuda.
To restart IP tables on the barracuda, just do this;
/etc/init.d/iptables stop; /etc/init.d/iptables start;
————————————————————————— ———–
To read or reset the GUI password
READ:
config_read system_password
CHANGE:
config_change system_password chosen_new_password
————————————————————————— ———–
To add features to a lower spec machine GUI just ‘touch’ ‘ any of these
files; This will add the feature.
EXAMPLE;
touch /etc/barracuda/multiple_ip
/etc/barracuda/syslog (Advanced -> Syslog tab)
/etc/barracuda/explicit_user_config (Advanced -> Explicit Users tab)
/etc/barracuda/exchange_accelerator (MS Exchange Accelerator)
/etc/barracuda/trusted_relays (Advanced -> Rate Control tab)
/etc/barracuda/multiple_ip (Advanced -> Advance IP Configuration tab)
// static routes etc
/etc/barracuda/clustering (Advanced -> Clustering tab)
/etc/barracuda/auth (Advanced -> Single Sign-On)
/etc/barracuda/api (Basic -> Administration -> API/SNMP section)
/etc/barracuda/plugin (Basic -> Bayesian/Fingerprinting -> Mail plug-in)
/etc/barracuda/per_domain (Domains tab)
/etc/barracuda/per_user_scores (Per-User scoring)
/etc/barracuda/ldap_routing (Advanced -> LDAP Routing) (3.5.11 and
above only) (600s and above only)
————————————————————————— ———–
To change the serial number / identity.
The backend Barracuda system is really lame at this time. Almost like it
was written by a couple of dickheads in their dens. This means you can
pretty much try random five and six figure serial numbers and get free
updates when you hit a good one. TIP; keep a lookout on eBay for people
stupid enough to sell them showing the serial number and advertising them
with a remaining subscription. Forget matching up the MAC address to the
system – they managed to screw that notion up. The PHYSICAL MAC is never
properly recorded (and at Jan of 2009 still was not). This is read from a
text file that can be set to anything you like. The only real restriction
comes from a simple geo lookup on your IP when you connect to Barracuda.
Domestic US units being used outside of the USA will fail with CODE -4
(you can always try an HTTP proxy or another serial number). Changing the
password involves changing a few files and a couple of database entries.
This is easy to script with this tested perl script that also backs up
the current settings:
<START OF SCRIPT>
#!/usr/bin/perl -w
use DBI;
my $newserial = “12”;
my $newmodel = “120”;
my $newmac = “GG:GG:GG:GG:GG:GG”;
my $current_model = “”;
my $keypress = “”;
my @oldmachine =();
my @machinearray =();
my @result= ();
my $dsn = “”;
my $dbn = “”;
my $sth = “”;
my $sql = “”;
my $a1 = 0;
my $xx = 0;
my $shell_command =””;
my $count = 0;
my $database = “config”;
my $hostname = “localhost”;
my $port = “3306”;
my $db_username = “root”;
my $db_password = “none”;
print “n*************************************************n”;
print “* Barracuda Serial Number & Model Changer v1 *n”;
print “*************************************************n”;
while (1) {
print “nenter new serial (or k to keep existing | x to exit): “;
$keypress = <STDIN>;
chomp ($keypress);
if ($keypress =~ /D/){
if (($keypress eq “k”) || ($keypress eq “K”)) {
last;
}
if (($keypress eq “x”) || ($keypress eq “X”)) {
exit;
}
print “n! Error ! – numeric input only
pleasen”;
next;
}
if ($keypress >99 && $keypress < 1000000) {
$newserial = $keypress;
last;
} else {
print “n! Error ! – check serial number is
within correct rangen”;
next;
}
}
while (1) {
print “nenter new model (or k to keep existing | x to exit): “;
$keypress = <STDIN>;
chomp ($keypress);
if ($keypress =~ /D/){
if (($keypress eq “k”) || ($keypress eq “K”)) {
last;
}
if (($keypress eq “x”) || ($keypress eq “X”)) {
exit;
}
print “n! Error ! – model number is bad
try againn”;
next;
}
if ($keypress ==100 || $keypress ==200 ||
$keypress ==300 || $keypress ==400 || $keypress ==600 || $keypress
==800) {
$newmodel = $keypress;
last;
} else {
print “n! Error ! – check model number is within
correct rangen”;
next;
}
}
while (1) {
print “nenter new mac (or k to keep existing | x to exit):”;
$keypress = <STDIN>;
chomp ($keypress);
if ($keypress =~ /[0-9A-Fa-f][0-9A-Fa-f]:
[0-9A-Fa-f][0-9A-Fa-f]:[0-9A-Fa-f][0-9A-Fa-f]:[0-9A-Fa-f][0-9A-Fa-f]:
[0-9A-Fa-f][0-9A-Fa-f]:[0-9A-Fa-f][0-9A-Fa-f]/){
$newmac = $keypress;
last;
} else {
if (($keypress eq “k”) || ($keypress eq
“K”)) {
last;
if (($keypress eq “x”) || ($keypress eq
“X”)) {
exit;
}
print “n! Error ! – check mac address
and try againn”;
next;
}
}
}
print “n*************************************************n”;
print “* Checking current config and updating……. *n”;
print “*************************************************n”;
$dsn = “DBI:mysql:database=$database;host=$hostname;port=$port”;
$dbh = DBI->connect($dsn, $db_username ) or die(“fatal error – could not
connect to backend database.”);
$sql=”SELECT * FROM config WHERE variable like ‘system_serial’;”;
$sth = $dbh->prepare($sql);
$sth->execute or die “SQL Error: $DBI::errstrn”;
if ($sth->rows) {
@row = $sth->fetchrow_array;
if (@row) {
push(@oldmachine, $row[1]);
print “CURRENT DATABASE SERIAL:
” . $oldmachine[0] . “n”;
} else {
die(“fatal error – unable to find
current serial number in databasee.”)
}
};
$shell_command = `ifconfig -a`;
if(($shell_command =~ /ethd.*HWaddr.*d/)){
$shell_command =~ m/b..:..:..:..:..:..b/;
$shell_command = uc($&);
} else {
$shell_command = “UNKNOWN”;
}
push(@oldmachine, $shell_command);
print “CURRENT ACTUAL MAC: ” . $oldmachine[1] . “n”;
if (-e “/home/remote/backup”) {
unless (-d “/home/remote/backup”) {
die “MCF File exists but is not directory”;
}
}
else {
mkdir(“/home/remote/backup”, 0777) or die “Can’t make directory: $!”;
}
if (-e “/root/machine$oldmachine[0]”) {
print “nMachine File found – backing up;n”;
$shell_command = `cp /root/machine$oldmachine[0] /home/remote/
backup/`;
print “CONTENTS OF CURRENT MACHINE FILE:n”;
open (FILE, “/root/machine$oldmachine[0]”);
while (<FILE>) {
chomp; #cut off /n newlines from the end of each line
next unless /S/; # if the file line is blank move on – we don’t
need blank lines
$member = $_;
print $member . “n”;
if (($member =~ /serial_number/) && ($newserial ne “12”)){
push (@machinearray, “serial_number $newserial”);
next;
}
if (($member =~ /mac_address/) && ($newmac ne
“GG:GG:GG:GG:GG:GG”)){
push (@machinearray, “mac_address $newmac”);
next;
}
if($member =~ /model ddd/) {
$current_model = $member;
$current_model =~ /ddd/;
$current_model = $&;
if($newmodel ne “120”){
push (@machinearray, “model $newmodel”);
next;
}
}
push (@machinearray, $member);
}
close (FILE);
# now write the new machine file
print “nPOPULATE NEW MACHINE FILEn”;
foreach $member(@machinearray)
{
$fileout .= “$membern”;
}
print $fileout;
open FILE, “>/root/machine$newserial”;
print FILE “$fileout”;
close (FILE);
}
if (-e “/etc/barracuda/serial”) {
print “nBarracuda Serial File found – backing upn”;
$shell_command = `cp /etc/barracuda/serial /home/remote/backup/`;
print “CONTENTS OF SERIAL FILE: “;
open (FILE, “/etc/barracuda/serial”);
while (<FILE>) {
chomp;
next unless /S/;
print $_ . “n”;
}
close (FILE);
if($newserial ne “12”) {
print “ndebug – newserial is NOT EQUAL to 12 :>$newserial<:n”;
open FILE, “>/etc/barracuda/serial”;
print FILE “$newserialn”;
close (FILE);
print “Overwritten /etc/barracuda/serial with:n”;
open (FILE, “/etc/barracuda/serial”);
while (<FILE>) {
chomp;
next unless /S/;
print $_ . “n”;
}
close (FILE);
}
}
if (-e “/etc/barracuda/model”) {
print “nBarracuda model File found – backing upn”;
$shell_command = `cp /etc/barracuda/model /home/remote/backup/`;
print “CONTENTS OF MODEL FILE: “;
open (FILE, “/etc/barracuda/model”);
while (<FILE>) {
chomp;
next unless /S/;
print $_ . “n”;
}
close (FILE);
if($newmodel ne “120”) {
open FILE, “>/etc/barracuda/model”;
print FILE “$newmodeln”;
close (FILE);
print “Overwritten /etc/barracuda/model with:n”;
open (FILE, “/etc/barracuda/model”);
while (<FILE>) {
chomp;
next unless /S/;
print $_ . “n”;
}
close (FILE);
}
}
if (-e “/etc/cudamodel”) {
print “nBarracuda cudamodel found – backing upn”;
$shell_command = `cp /etc/cudamodel /home/remote/backup/`;
#read serial file
print “CONTENTS OF cudamodel: “;
open (FILE, “/etc/cudamodel”);
while (<FILE>) {
chomp;
next unless /S/;
print $_ . “n”;
}
close (FILE);
if($newmodel ne “120”) {
open FILE, “>/etc/cudamodel”;
print FILE “$newmodeln”;
close (FILE);
print “Overwritten /etc/cudamodel with:n”;
open (FILE, “/etc/cudamodel”);
while (<FILE>) {
chomp;
next unless /S/;
print $_ . “n”;
}
close (FILE);
}
}
$shell_command = `mysqldump –user root config >/home/remote/
backup/database.sql`;
if ($newserial ne “12”) {
$sql=”update config set value = “. $newserial . ” where variable
like ‘system_serial’;”;
$sth = $dbh->prepare($sql);
$sth->execute or die “SQL Error: $DBI::errstrn”;
print “nUPDATE DATABASE with query: $sql:n”;
$sql=”update config set value = “. $newserial . ” where variable
like ‘user_quarantine_server%’ and value = ” . $oldmachine[0] . “;”;
$sth = $dbh->prepare($sql);
$sth->execute or die “SQL Error: $DBI::errstrn”;
print “nUPDATE DATABASE with query: $sql:n”;
$sql=”update last_notified set server = “. $newserial . ” where
server like ‘” . $oldmachine[0] . “‘;”;
$sth = $dbh->prepare($sql);
$sth->execute or die “SQL Error: $DBI::errstrn”;
print “nUPDATE DATABASE with query: $sql:n”;
$sql=”select value from config where variable like
‘cluster_systems_serial’;”;
$sth = $dbh->prepare($sql);
$sth->execute or die “SQL Error: $DBI::errstrn”;
if ($sth->rows) {
@row = $sth->fetchrow_array;
if (@row) {
print “nCurrent Clustered Serial Numbersn”;
@clustermembers = split(/n/, $row[0]);
foreach $cluster(@clustermembers)
{
print “Cluster Member:|> ” . $cluster . ”
<|”;
#print it
if ($cluster eq $oldmachine[0]){
print ” OLD/CURRENT SERIAL FOUND &
MATCHED”;
$oldmachine[2] = $newserial;
} else {
$oldmachine[2] .= “n” . $cluster;
}
print “n”;
}
print “nUPDATE CLUSTER DATABASE – run
following sql:n”;
$sql = “update config set value='” .
$oldmachine[2] . “‘ where variable like’cluster_systems_serial’;”;
print “$sqln”;
} else {
die(“fatal error – unable to find
current cluster serial.”)
}
}
$shell_command = `rm -f /root/machine$oldmachine[0]`;
}
$sth->finish;
$dbh-> disconnect;
exit();
<END OF SCRIPT>
————————————————————————— ————
What else can you do?
View the logs:
less /mail/log/info (mail log)
less /mail/log/gui (what has done on the gui)
run diagnose.sh and get a look at what is wrong
Read database values such as domain controller/ad login credentials with
config_read %ldap% and a plethora of other useful information
READ, REQUEUE & REDELIVER MESSAGES;
REQUEUE INBOUND/ALL MAIL
postsuper -r ALL
REQUEUE OUTBOUND MAIL
postsuper -c /home/emailswitch/code/firmware/current/etc_outbound -r ALL
find /mail/email/deferred -type f -exec ls -l {} ; | wc -l
******** THIS WILL GIVE QUEUE ERRORS ************
find /mail/email/defer -type f -exec head {} ;
******** THIS WILL GIVE QUEUE ERRORS ************
READ OUTBOUND
postqueue -c /home/emailswitch/code/firmware/current/etc_outbound/ -p
find /mail/email_outbound/deferred -type f -exec ls -l {} ; | wc -l //
show how many
find /mail/email_outbound/defer -type f -exec head {} ;
REDELIVERY
In spam firewall v3.5.12.010 there is a new deliver_mstore that will find
messages even if they are further then the previous 250,000 message limit.
It does require full timestamps when specifying date ranges. yyyy-mm-
ddThh:mm:ss
For example:
“2007-04-10T04:00:00:00/2007-04-12T00:00:00” or “2007-05-16T10:40:53/
T17:03:00”
Start or end may be omitted: “2007-01-20T00:00:00/”
deliver_mstore.pl -d “2007-10-09T11:47/2007-10-09T11:48”
2007 – Year
10 – Month
09 – Day
T11:47 – Time from
T11:48 – Time To
Use the FILTER to narrow down the delivery
-d, –time=s
(Must specify) A date/time range, specified as start/end dates
and times of day in the ISO 8601 extended format (e.g.,
“2007-04-10T04:00/2007-04-12” or
“2007-05-16T10:40:53/T17:03:00”.). Start or end may be omitted,
as “2007-01-20T00:00/”.
-f, –from=s
The mail envelope sender.
-t, –to=s
The mail envelope recipient.
-c, –action=s
The action taken for the message. Either a number, or one of:
allowed, aborted, blocked, quarantined, tagged,
deferred, pu-quarantine, or whitelisted.
-r, –reason=i
The reason for the action taken for the message. A number.
-e, –extra=s
Additional details on the reason for the action taken for the
message. An exact string match.
-s, –subject=s
Substring search within subject.
-b, –body-text
A regular expression to match against the message content
(header & body). WARNING: use of this option will incur extra
overhead, as it requires that all mail content be decoded and
processed.
-o
OR the previous filter option with the following one
(otherwise, they are ANDed).
–regex
Use regexes for filters, instead of matches.
!
Negate the sense of the following filter option.
(, )
Used to group options together. Note that you will need to
escape these within the shell: ( ) or ‘(‘ ‘)’.
Example (per-user email address): this will redeliver from Date (-d),
Action (-c) and To Email (-t)
# deliver_mstore.pl -d “2008-03-13T01:00/2008-03-15T01:00” -c “allowed” –
t “test_c…@twonks.com”
Example (per domain): this will redeliver from Date (-d), Action (-c) and
To domain (-t) (note: –regex must be there)
#deliver_mstore.pl -d “2008-02-20/2008-03-18” –regex -c “0” -t
“*…@barracuda.com”
——–
Warning: DcGetDcName(TIME_SERVER) call failed, error 1355
A Time Server could not be located.
The server holding the PDC role is down.
Warning: DcGetDcName(GOOD_TIME_SERVER_PREFERRED) call failed,
error 1355
A Good Time Server could not be located.
——–
Quick resolution worked for me changing time server:
The procedure for doing this on a PDC Emulator running Windows Server 2003 in the forest root domain is as follows. Open Registry Editor (regedit.exe) and configure the following registry entries:
This registry entry determines which peers W32Time will accept synchronization from. Change this REG_SZ value from NT5DS to NTP so the PDC Emulator synchronizes from the list of reliable time servers specified in the NtpServer registry entry described below.
This registry entry controls whether the local computer is marked as a reliable time server (which is only possible if the previous registry entry is set to NTP as described above). Change this REG_DWORD value from 10 to 5 here.
This registry entry specifies a space-delimited list of stratum 1 time servers from which the local computer can obtain reliable time stamps. The list may consist of one or more DNS names or IP addresses (if DNS names are used then you must append ,0x1 to the end of each DNS name). For example, to synchronize the PDC Emulator in your forest root domain with tock.usno.navy.mil, an open-access SNTP time server run by the United States Naval Observatory, change the value of the NtpServer registry entry from time.windows.com,0x1 to tock.usno.navy.mil,0x1 here. Alternatively, you can specify the IP address of this time server, which is 192.5.41.209 instead.
Now stop and restart the Windows Time service using the following commands:
%system32% represents the path to the System32 folder. For example, if the path is C:\Windows\System32, then the data would be: “C:\Windows\System32\wsaupdater.exe”
Instead of “wsaupdater.exe”, the data should contain “userinit.exe,”.
Using the example above, the data would be “C:\Windows\System32\userinit.exe,”
(!Note! the comma following the file path information.)
Using the XP’s recovery console, copy userinit.exe to wsaupdater.exe to allow log on capability to be restored, and correct the registry data manually.
In the following instructions, C:\Windows\System32 shall be used as the System32 location. Change the path accordingly to accommodate for your installation directory.
Insert the Windows XP startup disk into the floppy disk drive, or insert the Windows XP CD-ROM into the CD-ROM drive, and then restart the computer.
Click to select any options that are required to start the computer from the CD-ROM drive if you are prompted to do so.
When the “Welcome to Setup” screen appears, press R to start the Recovery Console.
If you have a dual-boot or multiple-boot computer, select the installation that you want to access from the Recovery Console.
When you are prompted to do so, type the Administrator password.
If the administrator password is blank (which is likely the case if Windows XP was preinstalled by your computer manufacturer), just press ENTER.
You should now be in the Windows installation folder (“C:\Windows”).
At the Recovery Console command prompt, type the following lines, pressing ENTER after you type each line:
“
cd system32
copy userinit.exe wsaupdater.exe
exit “
At this time, remove the startup floppy or CD-ROM from your system, and boot into Windows XP. Log on to the system using an account with administrator-level privileges, and edit the registry using this information. It is recommeded that a registry backup be created prior to continuing.
Click start, then run. Enter
regedit
and click OK. Using RegEdit, expand
HKEY_LOCAL_MACHINE
+Software
+Microsoft
+Windows NT
+CurrentVersion
+Winlogon
Locate Userinit in the value column, right-click this item, and choose modify. Replace
“wsaupdater.exe” with “userinit.exe,” (do not use quotes, and ensure the trailing comma is present as shown) and click OK.
Exit RegEdit.
Restart your computer, and log on to the system using an account with administrator-level privileges.
Go to My Computer, then to the System32 folder (usually C:, then Windows, then System32). If Explorer prompts that removing files from these areas is not recommended, click to continue. Locate and remove wsaupdater.exe, and delete this file.
At the end of the installation process, you will be prompted to set a password.
The password that you set here will later be used to connect the remote PC.
If for some reason you aren’t prompted for the password, run the following from the command line:
“C:\Program Files\RealVNC\WinVNC\winvnc.exe” -defaultsettings
Also run net start from the command line and confirm VNC Server is running as a service
Step 2: Configure VNC on the remote PC using PsExec
Make sure to use the /s switch with regedit so that confirmation isn’t required on the remote PC.
You are using regedit on the remote PC to perform this command. If the path for regedit is different on the remote PC, use the exact path instead of %windir% (local, not remote environmental variable).
Example: If the local PC is running XP Pro and the remote PC is Windows 2000, use this command: psexec \\RemotePC -s -i -d C:\Winnt\regedit /s C:\vncdmp.txt
So, how to install ipa files on an iPhone or iPod Touch OS2.1 and OS3.0?
Username: root
password for root: alpine
password for mobile: dottie
1. You need to be on jailbroken iPhone with Cydia installed. For this, you may use QuickPwn, PwnageTool, or WinPwn. See my tutorials for on how to jailbreak your iPhone or iPod Touch using any of these tools. (I installed Community source)
2. Install OpenSSH from Cydia on your iPhone. Click on Cydia and then click Install (Sections)>Networking>OpenSSH then click Install>Confirm (if you get a running out of disk space error click “ok”).
3. Log into WinSCP. (I used Fugu) The first time you try to login you may get a connection timeout error, click retry several times (up to 20 times!) and it should work. If you still get an error, reboot your iPod/iPhone and try again.
4. Navigate to /private/var/mobile/ folder
5. Set the permission of the Applications folder to 777 (make sure reclusive is checked).
———Note: You will only need to create these two Documents folders once for OS3 don’t need to ———
for OS3 Simply go to Cydia and add the following source: http://cydia.hackulo.us. Then install the application called AppSync. This will patch your MobileInstallation file. Don’t need to do step 6-14.
6. Stay in the /private/var/mobile/ folder.
7. Create a folder called “Documents” in the /private/var/mobile/ folder. Make sure to spell “Documents” correctly, with a capital “D”.
8. Set the permission to 777.
9. Navigate to the root level and open the /Applications folder.
10. Create a folder called “Documents” inside the /Applications folder and set permission to 777.
11. Go to <root> /System/Library/PrivateFrameworks/MobileInstallation.framework
12. Rename the file “MobileInstallation” to “MobileInstallation.bak”
13. Download this patched MobileInstallation file from HERE. Note that you have to download the patched file for the firmware you are running. ie. if you are running 2.1, you need the MobileInstallation 2.1 patched file.
14. Place the patched file into the /System/Library/PrivateFrameworks/MobileInstallation.framework folder and set the permissions 775 for the patched MobileInstallation file. If there is some type of extension (ie .dylib), then you need to remove that extension.
15. Reboot your iPhone/iPod Touch
16. Download cracked api Games and Apps from Here.
17. Download at least one App from Apple App Store (Free or Paid). What I do is I download one app from the App Store using iTunes, then I sync my iPhone and reboot it. Then I download one app from the App Store on the iPhone and reboot the phone. THIS IS VERY IMPORTANT: Otherwise you will get an error! [Only need to do this once]
18. Drag and drop the .ipa file you downloaded into the iTunes Application library.
19. Sync your iPhone/iPod Touch and enjoy!
If the registry key does not exist, follow these steps to create it:
Locate, and then click the following registry key:
HKEY_CURRENT_USER\Software\Microsoft
Under Edit, click New, and then click Key.
Type Office, and then press ENTER.
Under Edit, click New, and then click Key.
For Outlook 2007, type 12.0, and then press ENTER.
For Outlook 2003, type 11.0, and then press ENTER.
For Outlook 2002, type 10.0, and then press ENTER.
For Outlook 2000, type 9.0, and then press ENTER.
Under Edit, click New, and then click Key.
Type Outlook, and then press ENTER.
Under Edit, click New, and then click Key.
Type Security, and then press ENTER.
Under Edit, click New, and then click String Value.
Copy and paste (or type) the following name for the new value:
Level1Remove
Press ENTER.
Right-click the new string value name, and then click Modify.
Type the file name extension of the file type that you want to open in Outlook. For example:
.exe
To specify multiple file types, use the following format:
.exe;.com
Click OK.
Exit Registry Editor.
Restart your computer.
When you start Outlook, you can open the file types that you specified in the registry.
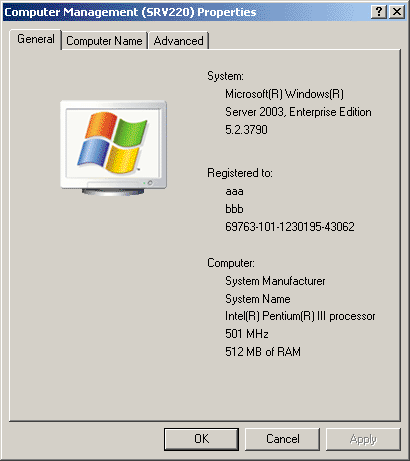
Remote Desktop is a cool feature of Windows Server 2003 that lets you remotely log on to and work at a machine as if you were seated at the local console (in Windows 2000 Advanced Server, this feature was called Terminal Services in Remote Administration Mode). Remote Desktop can be a lifesaver for fixing problems on servers at remote sites, but what if you forgot to enable the feature before you shipped the server out to Kalamazoo? Enabling Remote Desktop is easy if the server is in front of you: just log on as an administrator, open System in Control Panel, select the Remote tab, and under Remote Desktop select the checkbox labeled “Allow users to connect remotely to this computer.” Unfortunately, you can’t use the System utility to enable Remote Desktop on a remote machine, though you can access some properties pages of System using Computer Management by first connecting the console to a remote computer, then right-clicking on the root node and selecting Properties. Unfortunately, as you can see in Figure 1 below, the Remote tab is not available when you access System properties this way on a remote machine (here named SRV220).
Figure 1. System properties for a remote machine does not have Remote tab.
Fortunately, there’s a workaround. Sit down at your desk and log on to your Windows XP workstation using your administrator credentials and start Registry Editor by Start –> Run –> regedit –> OK. Then select the Connect Network Registry option under the File menu (Figure 2).
Figure 2. Connecting to the Registry on a remote machine.
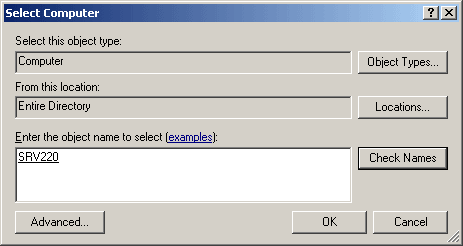
This opens the Select Computer search box. Either browse Active Directory to locate the remote server, or type its name in the textbox (Figure 3).
Figure 3. Connecting to the Registry on a remote server named SRV220.
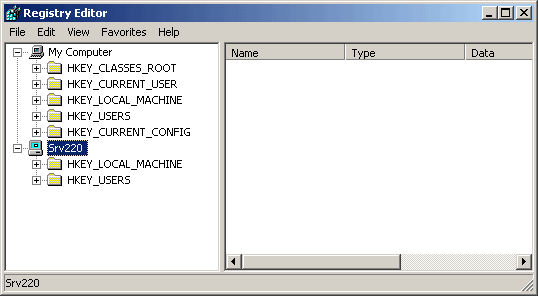
Click OK and a node will be displayed in Registry Editor for the remote machine (Figure 4).
Figure 4. HKLM and HKU hives on SRV220.
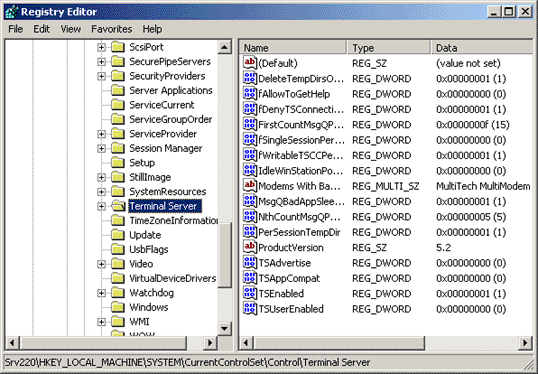
Now browse HKLM on SRV to find the following Registry key (Figure 5).
HKLMSYSTEMCurrentControlSetControlTerminal Server
Figure 5. Registry key for Terminal Server on remote machine.
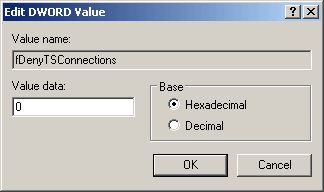
Under the Terminal Server key, you’ll find a REG_DWORD value named fDenyTSConnection. Double-click on that value to open the Edit DWORD Value box and change the value data from 1 (Remote Desktop disabled) to 0 (Remote Desktop enabled), as in Figure 6 below.
Figure 6. Set fDenyTSConnections to 0 to enable Remote Desktop on SRV220.
The remote machine needs to be rebooted for the change to take effect, so open a command prompt and type the following command:
shutdown -m \srv220 -r
After the remote machine reboots, Remote Desktop should be enabled on it. To test this from your workstation, open Start –> All Programs –> Accessories –> Communications –> Remote Desktop Connection, enter the name of the remote server in the Remote Desktop Connection logon box, supply your administrator password when prompted, and you’re in.
