High Availability Changes in Exchange Server 2010? DAG part 4

Introduction
In part three of this multi-part article, we created the log and database LUNs, changed the path for the logs and databases, created the DAG, and added the servers to the DAG.
In this fourth part of this multi-part article uncovering Exchange 2010 Database Availability Groups (DAGs), I am going to show you how to configure miscellaneous interesting DAG settings and perform the most typical operational tasks.
Fasten your seatbelt and let us get moving!
Suspending and Resuming Database Copies
In situations where you have a planned outage/maintenance window or if you perhaps need to seed a database, the first step is to suspend replication for the involved database(s). This can be done both via the Exchange Management Console (EMC) and the Exchange Management Shell (EMS). To do so via the EMC, you simply right-click on the respective database copy/copies and select suspend in the context menu.
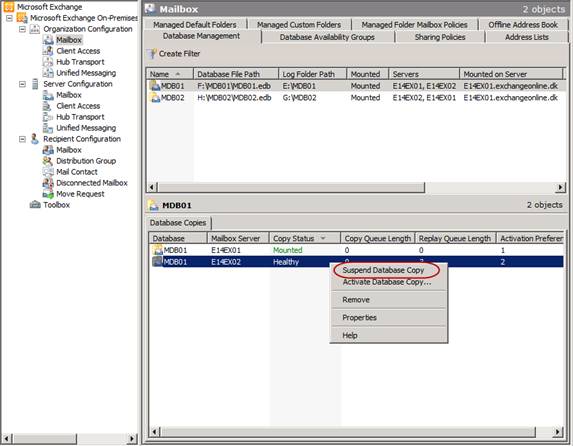
Figure 1: Suspending a Database copy
To do the same via the EMS, you can use the following command:
Suspend-MailboxDatabaseCopy –Identity MDB02E14EX02
In order to resume a database copy using the EMC, you just right-click on it again and choose Resume Database Copy.
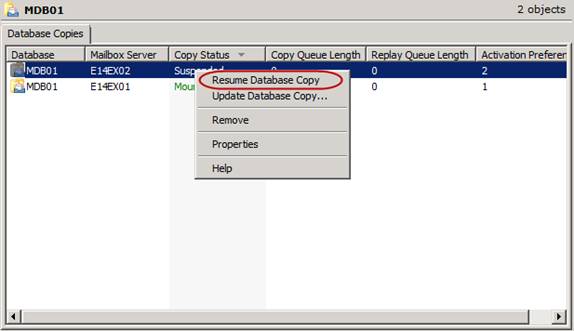
Figure 2: Resuming a Database Copy
If you rather want to resume it using the EMS, run the following command:
Resume-MailboxDatabaseCopy –Identity MDB02E14EX02
Moving the Active Database Copy to another DAG Member (aka Switchover)
When you have a planned outage and need to take a DAG member that holds one or more active database copies down for maintenance, it’s considered best practice to manually move any active database copies (aka performing a switchover) to another DAG member in the DAG. To move an active database copy to another DAG member using the EMC is accomplished by right-clicking on the respective database(s) and selecting Move Active Mailbox Database in the context menu as shown in Figure 3.
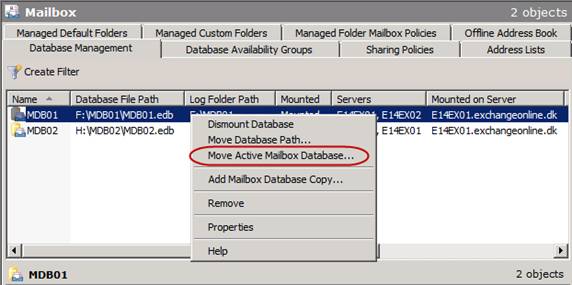
Figure 3: Activating a Database Copy
This brings up the Activate a Database Copy wizard (Figure 4).

Figure 4: Activate Database Copy wizard
Here we can see the name of the database and on which DAG member it currently is mounted. To move the database copy to another DAG member, click Browse.
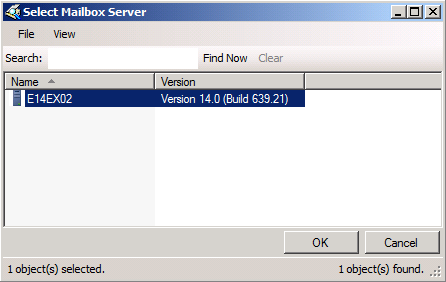
Figure 5: Selecting the server holding the database copy to be activated
When you have selected the DAG member on which the databse copy should be activated, click OK. Then decide if you want to change the database mount dial settings on the target mailbox server. As you can see in Figure 6 its set toNone (change nothing) by default. If you want to change the current setting (set to Best Availability by default) instead choose Lossless, Best Effort, or Best Availability.
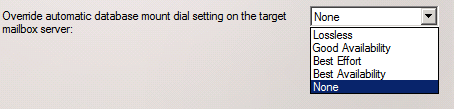
Figure 6: Automatic database mount dial settings
Here’s a description of each of the available database mount dial settings:
- Lossless: (when selecting Lossless the database will not mount automatically until all logs generated on the active database copy has been copied to the passive database copy)
- Good Availability: (when selecting Good Availability, the database will mount automatically as long as you have a copy queue length less than or equal to 6. If the copy queue holds more than 6 log files, the database will not mount)
- Best Effort: (with Best Effort the database will mount no matter the copy queue length. Be careful with this setting as you could loose a lot of mailbox data!)
- Best Availability: (with Best Availbility the database will mount automatically as long as the copy queue length is less than or equal to 12. If the copy queue length is more than 12, the database will not be able to mount)
Unless there’s a specific reason to chose another database mount dial override than the setting currently configured, leave this option at None. When you are ready to activate the database copy in the target mailbox server specified, click Move.
To activiate a database copy using the EMS, we can use the following command:
Move-ActiveMailboxDatabase MDB01 -ActivateOnServer E14EX02 -MountDialOverride:None
Seeding Database Copies
There may be times where you need to seed a database copy for one reason or the other. This can both be done via the Exchange Management Console (EMC) and the Exchange Management Shell (EMS). Let us take a look at how to accomplish this via the EMC.
If it is not already the case, the first thing we must do is to suspend replication for the passive database copy we want to seed.
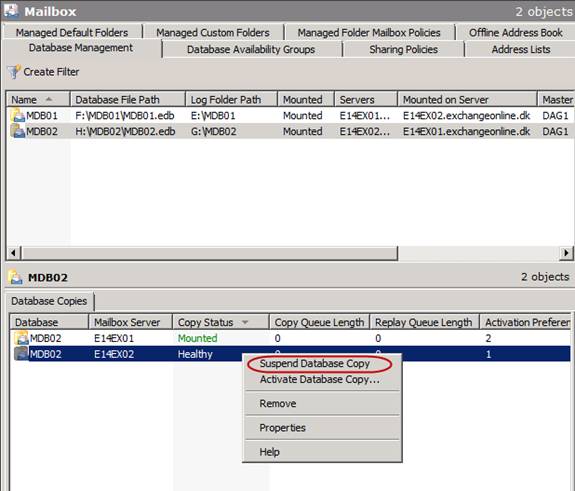
Figure 7: Suspending the Database Copy
You will now be presented with a dialog box where you can enter a comment on why replication for the database copy is being suspended.
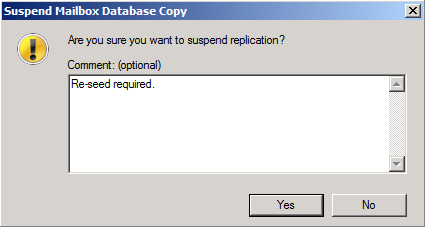
Figure 8: Dialog box for optional comment
When suspended, right-click on the database copy once again and select Update Database Copy.
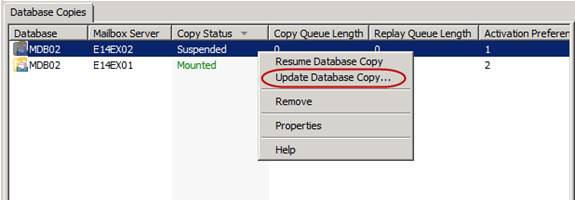
Figure 9: Selecting update Database copy in the context menu
The Update Database Copy wizard will now appear (Figure 10).
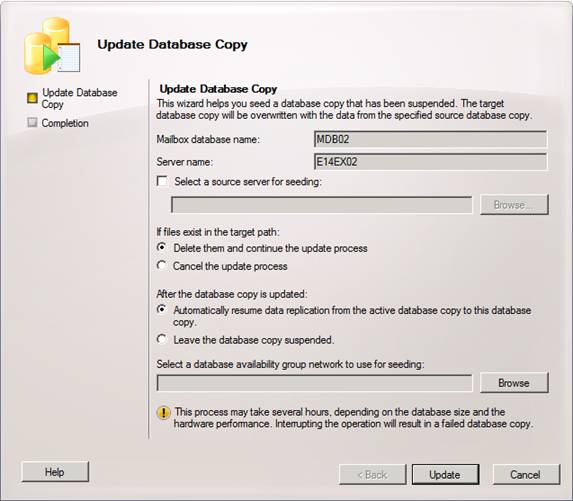
Figure 10: Update database copy wizard
As you can see we have several options in this wizard. We have the option of specifying the source server that should be used for seeding. This is a really cool feature since you are no longer limited to seeding from an active database copy as was the case in with Exchange 2007 LCR/CCR/SCR.
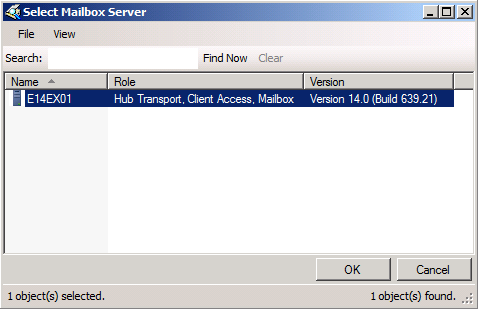
Figure 11: Selecting source seeding server
We can also choose the behavior when files exist in the target path. In addition, we can specify whether replication to this database copy should be resumes or whether it should be leaved suspended.
Lastly, we can select which DAG network should be used to seed the database copy. Again a great feature, which although it was an option in Exchange 2007 SP1, was very cumbersome.

Figure 12: Selecting DAG network used for seeding database copy
When you have chosen your settings, click Update in order to seed the database copy. When the seeding has completed, click Finish.
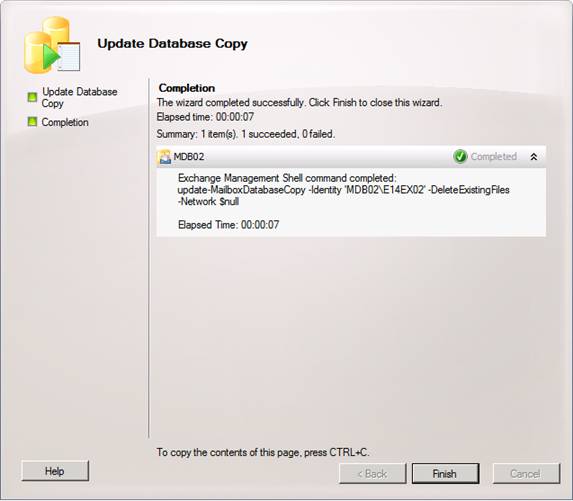
Figure 13: Seeding process completed successfully
If you rather want to use the EMS to seed a database copy, the above could be accomplished by first suspending replication with:
Suspend-MailboxDatabaseCopy –Identity MDB02E14EX02

Figure 14: Suspending a database copy via the Exchange Management Shell
Then run the following command to re-seed the database copy:
Update-MailboxDatabaseCopy -Identity MDB02E14EX02

Figure 15: Seeding a database copy via the Exchange Management Shell
Changing the Log file Replication Port
In Exchange 2007, the Microsoft Exchange Replication Service copies log files to the passive database copy (LCR), passive cluster node (CCR) or SCR target over Server Message Block (SMB). With DAGs in Exchange 2010, the asynchronous replication technology no longer relies on SMB. Instead, Exchange 2010 uses TCP/IP for log file copying and seeding and, even better; it provides the option of specifying which port you want to use for log file replication. By default, DAG uses TCP port 64327, but you are free to specify whatever port you want to use. To see the current port used, you must use the Get-AvailabilityGroup cmdlet with the –Status parameter. To see the port used in our lab environment, use:
Get-DatabaseAvailabilityGroup DAG1 –Status | fl
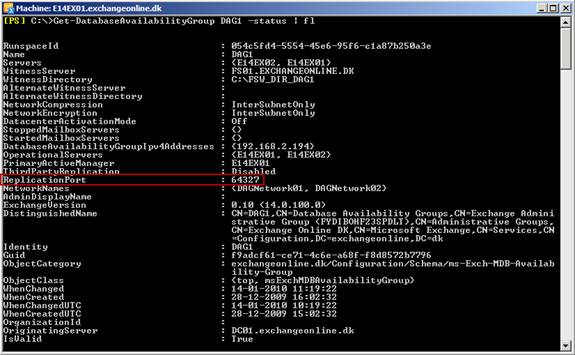
Figure 16: Checking Replication port settings for a DAG
To change the port used we must use Exchange Management Shell (EMS) as this option isn’t included in the Exchange Management Console (EMC). Since this setting is configured per DAG, we must use the Set-DatabaseAvailabilityGroup cmdlet.
For instance to change the port for the DAG in our lab to TCP port 7580, we must use the following command:
Set-DatabaseAvailabilityGroup DAG1 -ReplicationPort 7580
When the port have been changed, we can verify the new setting using:
Get-DatabaseAvailabilityGroup DAG1 –Status | fl ReplicationPort

Figure 17: Checking new Replication port settings for a DAG
Now when updating a database copy, we can see that TCP/7580 is used (below I ran Netstat –an while the database copy were updated.
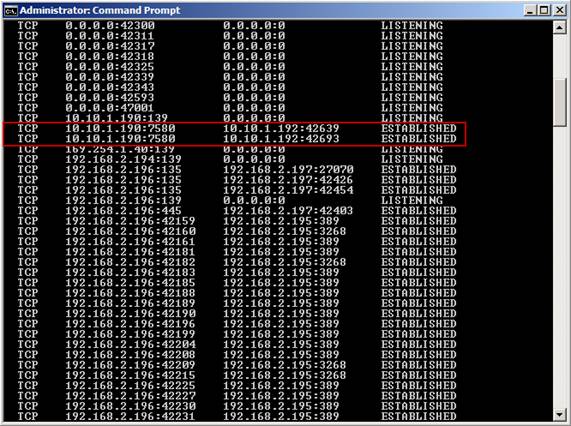
Figure 18: Checking the new replication port is used (by running Netstat -an)
Log file Network Compression
With DAGs in Exchange 2010, we can enable or disable compression for seeding and replication activities over one or more networks in a DAG. This is a property of the DAG itself, not a DAG network. The default setting isInterSubnetOnly (which means compression is used when replication occur across subnets) as shown in Figure 19.

Figure 19: Checking Network Compression settings for a DAG
The available values are:
- Disabled (disabled on all networks)
- Enabled (enabled on all networks)
- InterSubnetOnly (enabled for inter-subnet communication only)
- SeedOnly (enabled only for seeding)
If we for instance want to enable network compression for log file copying and seeding on all networks in a DAG in our lab environment, we would use the following command:
Set-DatabaseAvailabilityGroup DAG1 -NetworkCompression Enabled

Figure 20: Checking new Network Compression settings for a DAG
With compression enabled for log file seeding and replication, you can expect around 30% compression ratio. As you can see, there’s really no reason why you should disable network compression unless you for instance use a 3rd party WAN/network optimizer that doesn’t support DAG network compression.
Log file Network Encryption
With DAGs in Exchange 2010 there’s now native support for encryption of log file seeding and replication activities. In Exchange 2007 log files are copied over an unencrypted channel unless IPsec has been configured. DAG leverages the encryption capabilities of Windows Server 2008/R2, that is DAG uses Kerberos authentication between each DAG member. Network encryption is a property of the DAG itself, not the DAG network. Available settings for the network encryption property are:
- Disabled (network encryption not in use),
- Enabled (network encryption enabled for seeding and replication on all networks associated with a DAG),
- InterSubnetOnly (the default setting meaning network encryption is used across subnets)
- SeedOnly (network encryption in use for seeding on all networks in a DAG).
The default setting is InterSubnetOnly.
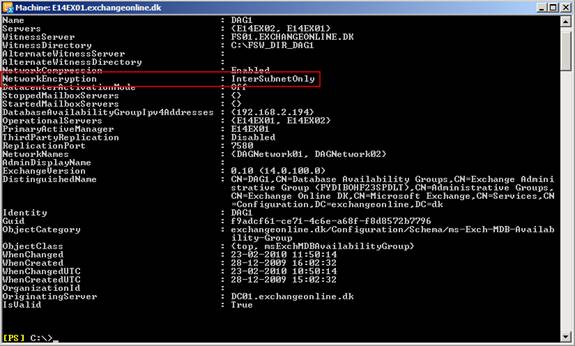
Figure 21: Checking Network Encryption settings for a DAG
If you want to change the network encryption settings, you can use the Set-DatabaseAvailabilityGroupcmdlet. For instance, if you wanted to enable encryption for log copying and seeding on all networks, you would use the following command:
Set-DatabaseAvailabilityGroup -identity DAG1 -NetworkEncryption Enabled

Figure 22: Checking new Network Encryptions settings for a DAG
Configuring Replay & Truncation Lag Time
The Standby Continuous Replication (SCR) feature that was introduced with Exchange 2007 SP1 gave us the option of replicating one or more databases from a stand-alone mailbox server, cluster continuous replication (CCR) cluster, or single copy cluster (SCC) to a target stand-alone mailbox server or standby cluster (CCR or SCC failover cluster where only the passive clustered mailbox role has been installed). SCR could both be used for replicating storage groups locally in a datacenter or remotely to servers located in a secondary or backup datacenter.
In addition to being able to replicate data to multiple targets per storage group, SCR also introduced the concept of replay lag time and truncation lag time. With replay lag time you could configure the Microsoft Exchange Replication service to wait for a specified amount of time before log files that had been copied from the SCR source to the SCR target(s) were replayed. The default value for replay lag time was 24 hours and could be configured with a value of up to 7 days (if configured to 0 seconds there were a 50 log files lag time so that a reseed wasn’t require when a lossy failover has occurred). The idea with replay lag time was to have a database from back in time, which could be used to recover if active database copy/copies on the SCR source server(s) were struck by logical corruption. This way to can stop replication before the logical corruption is replicated to the SCR target server(s) and thereby prevent loosing data.
Truncation lag time could be used to specify how long the Microsoft Exchange Replication service should wait before truncating (deleting) the log files that had been copied to the SCR target server (s) and replayed into the copy of the database(s). The maximum allowable setting for truncation lag time is 7 days and the minimum is 0 seconds, which will remove the truncation delay completely. With truncation lag time you could recover from failures that affected the log files on the SCR source server(s).
DAG also supports replay lag time and truncation lag time we know from SCR in Exchange 2007 SP1. They work pretty much the same way although controlled via a new cmdlet (Set-MailboxDatabaseCopy).
These features have been improved a little with Exchange 2010. For instance, the replay lag time option now has a maximum setting of 14 days instead of 7 days as was the case with Exchange 2007 SP1. Also bear in mind that unlike SCR in Exchange 2007 SP1, replay lag time in Exchange 2010 does not have a hard-coded replay lag of 50 log files (even when set to 0 seconds).
As you can see in Figure 23 both replay and truncation lag time are disabled by default.
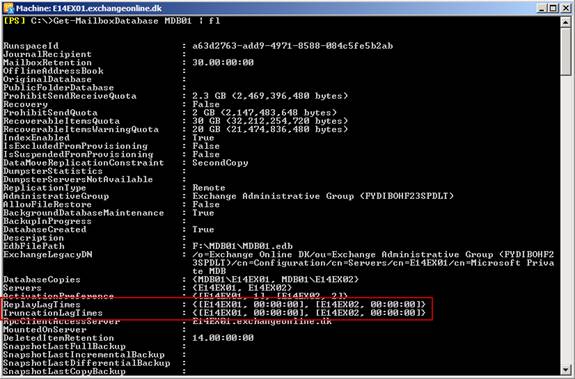
Figure 23: Default Replay and Truncation Lag time setting for a Mailbox database
The purpose with replay and truncation lag time in Exchange 2010 is pretty much the same as with SCR in Exchange 2007 SP1 that is to protect against database logical corruption and store logical corruption. What’s interesting and new with Exchange 2010 is you now can use lagged database copies in combination with legal hold etc.
I won’t dive further into lagged database copies in this multi-part article. Instead I’ll cover this topic in a future articles here on MSExchange.org.
Blocking a Database Copy from being activated
There are situations where you might want to block a passive database copy (or even server) in a DAG from being changed activated (changed to the active database copy). Good thing is the Exchange Product group thought about this kind of scenario. You can do exactly that using a so called activation policy. It’s not possible to use the EMC to set this, but using the EMS, you can use the Suspend-MailboxDatabaseCopy cmdlet for this purpose. Yes correct, this cmdlet is typically used for suspending replication for a database copy, but when run with a special ActivationOnlyparameter, you can block a database copy from being changed to the active database copy during a failover. For instance, if we want to block MDB01 on E14EX02 from ever being activated during a failover, we can use the following command:
Suspend-MailboxDatabaseCopy –Identity MDB01E14EX02 -ActivationOnly

Figure 24: Blocking a database copy from being activated
Notice this does not suspend replication for the database copy and thereby result in, an over time, huge copy queue. Only the database copy is being block from activation.
Figure 25: Replication not suspended when using Suspend-MailboxDatabaseCopy with the ActivationOnly parameter
When this cmdlet is run with the ActivationOnly parameter, the database copy cannot be activated until the following command is run:
Resume-MailboxDatabaseCopy –Identity MDB01E14EX02

Figure 26: Unblocking a database copy from being activated
Ok so what if I wish to block all databases on a DAG member server? Will I then need to run the above command on all database copies on the particular server? Luckily not. We have a similar command that works on the server level. If oyu want to block a DAG member instead use the Set-MailboxServer with the DatabaseCopyAutoActivationPolicy Blocked parameter.
For instance if I wanted to block DAG member E14EX02 from having database copies activated, I would use the following command:
Set-MailboxServer –Identity E14EX02 – DatabaseCopyAutoActivationPolicy Blocked

Figure 27: Blocking a DAG member from being activated
To allow database copies to be activated again, I would replace “Blocked” with “Unrestricted”:
Set-MailboxServer –Identity E14EX02 – DatabaseCopyAutoActivationPolicy Unrestricted

Figure 28: unblocking a DAG member from being activated
There’s also an “IntrasiteOnly” option which allows database copies to be activated in the same Active Directory site.
Alright, we have reached the end of part four as well as the end of this multi-part article that hopefully helped you get a better idea of how to deploy DAGs as well as customize miscellaneous settings related to DAGs.
Fear not though, this was definitely not my last article covering DAGs in some form.
—
http://blog.shiraj.com/2013/02/high-availability-changes-in-exchange-server-2010-dag-part-1/
http://blog.shiraj.com/2013/02/high-availability-changes-in-exchange-server-2010-dag-part-2/
http://blog.shiraj.com/2013/02/dag-part3/
Categorised as: Exchange, Microsoft
Leave a Reply
You must be logged in to post a comment.